
EKKO Mods for Season Eight
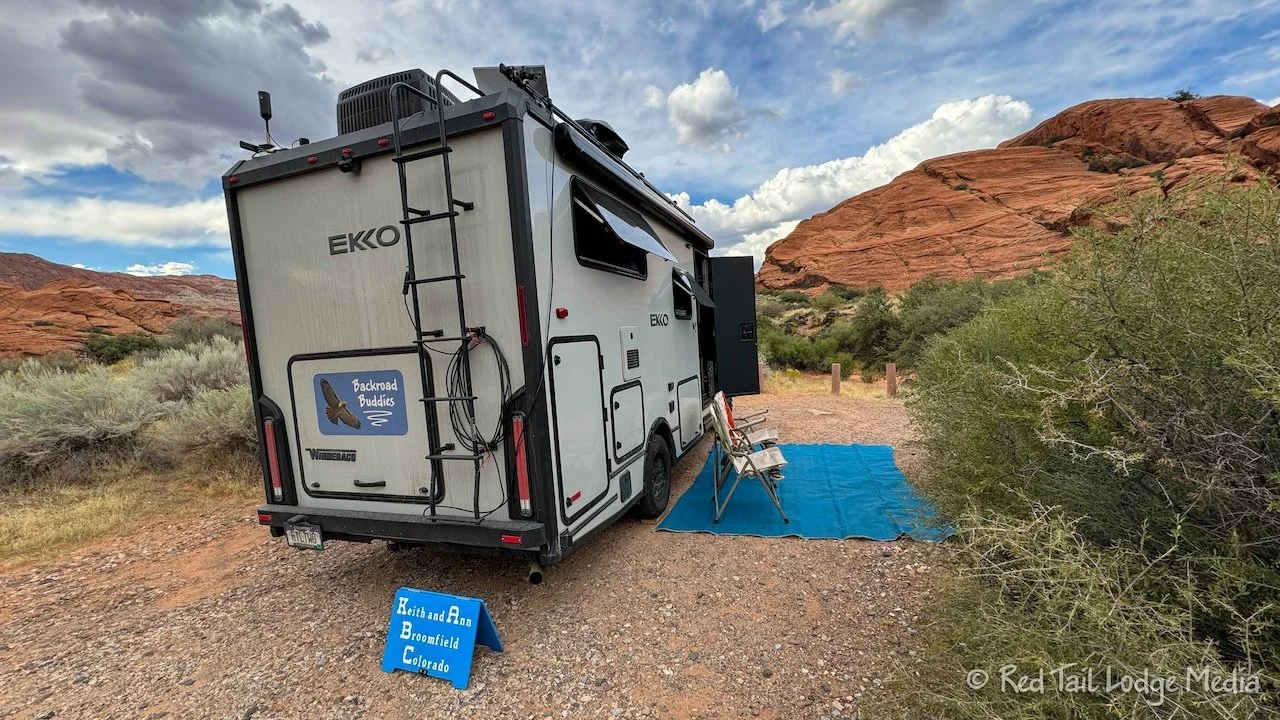
We’re sharing the modifications we’ve made to Red Tail (our Winnebago EKKO) for Season Eight, 2026, in hopes that they might help you. Since we didn’t RV during Season Seven, we had two winters home to make lots of mods, so this is part 1 of 2. This post covers the mods we made during Season Six (2024) and after we returned home from Season Six before leaving for Europe for Season Seven (2025). The next post will cover the mods we made after we got home from Europe, before starting our Season Eight travels for 2026.
Mod One: Thumb Screws for Window Hinges
Mod Three: Cargo Net Behind Laundry Basket
Mod Four: Aluminum Angle Iron on Dinette Cabinet Shelf
Mod Six: Added Weight on Top of Paper Towel Roll
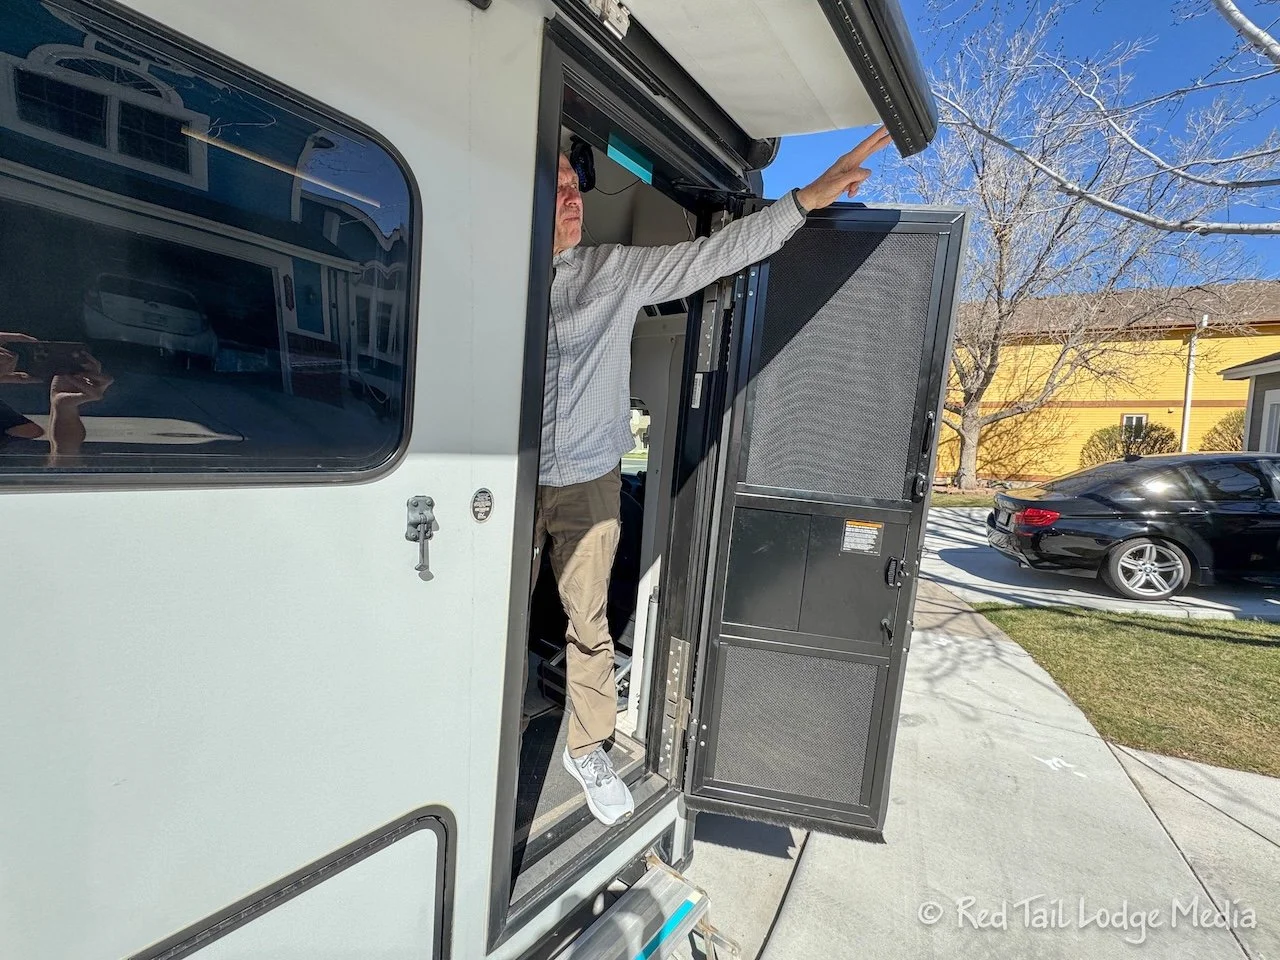
Mod Seven: Pull Handles for Outdoor Compartment Doors
Mod One: Thumb Screws for Window Hinges
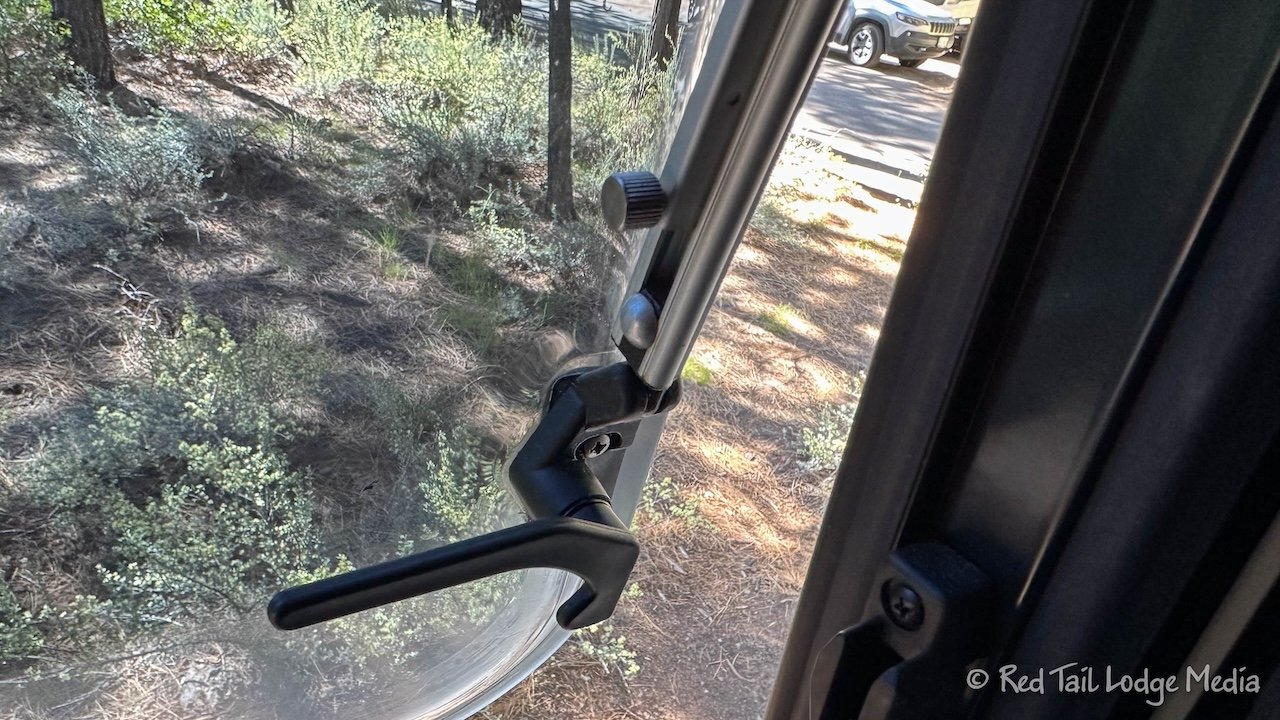
The window hinges that came with Red Tail liked to stick. The windows worked great, when they worked, but it got rather frustrating when the ratchet hinges would get stuck open, especially as we were trying to pack up and leave a camp site or close the windows before going to bed on a cool night. Sometimes we had to resort to grabbing a screw driver and take the hinges apart in order to close the window. Not ideal.
The Fit RV came up with a wonderful solution using thumb screws (https://www.thefitrv.com/rv-tech/acrylic-window-struts-stuck-repair-them-for-good-cheaply/). Before we left home for Season Six, we had ordered the parts, but didn’t have time to actually install them. So we installed them during our Season Six travels in 2024 (Lake Tahoe, California - June 2nd to 6th, 2024). It takes slightly more effort to open and close the windows using the thumb screws, but they work every single time. Thank you, James, for the great instructions!
Mod Two: Starlink
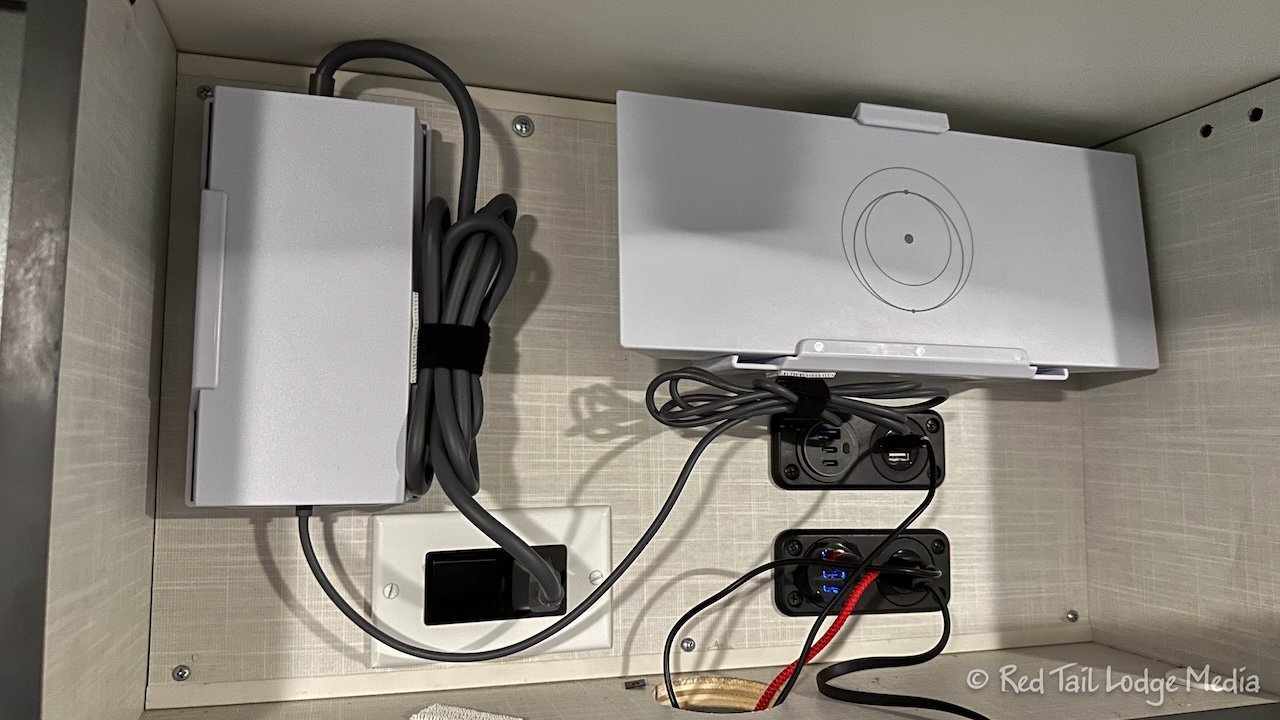
Also during our Season Six travels in 2024, we bought and installed Starlink. We enjoyed having it during our travels. However, since we were not RVing during Season Seven, we decided to uninstall and sell our Starlink. We would decide what we would do next after we returned from Europe in the fall of 2025, as the technology and offerings were constantly changing. If you want more details, we made a post earlier: Our Starlink Experience. We’ll cover what we ended up with in our next mods post.
Mod Three: Cargo Net Behind Laundry Basket
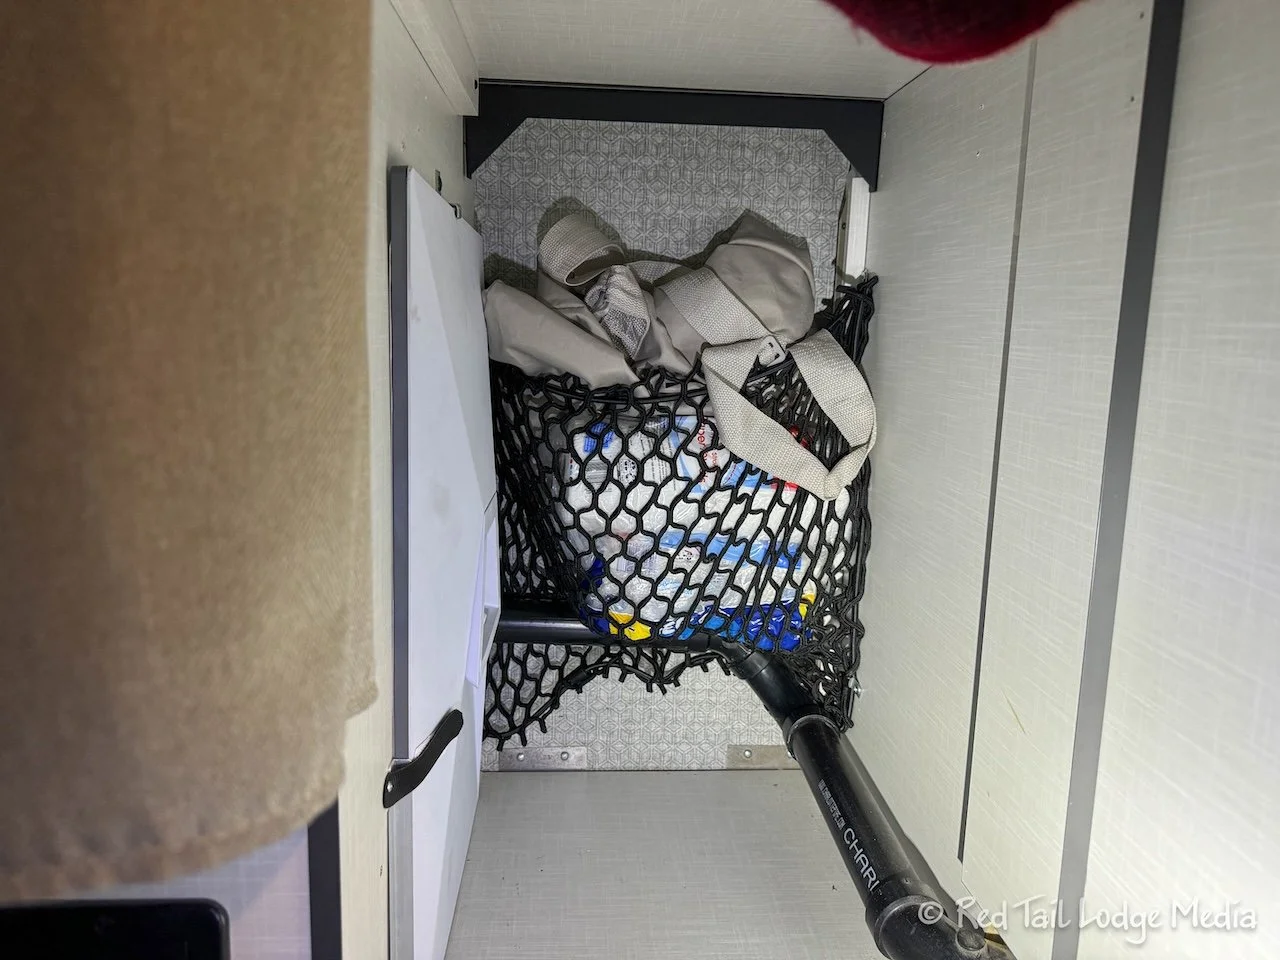
We had previously removed the door to the wardrobe cabinet under the passenger-side bed. That is where we have our laundry basket. Behind the laundry basket, we like to store our spare toilet paper, paper towels, and laundry supplies. Just to keep those items a little more organized and keep them from moving around, we installed a cargo net on the outside wall. It was a simple solution that worked out well.
Mod Four: Aluminum Angle Iron on Dinette Cabinet Shelf
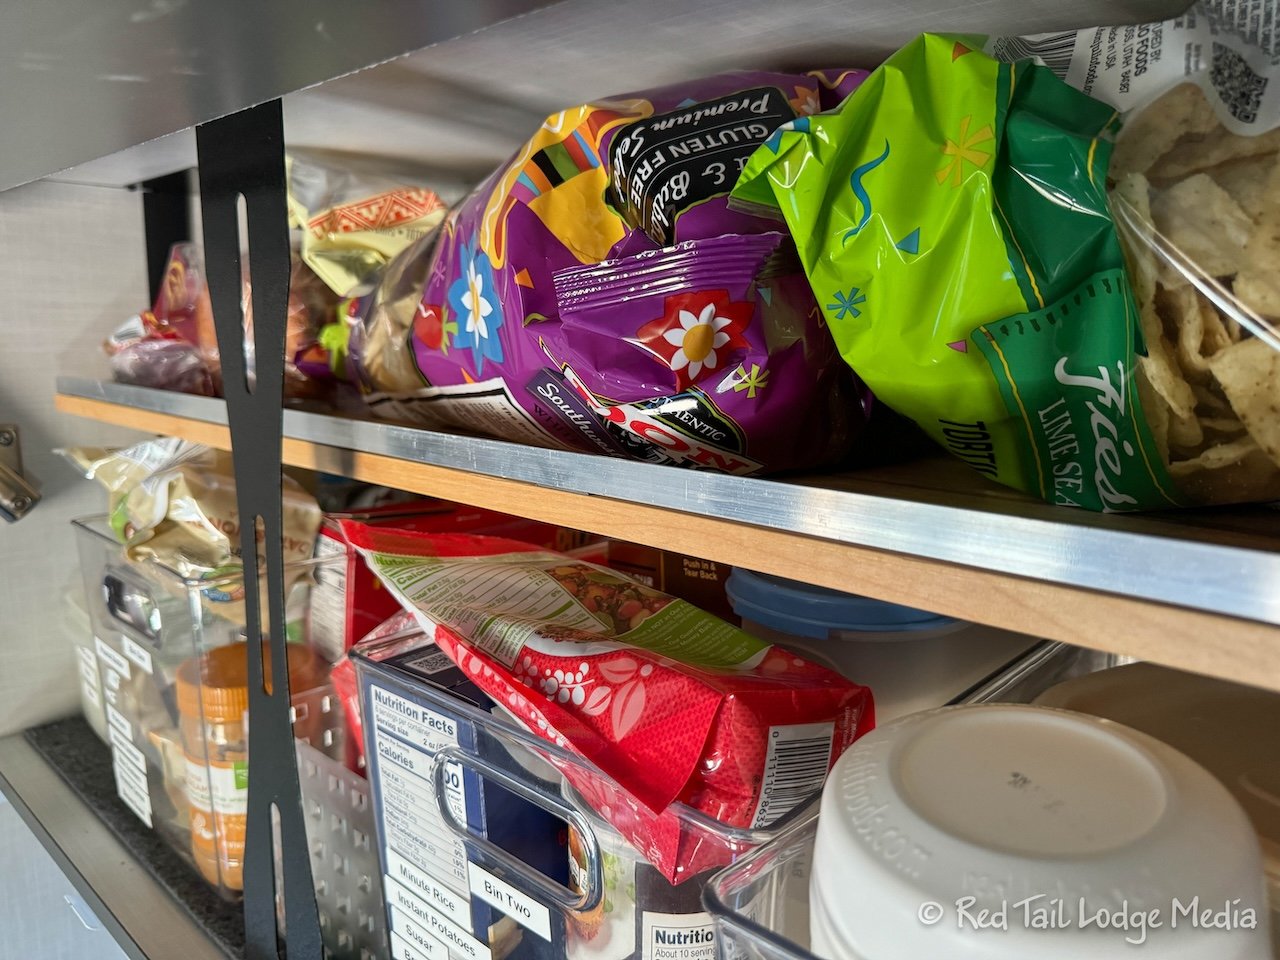
For the wall cabinet above the dinette table, we previously built and installed a shelf. We normally store light items on that shelf, such as bread, tortillas, chips, and boxes of tea. On occasion, some items would slide out of the cabinet as we opened the cabinet door, especially if we were not parked perfectly level. In order to keep this from happening, we bought some aluminum angle iron from a Tractor Supply store, cut it to length, and attached it to the front of the shelf using double-sided tape. (Red Rock Canyon National Conservation Area, Nevada - May 11th to 13th, 2024). The simple fix works like a charm!
Mod Five: Moved Awning Sensor
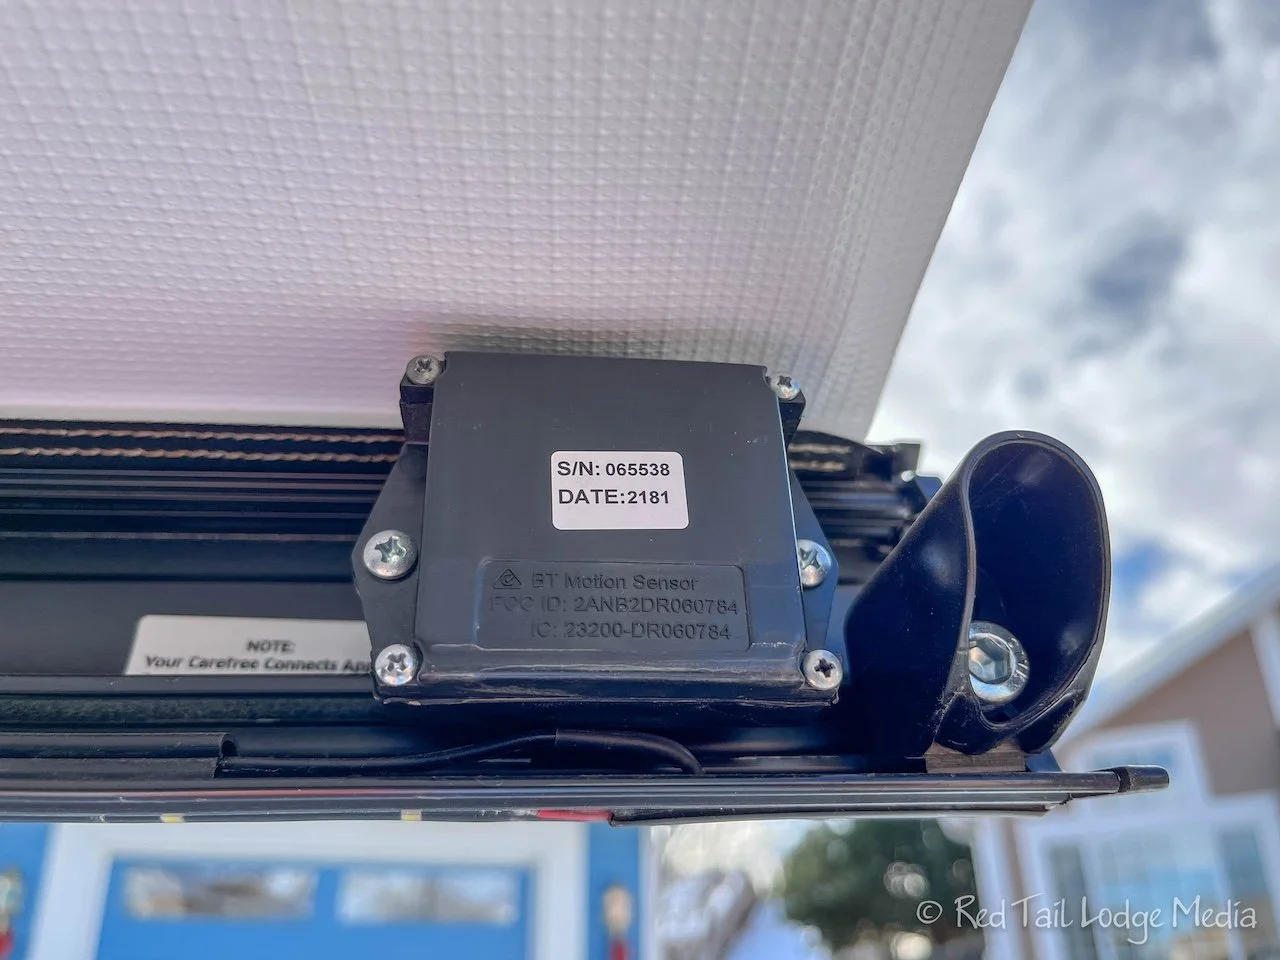
The awning has a sensor attached to it that detects when the wind picks up and causes the awning to automatically close to prevent damage to the awning. Unfortunately, the sensor contains batteries that seem to drain on a fairly regular basis. When the batteries get low, the sensor starts annoyingly beeping. The beeping usually seems to start at the most in-opportune time, like in the middle of the night as we are trying to sleep.
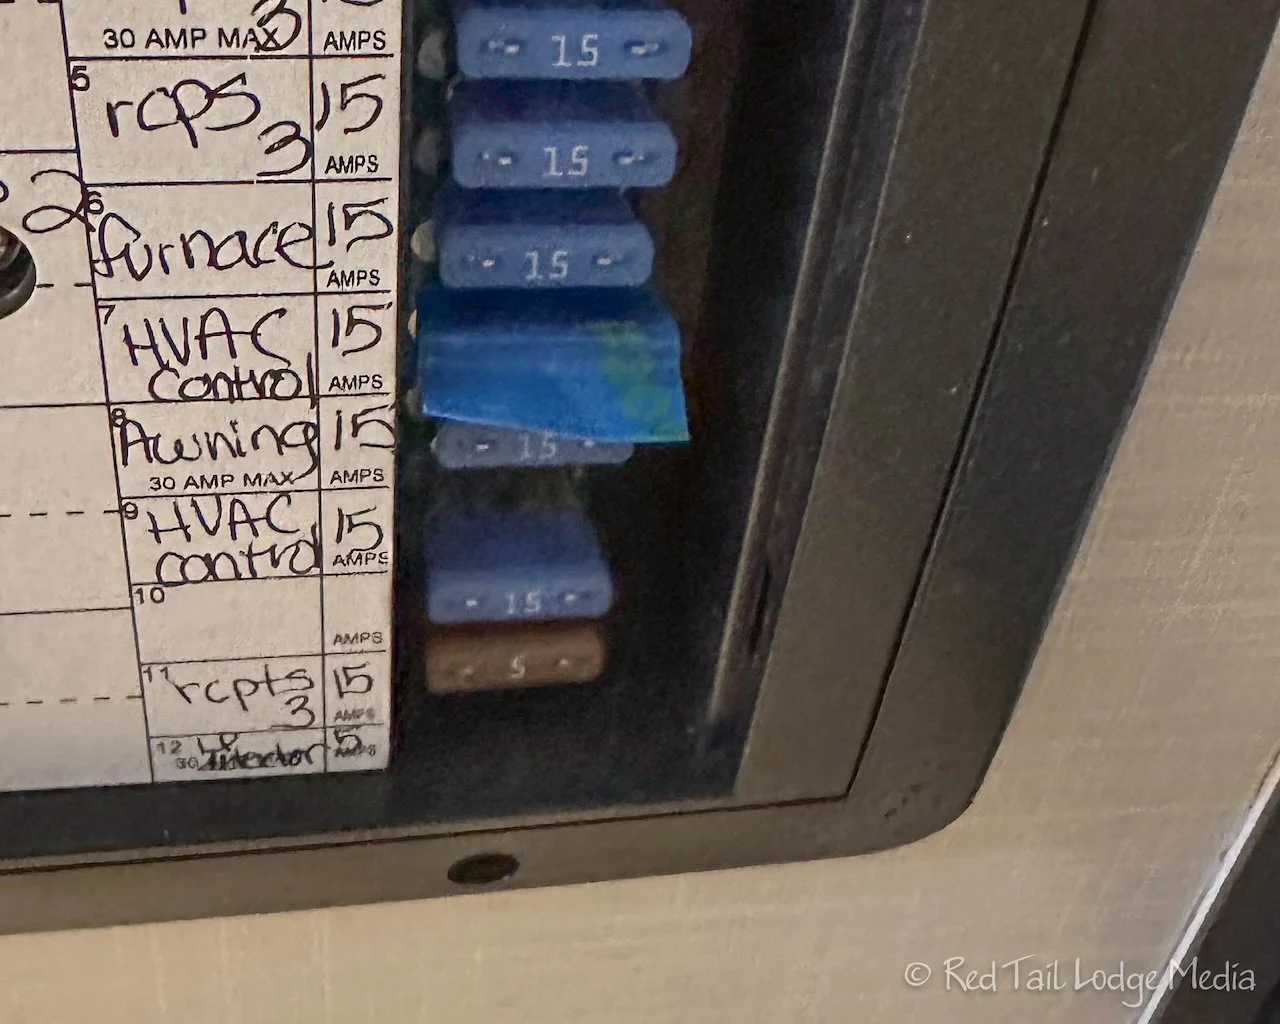
A quick remedy to stop the beeping is to pull the fuse for the awning. However, in order to use the awning again, we need to change the batteries in the sensor. To replace the batteries, you need to unscrew the sensor from the awning, then removed a couple more screws to open up the sensor to reach the batteries. Where the sensor is originally mounted to the awning, it usually requires a step stool or ladder in order to reach it from the ground. To make it easier to reach, we moved the sensor from near the rear of the RV to near the front of the RV. This allows us to reach the sensor while standing in the doorway of our EKKO.
Even though we can now reach the sensor more easily, we still have the habit of leaving the awning fuse out and only put the fuse in when we want to use the awning. This prevents the sensor from beeping at an inconvenient time.
Mod Six: Added Weight on Top of Paper Towel Roll
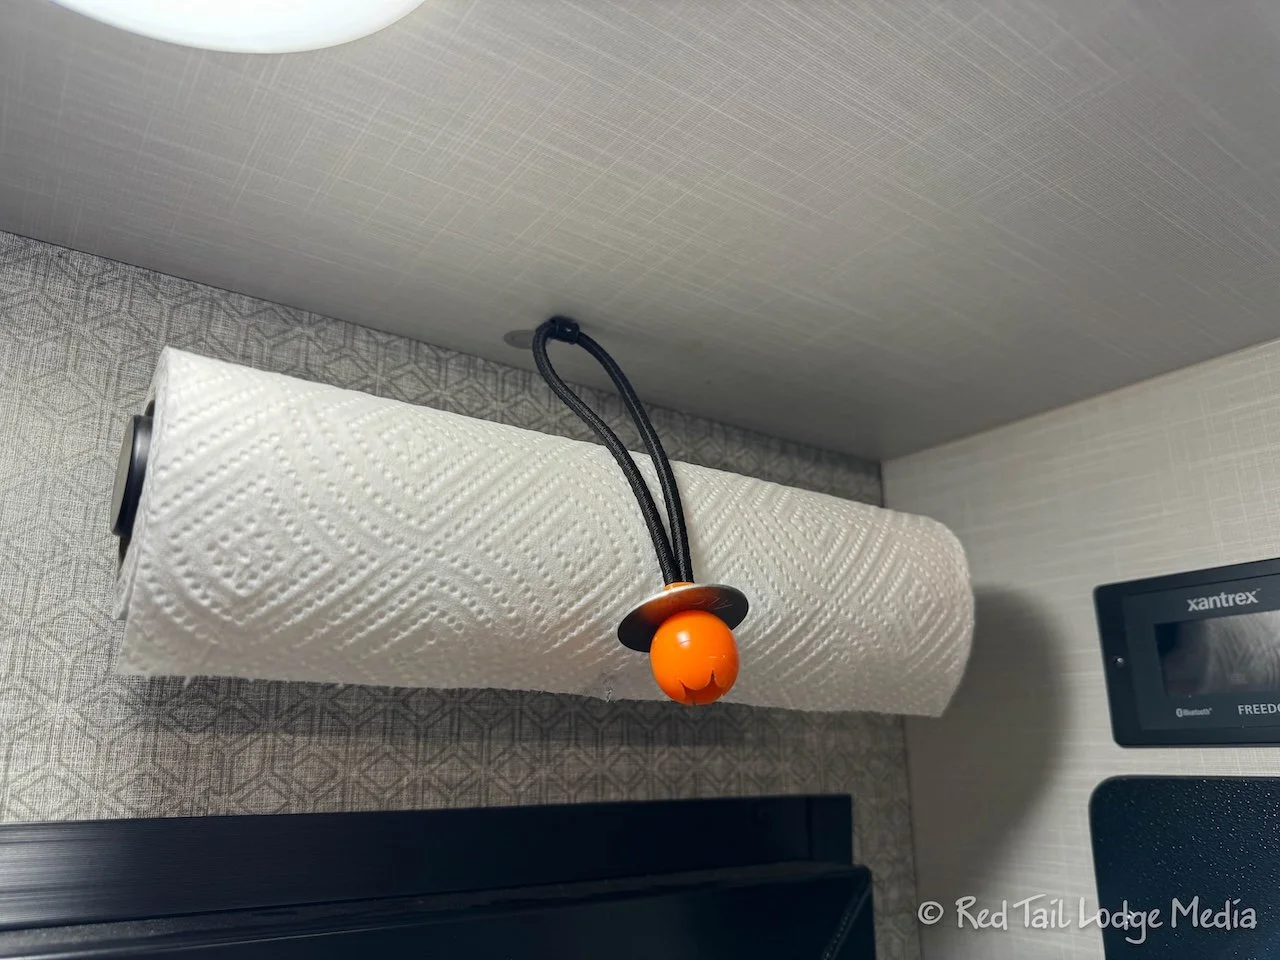
We mounted a paper towel holder above our entry door. It is a ratchet style so that it will not turn, which is important in a vehicle that moves and vibrates. However, when we have the main door open and only the screen door closed, the wind can blow in and cause the paper towels to unwind, despite the roll not actually turning.
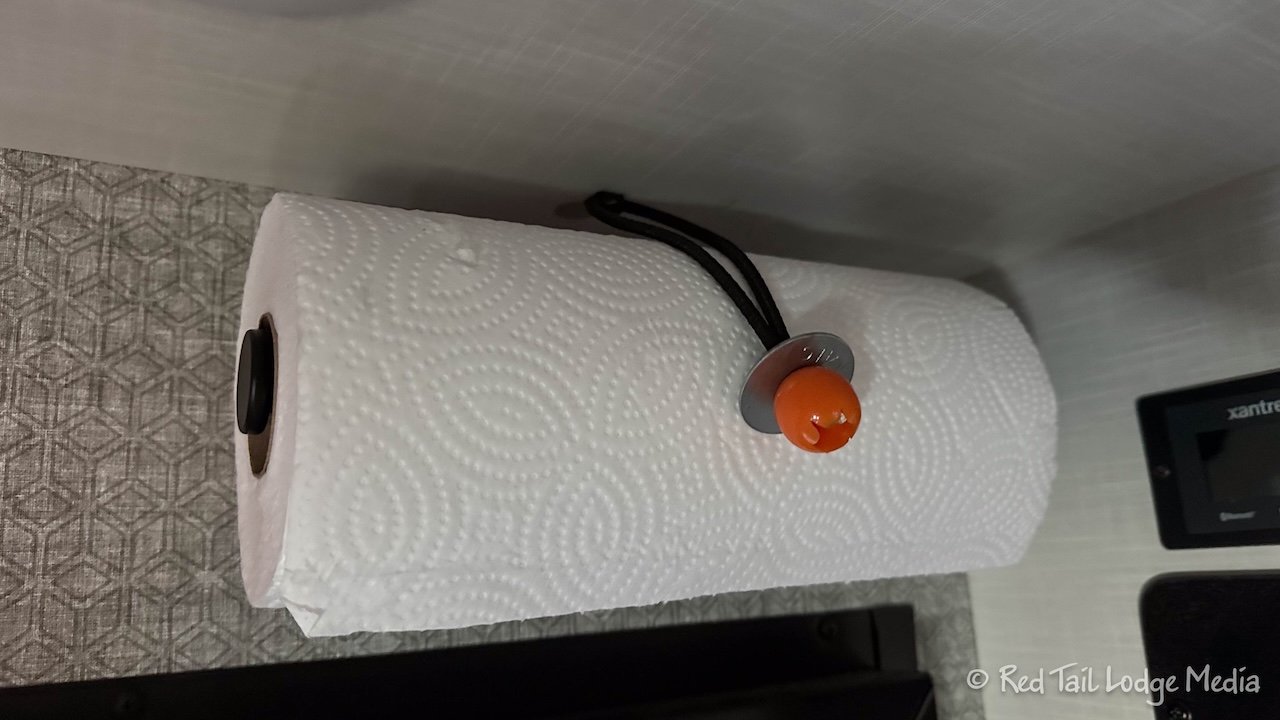
Our solution was just to add a little bit of weight to the top of the paper towels. We used what we had on hand to piece something together. We attached a small bungee fastener to the ceiling, adding a washer for a little more weight. We thought we might change it out later, but what we came up with worked so well, that we decided to use it as our permanent fix.
Mod Seven: Pull Handles for Outdoor Compartment Doors
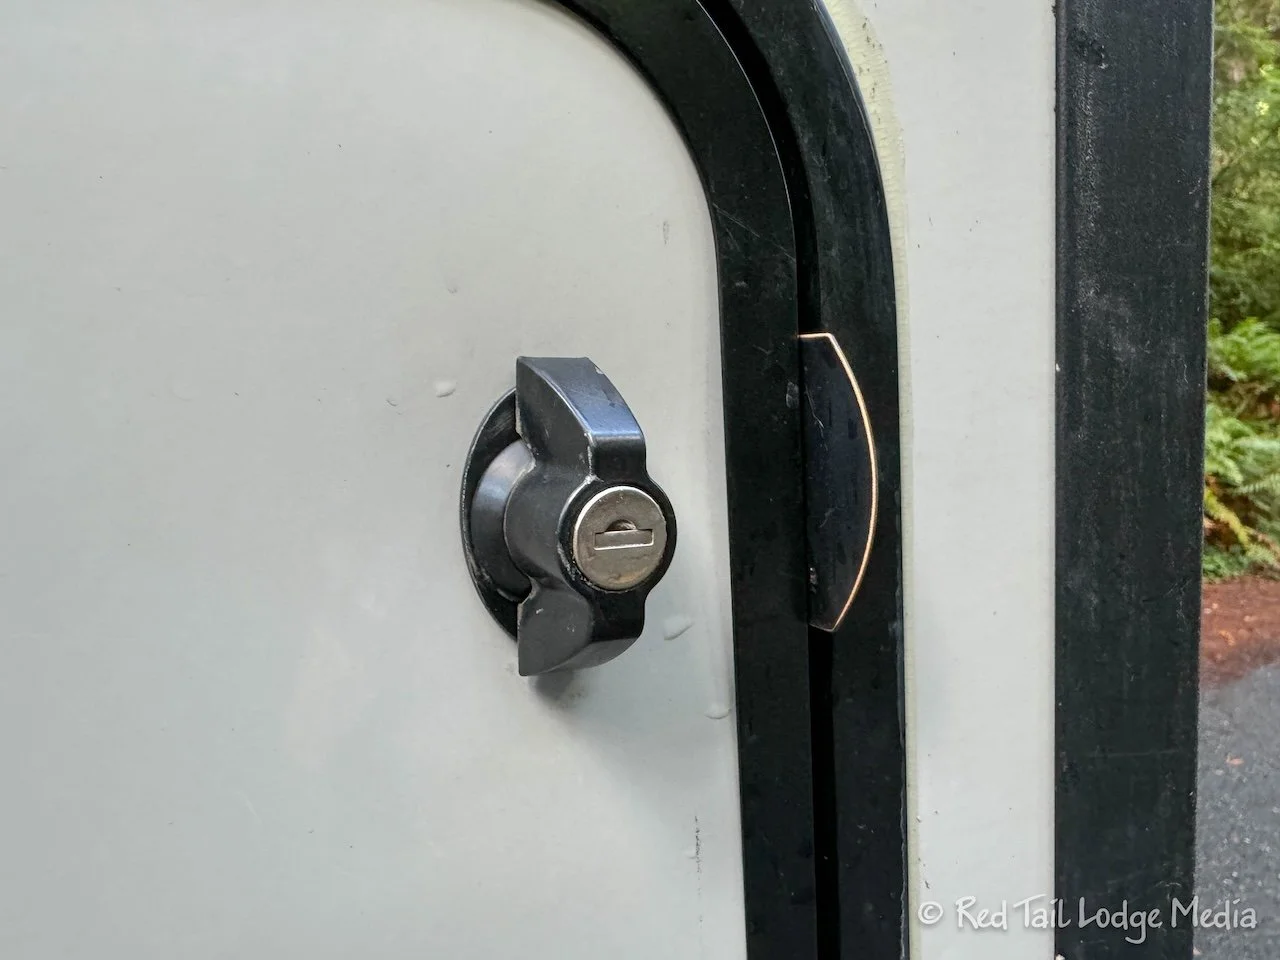
The outdoor compartments don’t have handles on them. There are levers that turn to latch and unlatch the doors, along with key holes to lock them. However, those don’t provide much leverage for opening the doors. If they stick at all, the doors are really hard to open. We didn’t want handles that protruded far, as we didn’t want to extend our vehicle’s width where they might scrape on something in tight places.
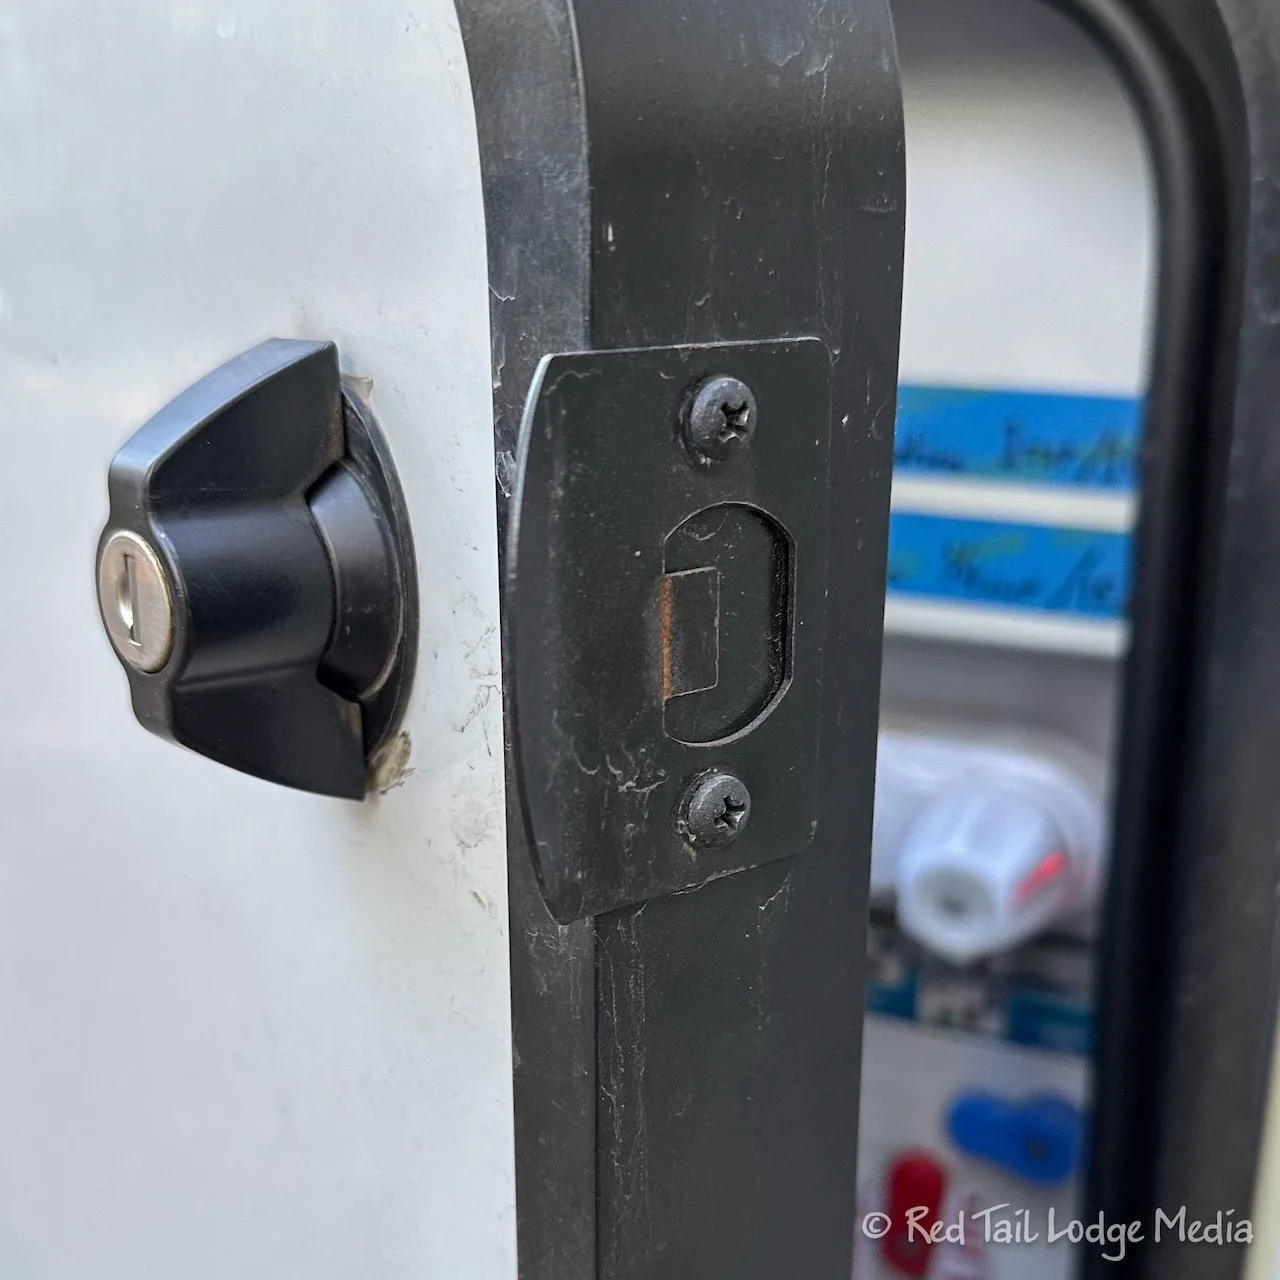
So we added slim metal tab pulls to all of the doors. They don’t provide the best grip, but enough to get the door open when it sticks. Keeping the door seals lubricated also helps, but they still stick sometimes, especially after Red Tail has been stored for months.
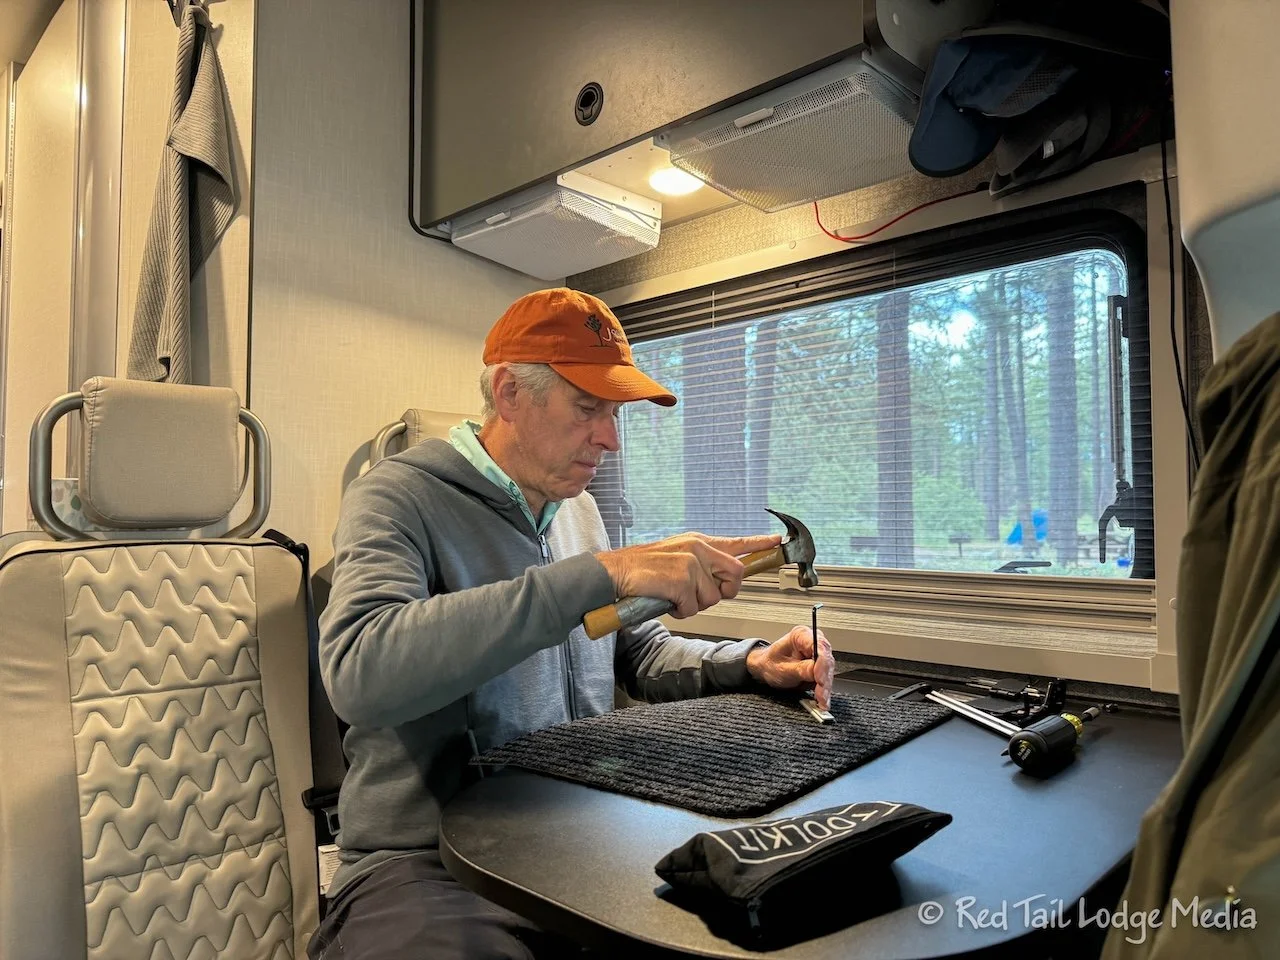
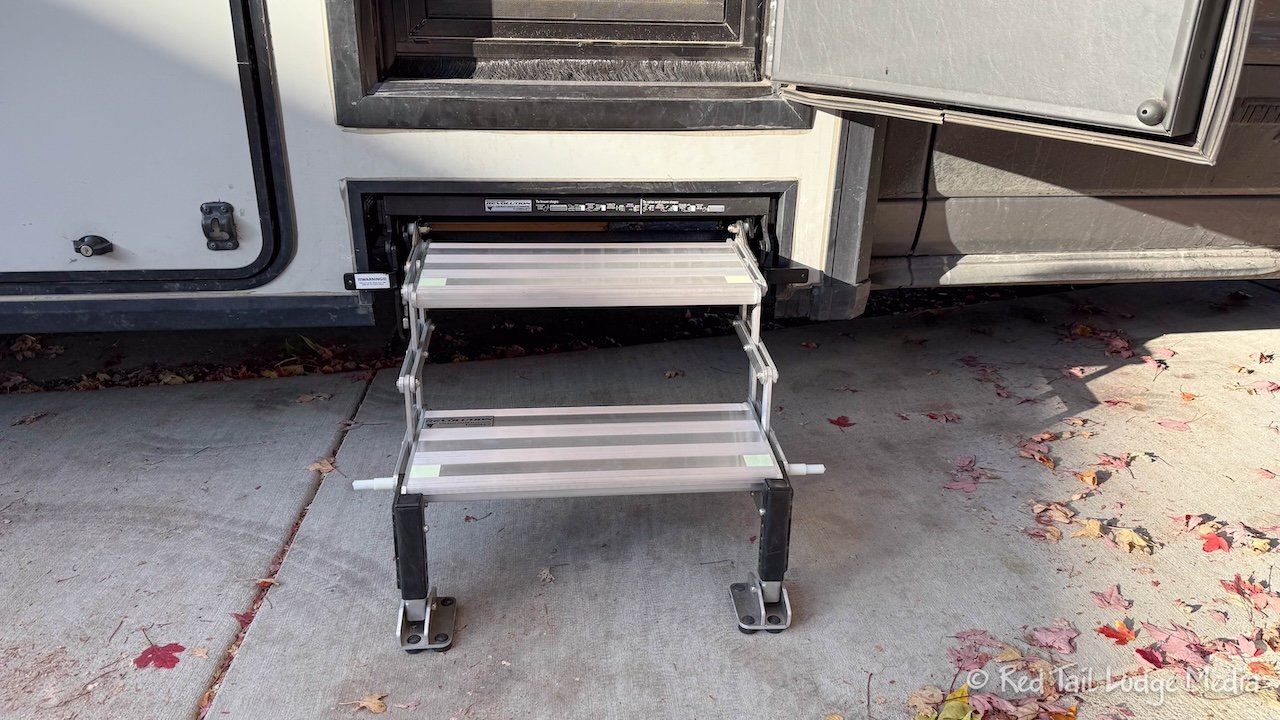
Mod Eight: Replaced Stairs
During Season Six, the entry stairs that came with Red Tail started failing. The stairs have a motor that allows the stairs to automatically deploy when the entry door is opened. There is a switch to leave the stairs out while camped. And the stairs will automatically retract when the engine is started. At first, the motor would intermittently fail. In our case, the stairs were stuck retracted. But we know others who would have the stairs stuck in the deployed position. Being stuck in the retracted position was easier to deal with, because it was still possible to get in and out of the rig using a step stool. We wouldn’t want to drive down the road with the stairs sticking out.
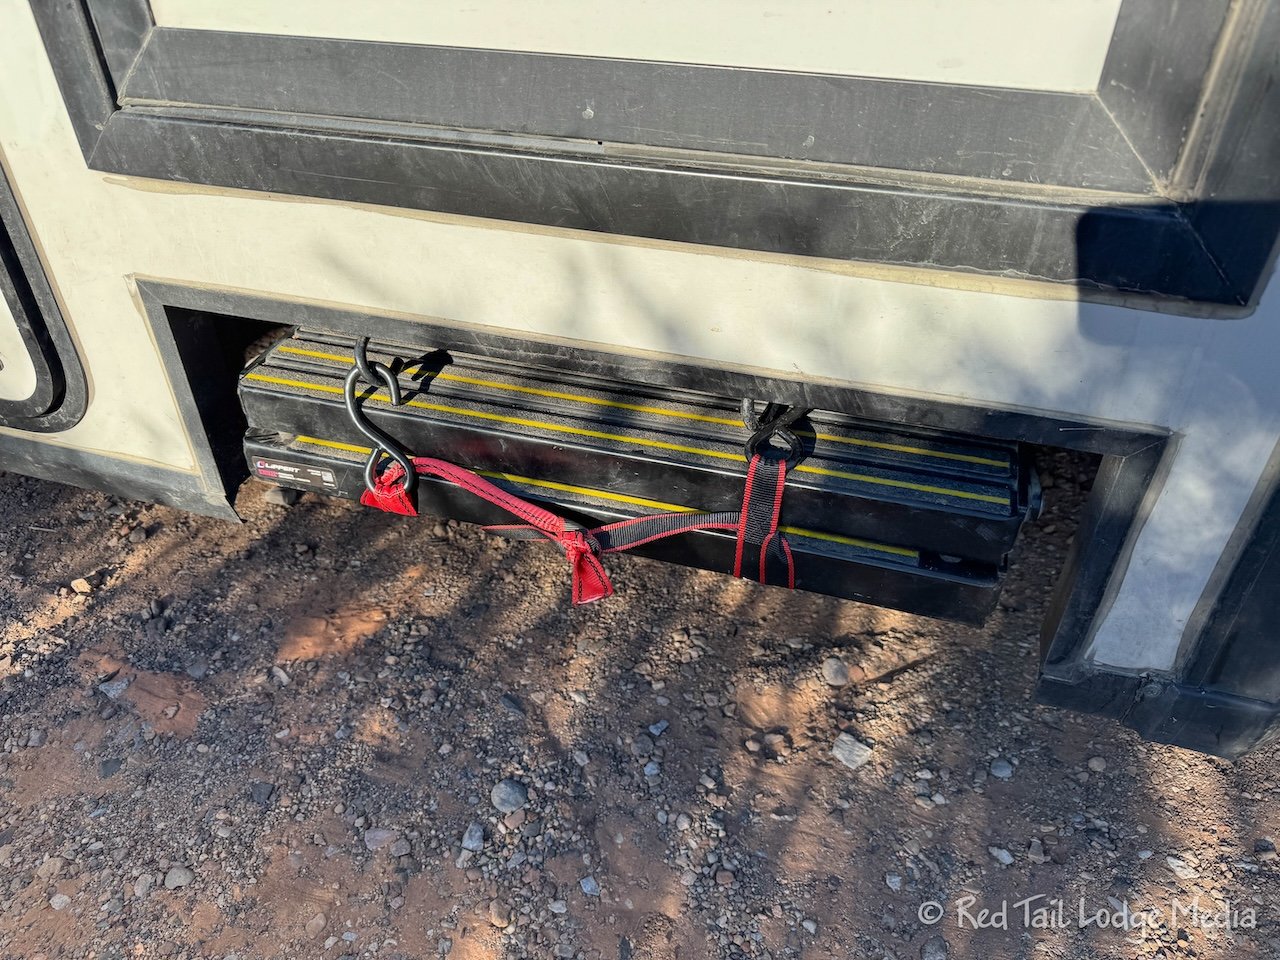
Eventually, the motor stopped working altogether. Using a step stool all the time got a little old and cumbersome, so we removed the motor. This allowed us to deploy the stairs, but then they wouldn’t stay retracted for travel days. A couple of ratchet straps fixed that problem. So we survived the rest of the season by deploying the stairs manually while we were camped and using a step stool on travel days.
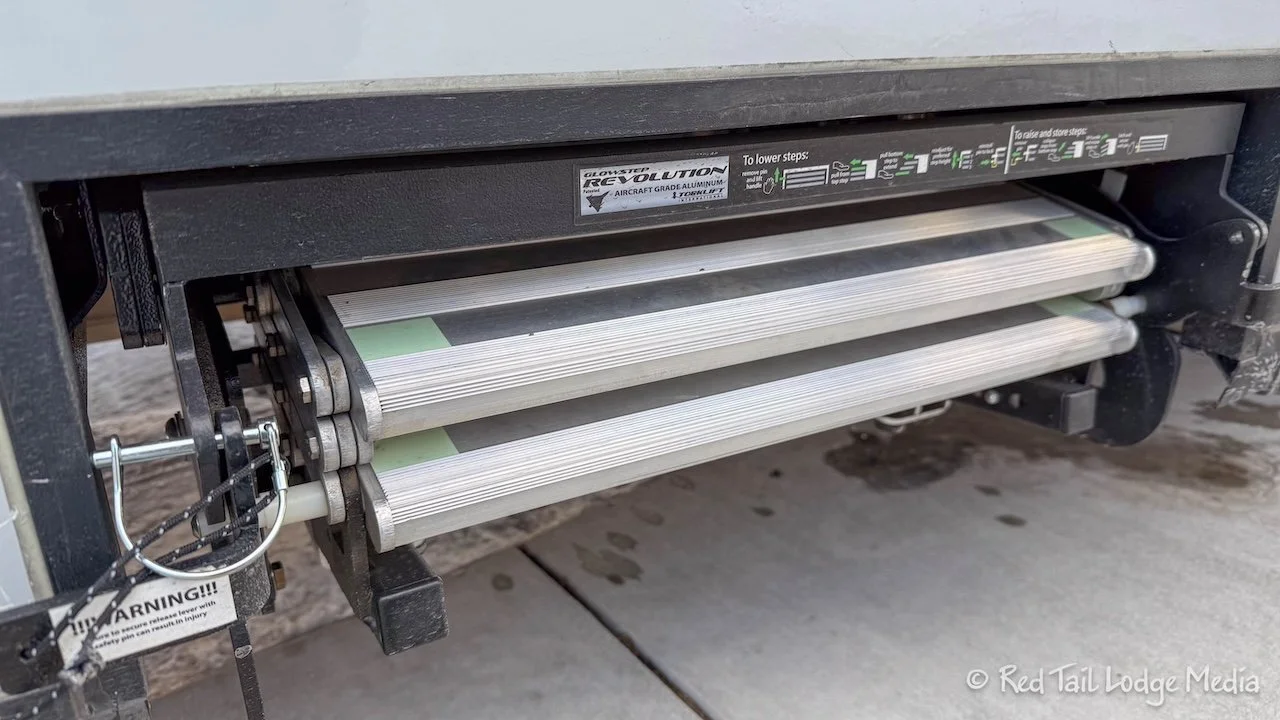
When we got home after Season Six, we opted for a more permanent solution. We didn’t really want to just replace the motor, as we just felt it would eventually fail again. So we chose to install manual steps. It took a little while for Keith to figure out how to get the stairs installed. He wrote up a blog post explaining what he did (Replacing Our EKKO Steps).
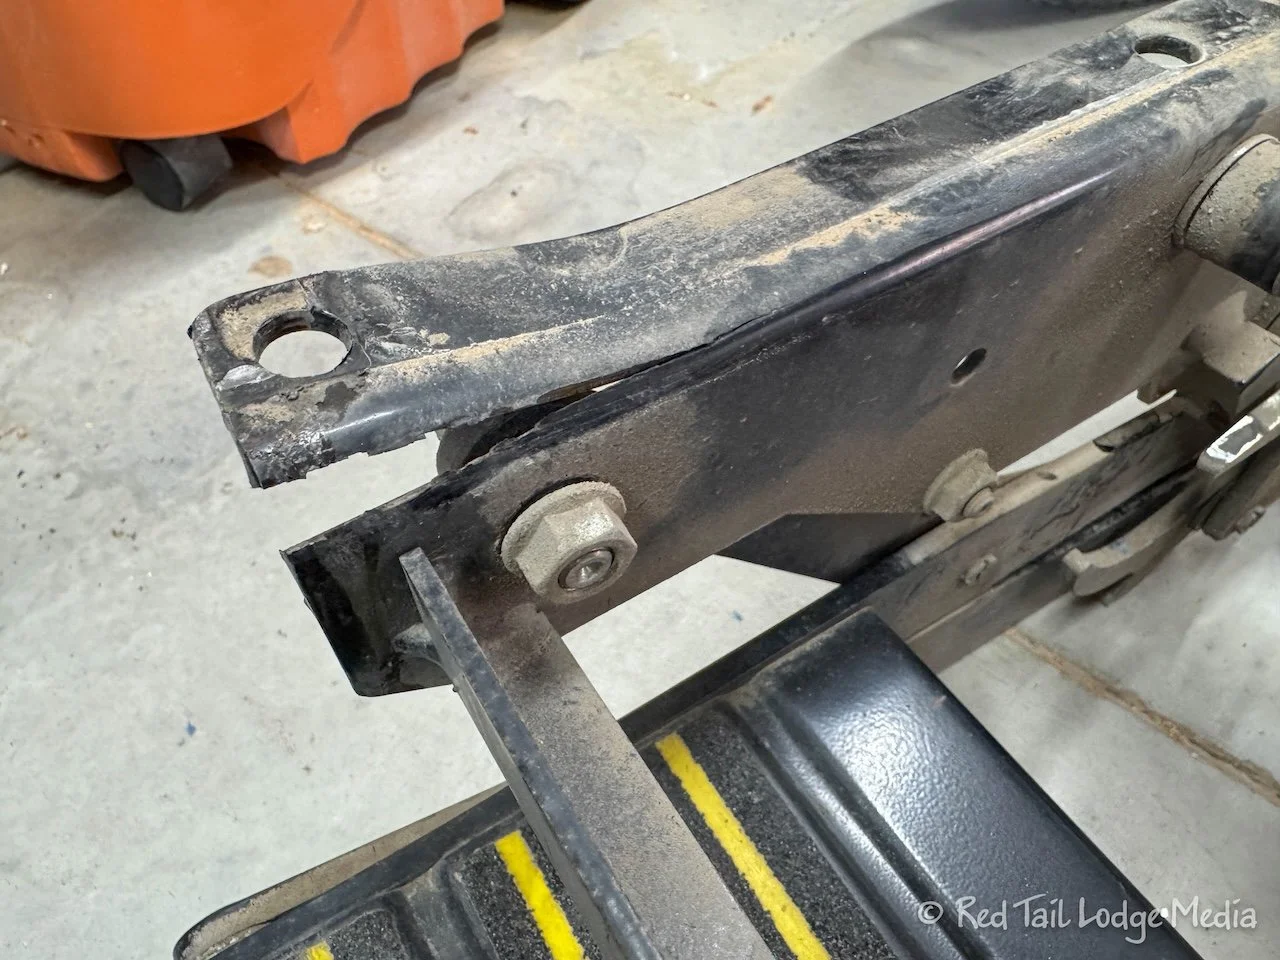
The manual steps we installed also rest on the ground, so it puts less stress on the frame of the steps. We noticed that the original stairs had gotten a little “mushy” as we would step on them getting in and out. What we didn’t realize until we were removing the original stairs, was that the frame had cracked. We were glad they hadn’t completely given way while we were using them. We could have potentially gotten hurt. So it made us feel even better about our decision to get the new stairs.
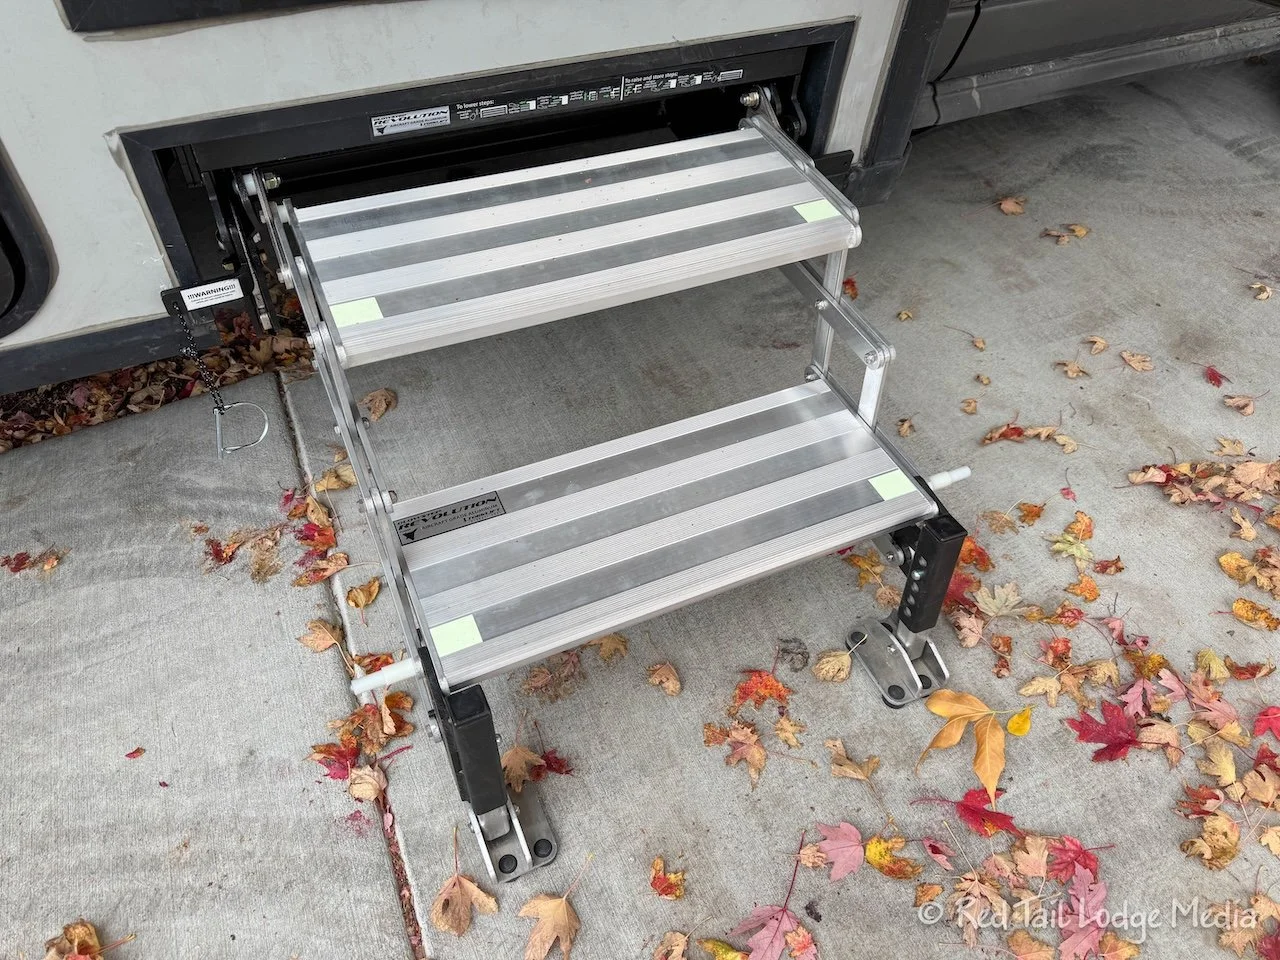
Yes, the manual stairs take a little more effort to deploy and retract than the old stairs. And yes, there is a little bit of a learning curve for making the process go smoothly. We still use a step stool on travel days, but we don’t have to worry about the stairs automatically deploying into an obstacle, like a high curb. We are much happier with the manual stairs.
Mod Nine: Old School Fresh Tank Monitor
The tank monitors on both the fresh tank and the gray tank are not very reliable. The one on our gray tank never did seem to work very well from the beginning, but that was not a big deal, since the fresh tank and gray tank are about the same size. We never hook up directly to a water source and always draw our fresh water from the tank. And we always dump the gray tank every time we refill the fresh tank, so we know we should never have a problem overflowing our gray tank.

However, near the end of Season Six, the fresh water tank monitor stopped working. Since by this time we had a good feel for how long the fresh water tank should last us, it was not a deal breaker. When water stopped flowing out of the faucet, you knew the fresh water tank was empty. As you are filling the tank and water starts coming out of the overflow, then you know the tank is full, although we generally don’t like to fill our tank all the way to the top. When you are that full and park on a slope, the water will spill out the overflow, creating some sort of vacuum that causes quite a bit of water to flow out onto the ground before it eventually stops.
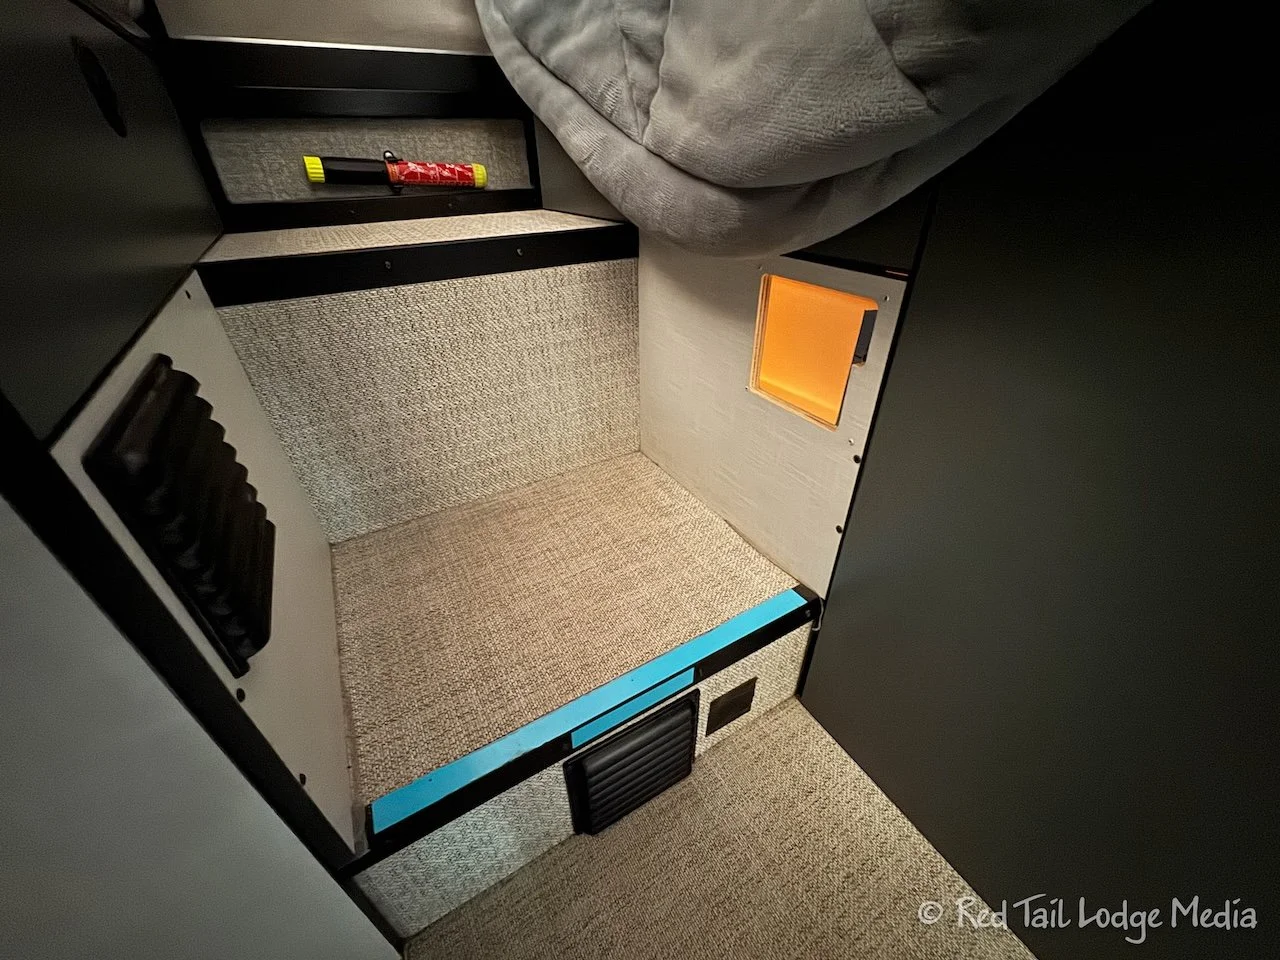
To help us get through the rest of the season, Keith opted for an easy, low tech solution, inspired by a post on the EKKO Facebook group. He removed the air vent grate under the driver-side bed, so we could see part of the fresh water tank, which lives under the beds. Then he moved the step light over to the tank and taped it to the side of the tank. So when we turned on the step light, it lit up the tank and we could see the water level inside the tank.
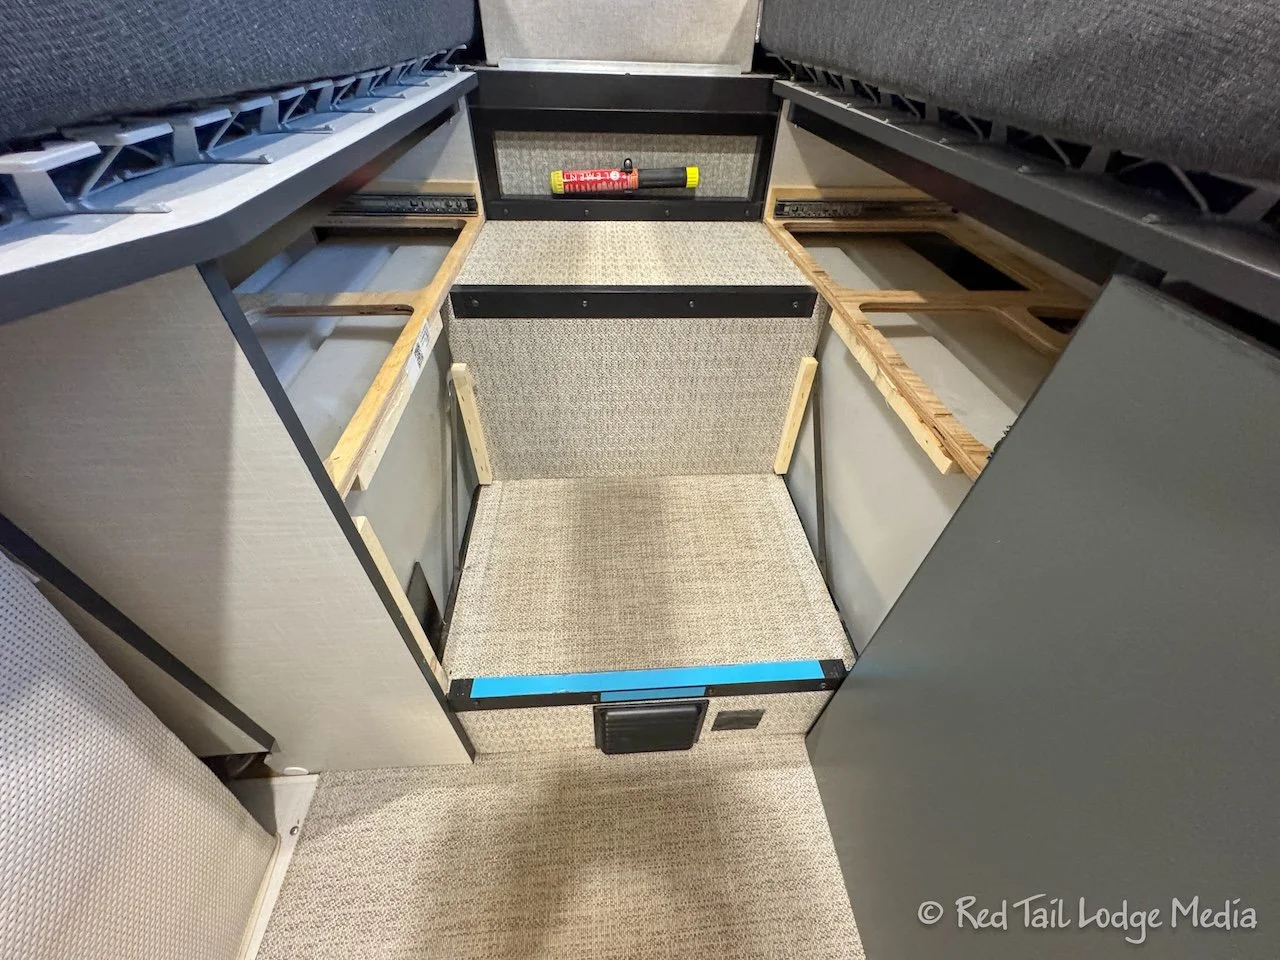
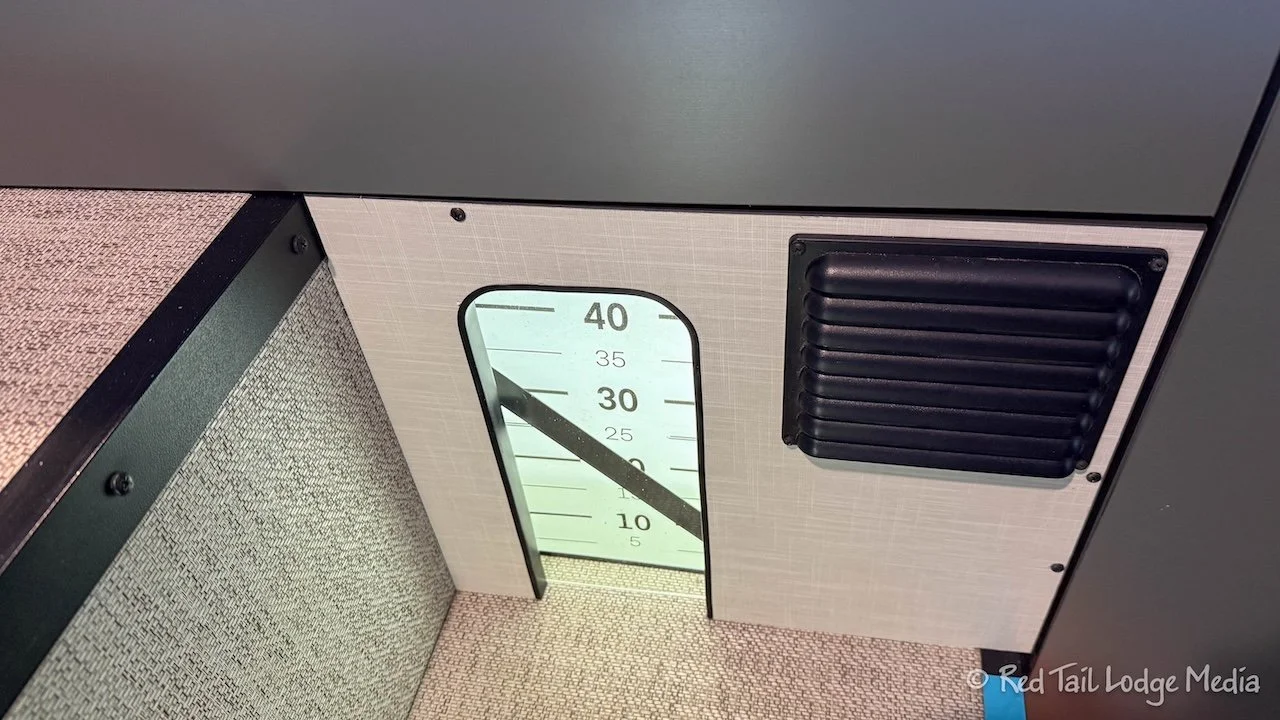
When we got home after Season Six, instead of replacing the fresh water tank sensor with another unreliable one, we opted for a more permanent low-tech solution. Are you seeing a pattern here yet? It was really just a tweak of the temporary fix. This was not our original idea, but one taken from the Winnebago EKKO Facebook group.
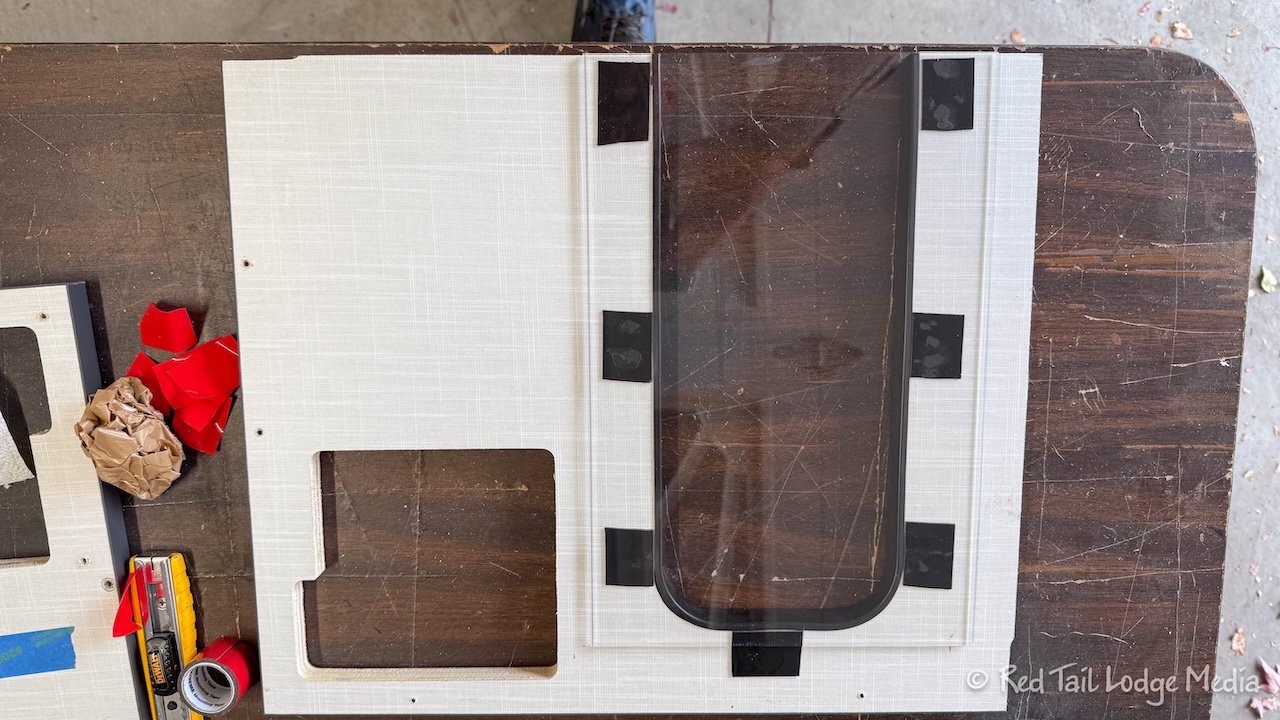
After moving the step light back and putting back the air vent grate, Keith cut two large openings in the panels under the beds, one on each side, to make the fresh water tank visible. He fit a piece of plexiglass to cover the cut-out. Being able to see the water level on both sides allows us to average the two readings together when Red Tail is parked on a sideways slope.
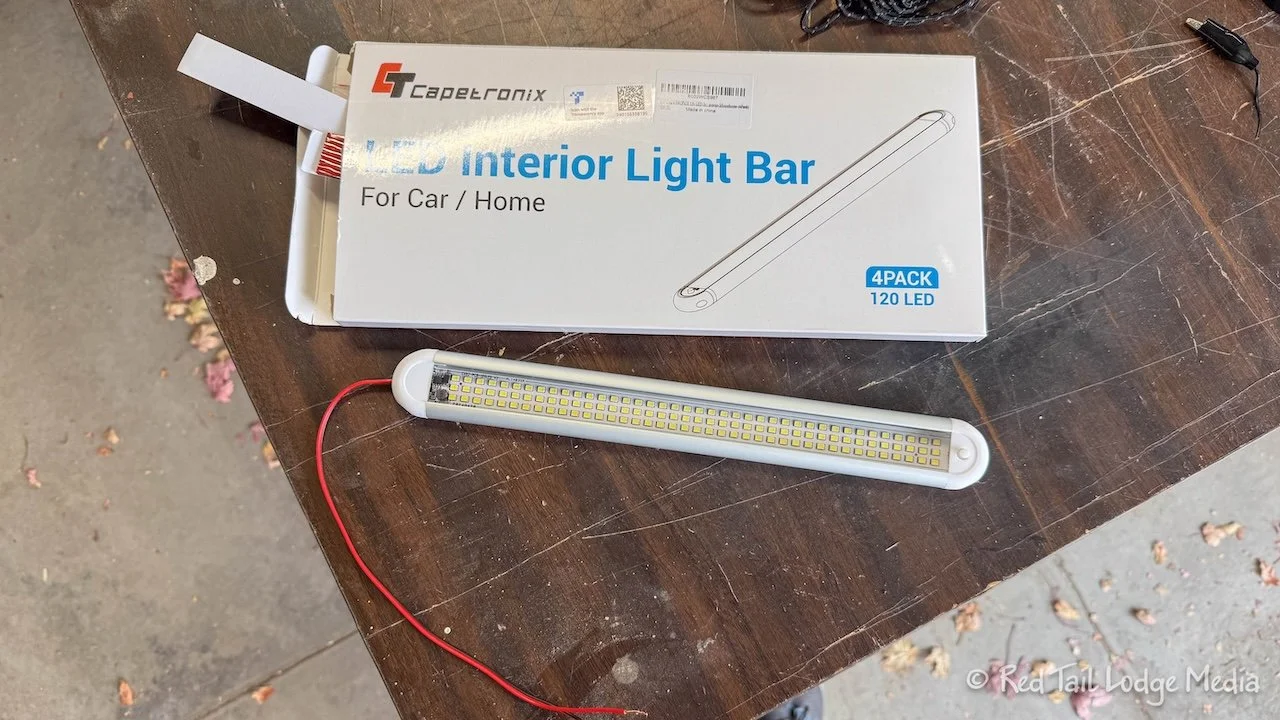
Then Keith attached LED light bars to the top of the water tank, one for each side. The light bars are connected to the step light circuit, so they come on when we turn on the step light using the wall switch.
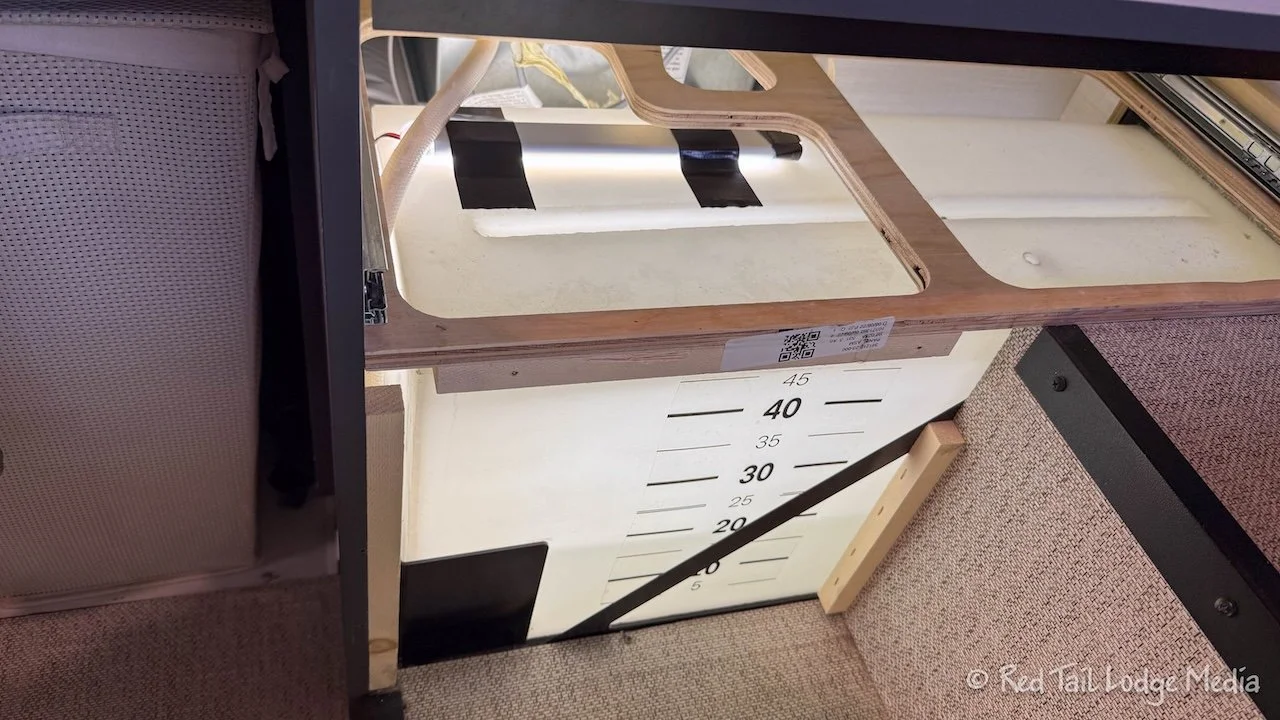
Next, Keith printed a scale onto transparent sticker paper which he then attached to the sides of the tank. The scale represented the number of gallons in the tank at the different levels. It was a little tricky to get the sticker under the supporting strap without it adhering to the tank before he wanted it to. He had to resort to the soapy water method to get it positioned properly into place.

Now we can visually see how much water is in our fresh water tank. It may not be high tech, but we don’t have to worry about it failing.
Mod Ten: Replaced Water Pump
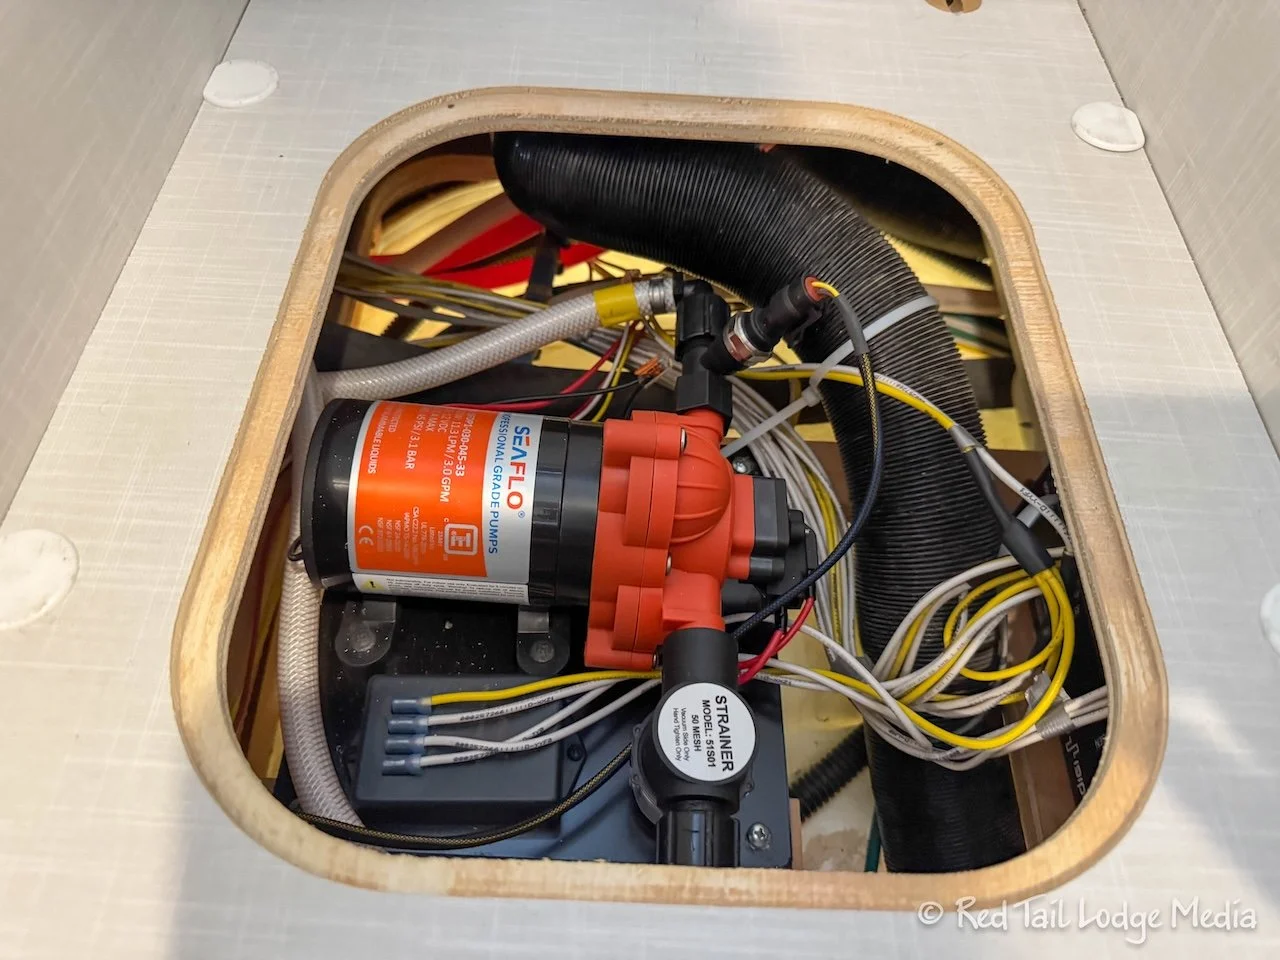
The water pump sits under the driver-side bed. The pump that came with our EKKO is rather loud, especially when one of us gets up in the middle of the night to use the bathroom. Even though Ann never complained about the noise (she sleeps on the driver’s side), Keith decided to replace the water pump with a quieter one and installed the IRVWPC controller (unpaid link). The controller controls the motor speed of the water pump, so it runs more smoothly instead of cycling between full on and full off. The Seaflo33 pump (paid link) was a little quieter than the original Shurflo pump, but the controller even reduced the noise more noticeably, especially when keeping the water flow low.
Mod Eleven: Replaced Chassis Batteries
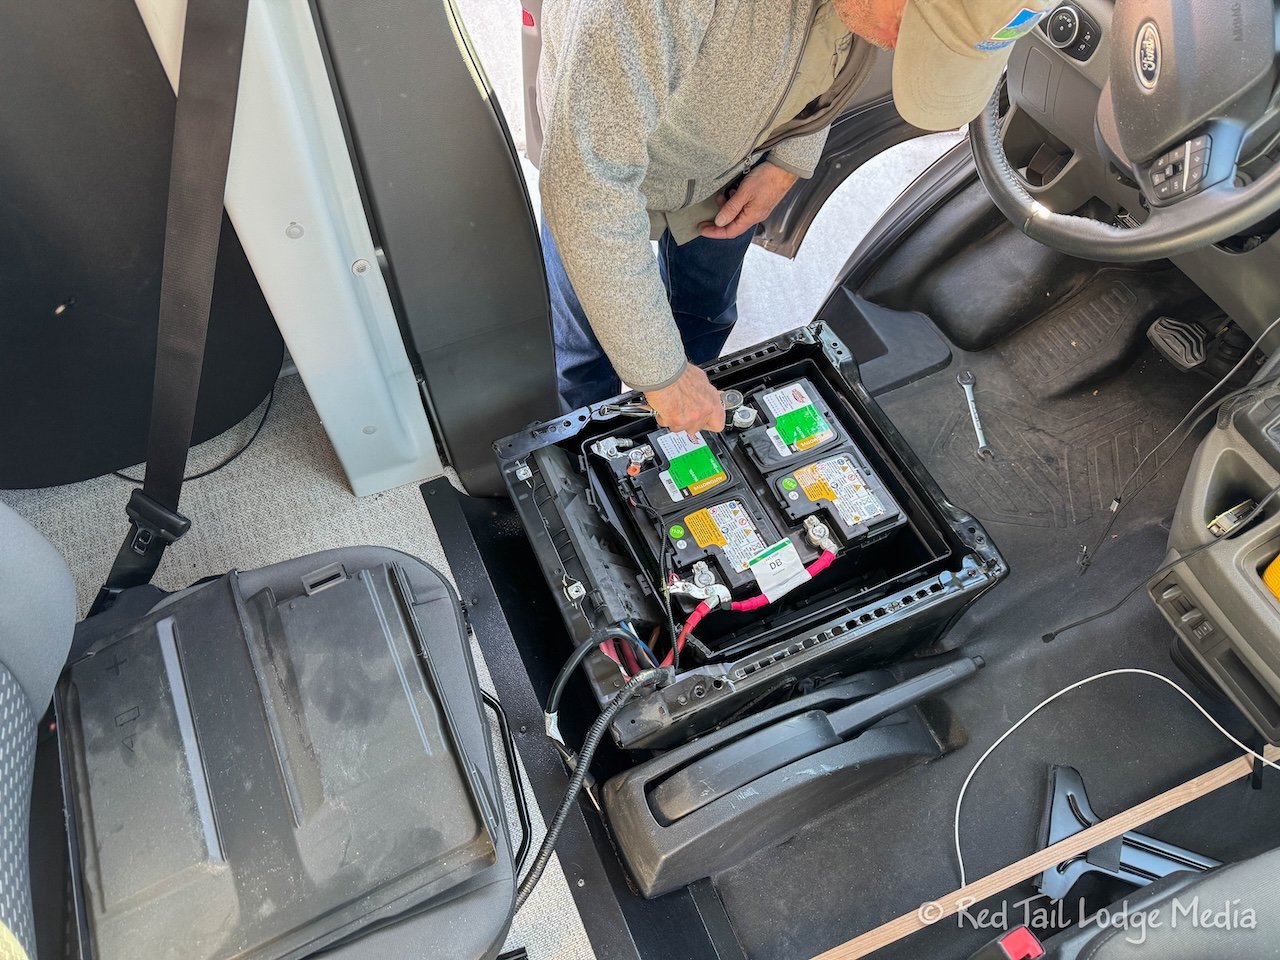
Before we put Red Tail into storage for eight months, we replaced the chassis batteries. The batteries were already over two years old, so it was about time. Plus, we didn’t want the batteries to die while our EKKO was in storage for so long. The two chassis batteries reside under the driver’s seat. It was a little difficult to get the cover off the batteries, so Keith just removed the driver’s seat to make it easier to access.
That wraps up our mods that we did before storing Red Tail during our Season Seven trip to Europe. Be sure to look for our next post on the rest of our mods for Season Eight.
Check out our related video: EKKO Mods for Season Eight
(Ann)