
Our EKKO Modifications

What? Modifications to our new Winnebago EKKO? You would think it would be all set to hit the road. Other than our shakedown trip, we haven’t even camped in our Red Tail Lodge Two (our EKKO) yet. But after four seasons of traveling in our camper van, we know how we like to travel and what gear we like to bring along. We spent two months making modifications so we’ll be ready to start Season Five on March 1st. Here are all the modifications we’ve made, in no particular order.
Mod One: Removed the tailgate package (outdoor kitchen) and installed a shelf.

The tailgate package was one of the options that we did not want, but it came with the EKKO that we found available. We wanted the extra storage space instead. So we removed the tailgate package and sold it to another EKKO owner who didn’t have it but wanted it. The items removed were the Norcold chest-style fridge, the collapsible sink, the Capital two burner propane stove top, and all the framework and wiring. Out of curiosity, we weighed what we removed. It came in at 128 pounds.
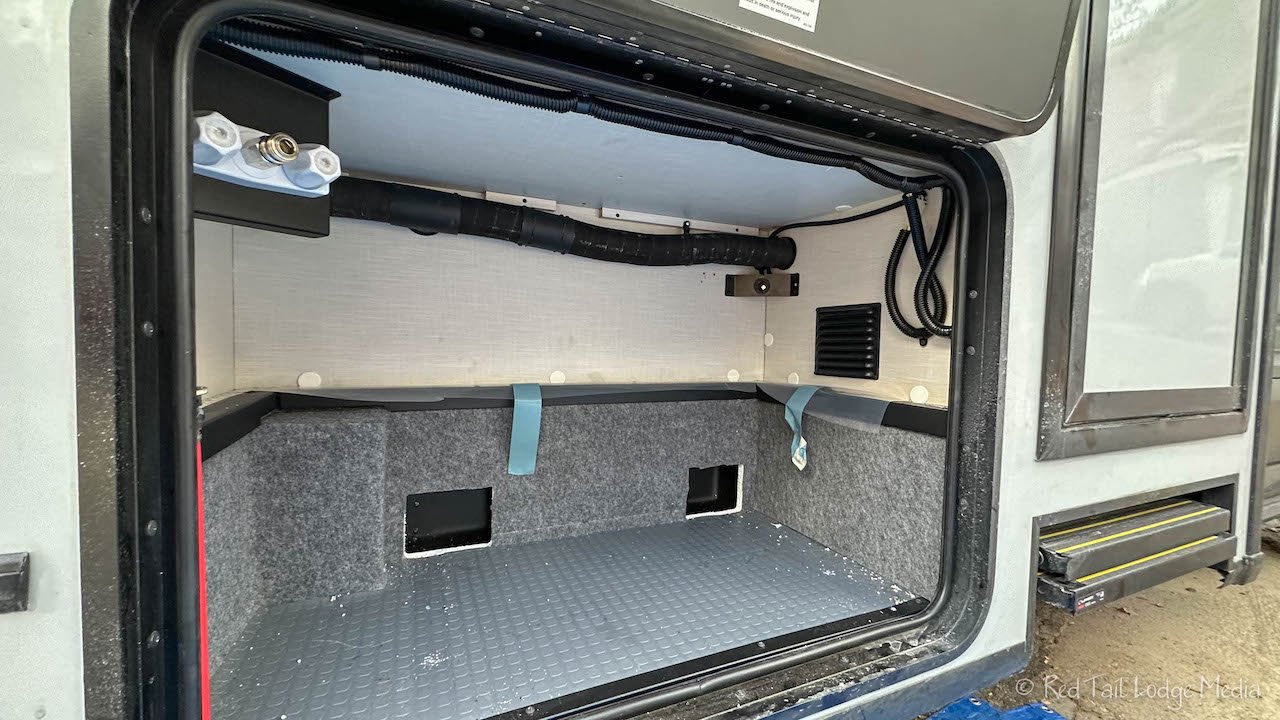
Removing everything went pretty smoothly. However, there are two square rectangles cut out of the back wall of the compartment so that the framework drawer slides fit. We initially taped the rectangles so that nothing would accidentally fall out of the compartment. We’ll probably glue some pieces of rubber in those cut-outs later. We squeezed some silicone into the screw holes left in the floor of the compartment to fill them.

To make better use of the space in the compartment, we added a shelf. First we built a mock up of the shelf using scrap wood and test fitted all the items we wanted to store in the compartment to make sure the shelf was the right size and height. The shelf does not go all the way across the full compartment so that we can store some taller items next to it. The final shelf is made from plywood and t-track (80/20). An aluminum angle was added to the shelf to keep items on the shelf from sliding.

The most important item we store inside the compartment is our new Blackstone griddle (paid link). Similar to the protective board we made for our butane camping stove in our van, we made a board to go under our Blackstone. It is plywood, but heavily coated with polyurethane. On the bottom, we added some small feet. The board protects whatever surface we use the griddle on, such as our plastic camping table or a picnic table, from the heat of the Blackstone. The Blackstone fits under the new compartment shelf along with the board underneath it. A strap was added to securely hold the Blackstone griddle in place. One end of the strap was screwed into the floor of the compartment and the other end was screwed into the wood for the shelf. A buckle on the strap makes it easy to load and unload the griddle.
Mod Two: Removed the entertainment center and created a storage cubby.

The entertainment center came with the EKKO we purchased, but it was another option that we did not want. The TV is in a similar location as the one that came with our VanDOit camper van, mounted high above in the cab. From experience, we know that the TV is in an awkward location. The only place to view it is sitting on the dinette bench, looking up. That is not very comfortable for two people for any extended period of time. Our initial plan was just to remove the entertainment center. However, removing the TV and sound bar left a headliner with several small openings in it. Our options at that point were either to cover the openings somehow or to make a larger opening in the headliner and turn it into storage cubby. An extra storage cubby, although small, seemed like the better choice.

Removing the headliner, so we could cut it, involved removing the side panels to access the space behind the headliner from the two side cubbies. In addition, we had to cut the wires going to the light bar that is attached to the headliner. We added quick connects to those wires to make re-installing and removing the headliner easier. We also removed the large metal bracket inside the space to allow more room for storage. Cutting the larger opening in the headliner was done rather easily with a Dremel Tool. An orbital sander was used to smooth the resulting rough edge.

Now we had a space with exposed insulation and wires. To protect them from damage, we lined the back and top of the space with ABS plastic. The shape is rather awkward, so there were a lot of test fits and trimming done to get the plastic pieces to fit properly. An aluminum angle mounted to the floor of the space in the back with VHB tape provides a mounting point for the back plastic piece. A few screws and ABS cement holds everything in place.

To match the other two cubbies and to keep things from falling out, we mounted a stretchy net across the bottom of the opening. It is a 4” x 24” Cubby Cover Stretch Net (unpaid link) from Organized Obie. Mounting it was a little tricky because there isn’t enough room inside the cubby to use a screwdriver in, at least not any screwdrivers that we own. Mounting it on the outside would have worked, but it wouldn’t look as nice nor would it match the other two cubbies.

We noticed there were two small rectangular pieces of plastic mounted behind the headliner, one on each side of the opening. So we glued two layers of plastic together to create enough depth for mounting screws. We made two sets of the double layers, making them the same size as the pieces already inside the cubby. Then we mounted the corners of the net to the new plastic pieces using screws, while everything was outside the cubby. Using ABS cement, we mounted our new plastic pieces on top of the existing pieces, using clamps to hold them in place until the cement dried. The bottom of the net was then secured using a couple of conveniently located existing screws in the floor of the cubby near the opening.

It’s not a large cubby, but we can easily fit our reusable shopping bags, a purse, and our spare water bottles in there. We kept the TV and put it in Keith’s workshop in our garage at home. The sound bar and Blu-Ray player we donated to charity.
Mod Three: Installed a weBoost cell signal amplifier.
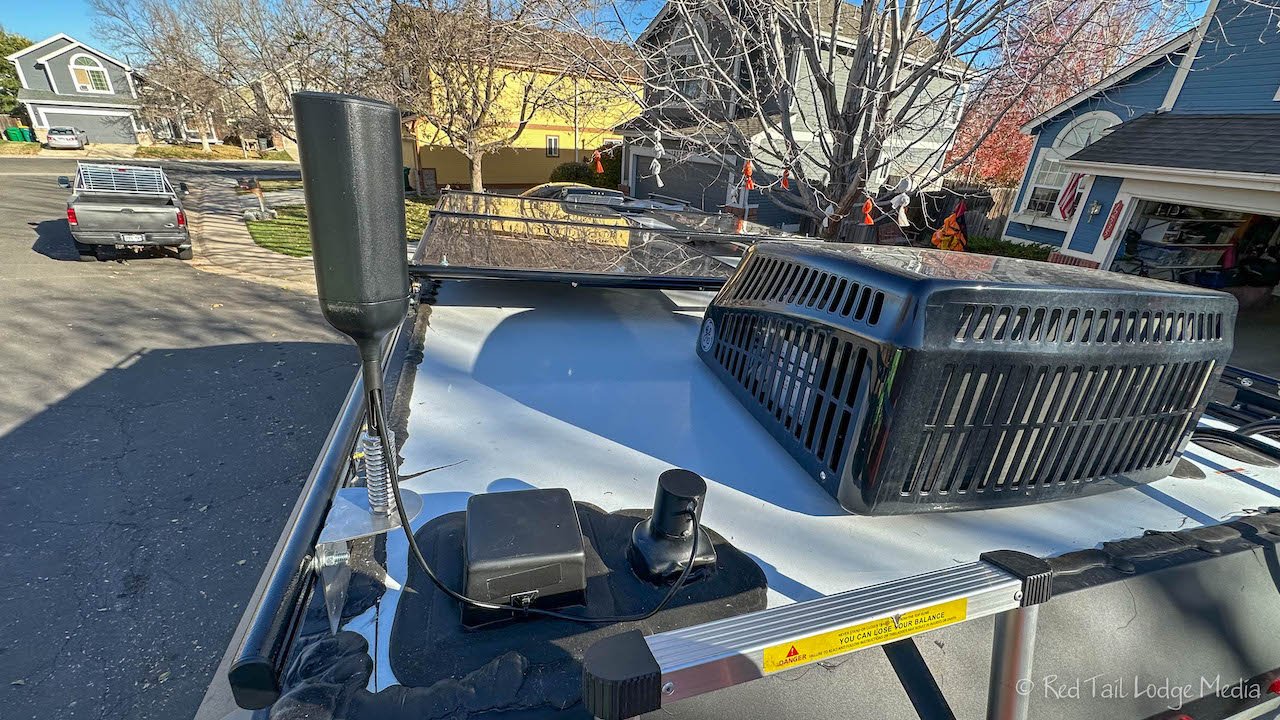
We had a weBoost in our previous rig, our VanDOit camper van, and loved it. It cannot create a cell signal from nothing, but it can mean the difference between a weak, unusable signal and a stronger, usable one. We installed the one in our camper van, but we were grateful that James demonstrated the procedure he followed for the EKKO over on FitRV (www.thefitrv.com/rv-tech/amazing-weboost-install-and-cell-booster-test/). James showed us how to reuse existing openings in the roof and existing wiring which made the install much easier. We had the weBoost Drive X RV in our van, but we purchased the newer, more powerful weBoost Drive Reach RV (paid link) for the EKKO.

The weBoost system consists of an outside antenna to receive the cell signal, an amplifier which boosts the signal, and an inside antenna which rebroadcasts the stronger signal inside the RV. We mounted the outside antenna on the side of the roof rack near the rear on the driver’s side of the vehicle. To route the cable from the antenna through the roof, we used James’ 3-D print file to have the plastic cap 3-D printed. The plastic cap replaces the King Jack Antenna (an HDTV antenna that we did not intend to use). At the cap, the cable from the weBoost outside antenna is connected to the cable from the King Jack Antenna and, voila, we now have a connection that goes all the way to the passenger side front cubby. No cable routing required.

The weBoost amplifier and the weBoost internal antenna both sit on the top shelf inside the passenger front cubby. The weBoost amplifier will generate some heat and needs to be in a ventilated space. A little reworking of the wires and outlets inside the cubby allows the cable from the roof to be connected to the amplifier along with providing power. We also added a USB port inside the cubby so that our Verizon Jetpack, a mobile hotspot, can be plugged in and sit on the shelf right next to the amplifier and antenna.

Although we plan on normally needing a good cell signal while sitting in the dinette area, we left the inside antenna in the passenger side cubby instead of routing a wire over to the driver side cubby as James did. If you mainly need a signal in the bedroom, you could place the inside antenna in one of the bedroom cabinets and not route it all the way to the front. However, you may run into issues with the inside and outside antennas interfering with each other. This is not an issue in a camper van, where the shell of the van is metal and electromagnetically isolates the two antennas. However, the shell of the EKKO is not metal. Placing the inside antenna near the front of the EKKO provides more distance between the antennas (assuming the outside antenna is mounted near the rear), which will reduce the interference. The metal cab of the Ford Transit may also provide some protection.
Mod Four: Installed a ceiling fan cover.

We were not very impressed with the front cab curtain (different from the insulated one). The curtain does not make a good privacy curtain as there are large gaps and it is also not very insulating. So we purchased cab shades from Van Made Gear (unpaid link). The shades provide a tighter fit, better privacy, block out more light, and are insulating. What does this have to do with a ceiling fan cover? Well, Van Made Gear also makes a ceiling fan cover which provides insulation when the fan is not in use. So while we were ordering the shades, we also purchased their ceiling fan cover. After all the money we’ve been spending on our new rig, the cost of the fan cover was a drop in the bucket. Unlike the cab shades, there is a simple installation of magnets required for the fan cover. The magnets install under the plastic trim with the help of a little tape. Easy peasy.
Mod Five: Sprayed T-9 into all the locks and the retractible steps to make them work easier.
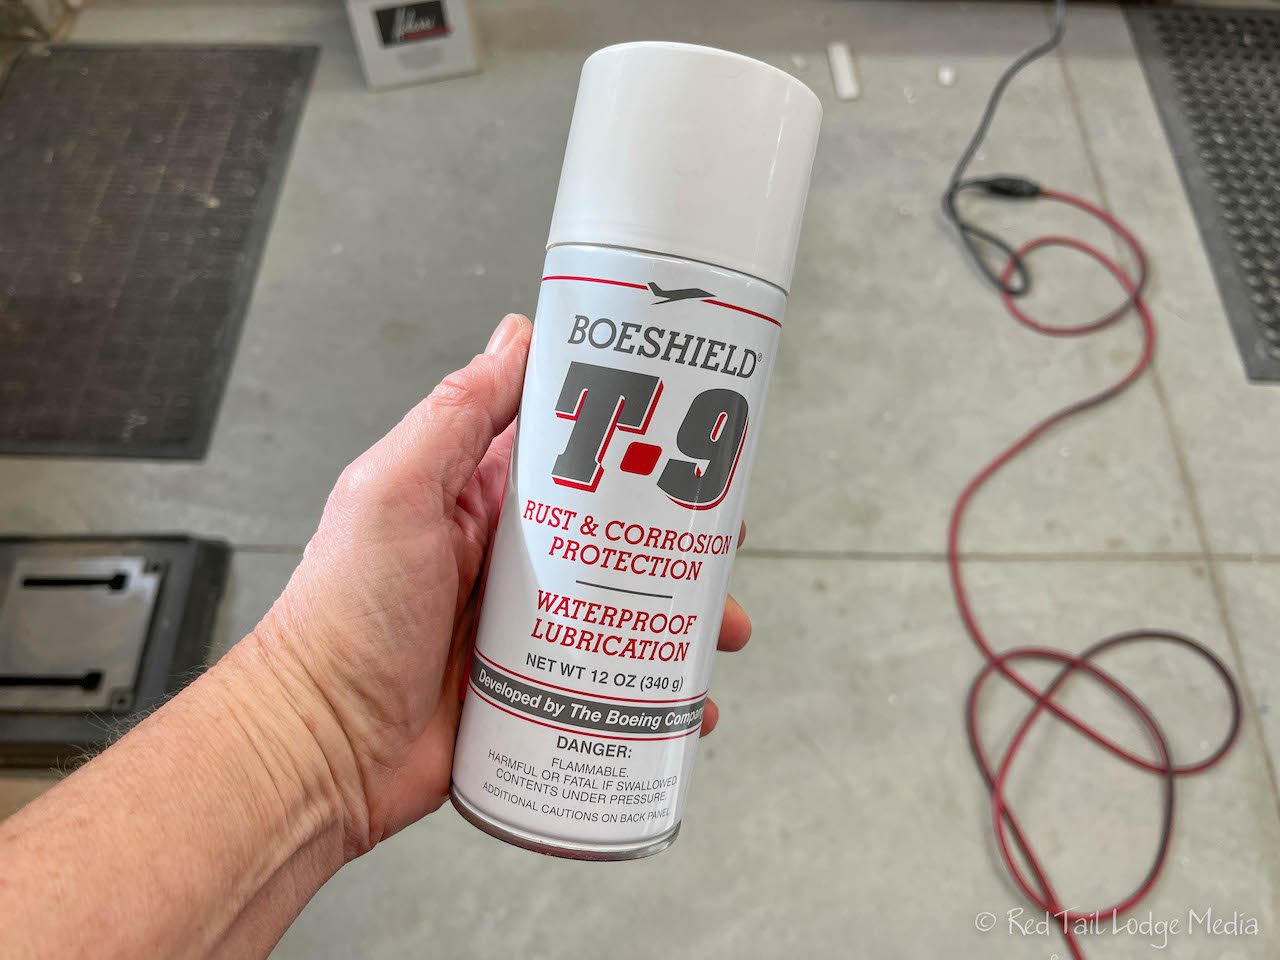
When we first picked up our EKKO, we struggled with the locks for the exterior compartments. When we got back home, we sprayed T-9 (paid link) into all the locks. This made them work much easier. We also used the T-9 on the retractible steps which also seemed to help. However, we learned later, that our lock issue was caused by one of the compartment doors being keyed differently than all the rest (not counting the toilet cassette compartment), so our two keys were different. One operated all the compartment doors except the driver side gear garage door and the other key operated just the driver side gear garage door. We would still recommend using T-9. Not only is T-9 a waterproof lubricant, but it also protects against rust and corrosion. It works great on bike chains as well.
Mod Six: Installed a clothes line in the bathroom.

The clothes line (paid link) we installed is a retractible one, so it is not in the way when not in use. The base end is attached to the front wall of the bathroom using VHB tape.

The bracket that the loose end of the clothes line hooks into does not have a flat surface to attach tape, so we screwed it into the rear wall of the bathroom using the screws that came with the clothes line. Unfortunately, the screws were just slightly too long, about 1/32” too long, and poked out the other side of the wall into the bedroom. Thankfully, they don’t stick out very far, so we’re leaving it the way it is for the time being. We haven’t used the clothesline yet, so we’ll report back how well it works and if the VHB tape is strong enough to last.
Mod Seven: Removed the Molle panels and replaced one with an Obie organizer.

To give us a little more space in the gear garage, we removed the Molle panels from both side doors of the gear garage. The panels just don’t seem to be a good use of space as they stick out from the door about an inch or two. On the one door, we added a stretch net to hold our bike helmets, so they fit nice and flush up against the door. The net was the 20” x 24” Barrier Stretch Cargo Net (unpaid link) from Organized Obie. We easily sold the Molle panels we removed, so they did not go to waste.
Mod Eight: Installed thermometer and hygrometer with three remote sensors.

The first thing we noticed when using the EKKO furnace on our shakedown trip was that it did not indicate what the current temperature was inside the EKKO, just what the desired temperature setting was. Now we have a thermometer (paid link) mounted right above the furnace and air conditioner controls, so we know what the temperature and humidity is.

The thermometer came with three remote sensors. We installed one inside the gear garage, another inside the water compartment, and the third one underneath the vehicle (on the passenger side, just in front of the rear tires). All four temperatures and humidity readings are displayed on the main console inside. It’s probably a bit overkill, but we always feel like the more information we have, the better decisions we can make. Hopefully it will help us prevent any damage to anything due to extreme temperatures, hot or cold.
Mod Nine: Installed a TPMS (Tire Pressure Monitoring System).

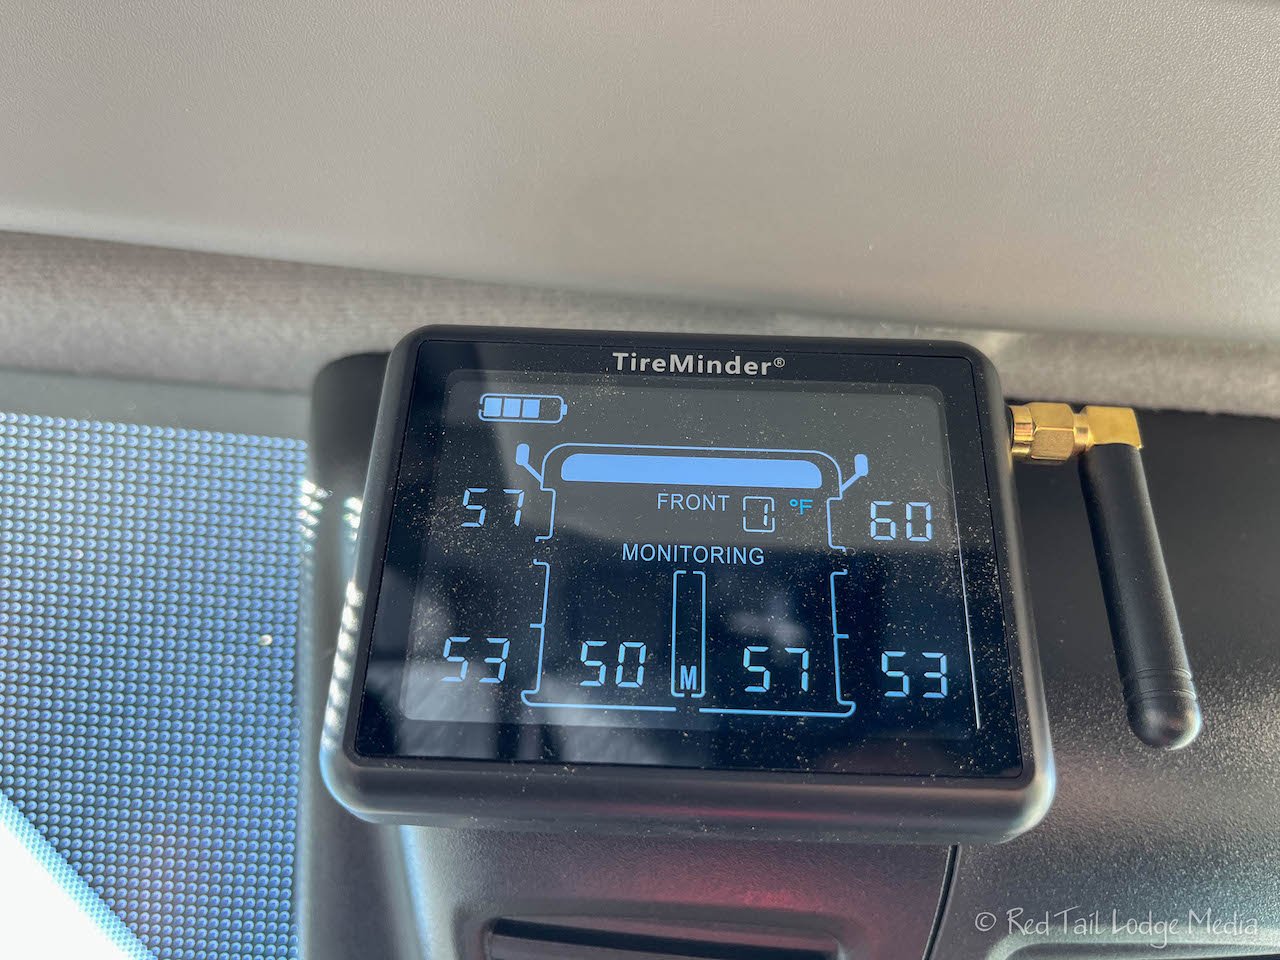
Yes, we know, the Ford Transit comes with built-in tire pressure monitoring. And yes, we know Ford’s system has gotten better over the years. However, the built-in TPMS only indicates when a tire is severely under-inflated. It will not warn you when a tire’s pressure gets too high, which is usually a precursor to a tire blow-out. The third party TPMS that we installed is the TireMinder i10 RV TPMS with 6 transmitters (paid link). Be sure to purchase one with 6 transmitters instead of 4 since the EKKO has six tires. The one we had installed in our camper van was the EEZTire. It worked fine, but you have to wait for it to cycle through all the tires to see all the pressures and temperatures. What we like about the TireMinder is that the pressures of all six tires are displayed at the same time on the screen. A button push toggles the display between tire pressures and temperatures. If any of the five alert conditions are met (no matter what which measurement is currently displayed on the screen), an alarm will sound and an alert will be displayed on the monitor. The five types of alerts are a rapid leak, slow leak, low pressure, high pressure, and high temperature. All you have to set is the baseline pressure, as indicated on the placard located on the driver’s side door jamb.

The system comes with a monitor, a signal booster, and six transmitters. We mounted the monitor in the cab above the rear view mirror using velcro. Even though TireMinder recommends installing the signal booster, we did not. We feel the EKKO is short enough of a vehicle that it is not needed. We can always install it later if it becomes an issue. The six transmitters screw onto the valve stems of each tire. As each transmitter is installed, you indicate on the monitor which tire it is. It is a simple process to follow.
Knowing the temperature in addition to the tire pressure has saved us in the past. We were following a slow vehicle down a steep road in the mountains, using our brakes a little too much. We noticed that the tires were getting overheated, probably from our brakes heating up. So we pulled over and waited for everything to cool down. If we had continued, we might have overheated our brakes, causing them to fail, or blown out a tire. Not something we care to experience.
Mod Ten: Installed propane tank monitors.

As you can probably tell already, we like information. Even though we didn’t have propane in our camper van, we’re pretty sure we want to know the levels of our tanks, since we’ll be using it for cooking, heating, and hot water. It is a stretch to call this a modification. The installation process for the Mopeka sensors (paid link) that we bought is pretty simple. A sensor mounts magnetically under the bottom of each tank and communicates to a Bluetooth app on our phones.
Mod Eleven: Mounted two waste bins under the bathroom sink.

Space in the EKKO is at a premium. Finding a place for a waste basket is challenging. We also like to recycle when we can. We found two waste bins that mount on the wall and fit nicely under the sink in the bathroom. We found the bins at the Container Store, but they are also available at Amazon (Brabantia Sort & Go Waste Bin - paid link). We’ll use one for garbage and one for recyclables. Having them in the bathroom is not as inconvenient as it sounds. Leaving the bathroom door open, they are easy to reach while cooking and preparing food in the galley. The biggest drawback is that we have to remove them when we want to use the shower, but they pull off the wall rather easily. Time will tell how painful or not this will become.
Mod Twelve: Installed motion detector lights.

The EKKO has lights in the gear garage and water compartment, but not in any of the other outdoor compartments. Also, the bathroom light switch is in a rather inconvenient location, outside the bathroom behind the open door. A nice solution for both these issues is a rechargeable motion detector light (paid link). We installed six of them with velcro, so we can easily pull them down to recharge them. The ones we purchase are dimmable and recharge using a USB outlet. One is in the battery compartment, one in the generator compartment (which we use to store our tools), one in the propane compartment, two in the outdoor kitchen compartment (one above the shelf and one below), and one in the bathroom under the medicine cabinet. We like dimming the one in the bathroom, so when one of us gets up in the middle of the night, it is not so blinding as turning on the main light.
Mod Thirteen: Secured e-bikes in the gear garage.

We replaced our Trek hybrid bikes with RadExpand 5 e-bikes (unpaid link). To be able to store our e-bikes inside was one of the reasons we wanted the gear garage. The way we secured our bikes in the gear garage was inspired by a Facebook post by Judy Gremmel in the Winnebago EKKO Owners and Wannabes group. Judy has two Rad Mini 4 e-bikes which are slightly different dimensions than our RadExpand 5 e-bikes, but we were able to use many of the same ideas. Both of these bikes fold in half, but we both chose to only fold down the handle bars when storing the bikes in the gear garage to make them easier and faster to load and unload.
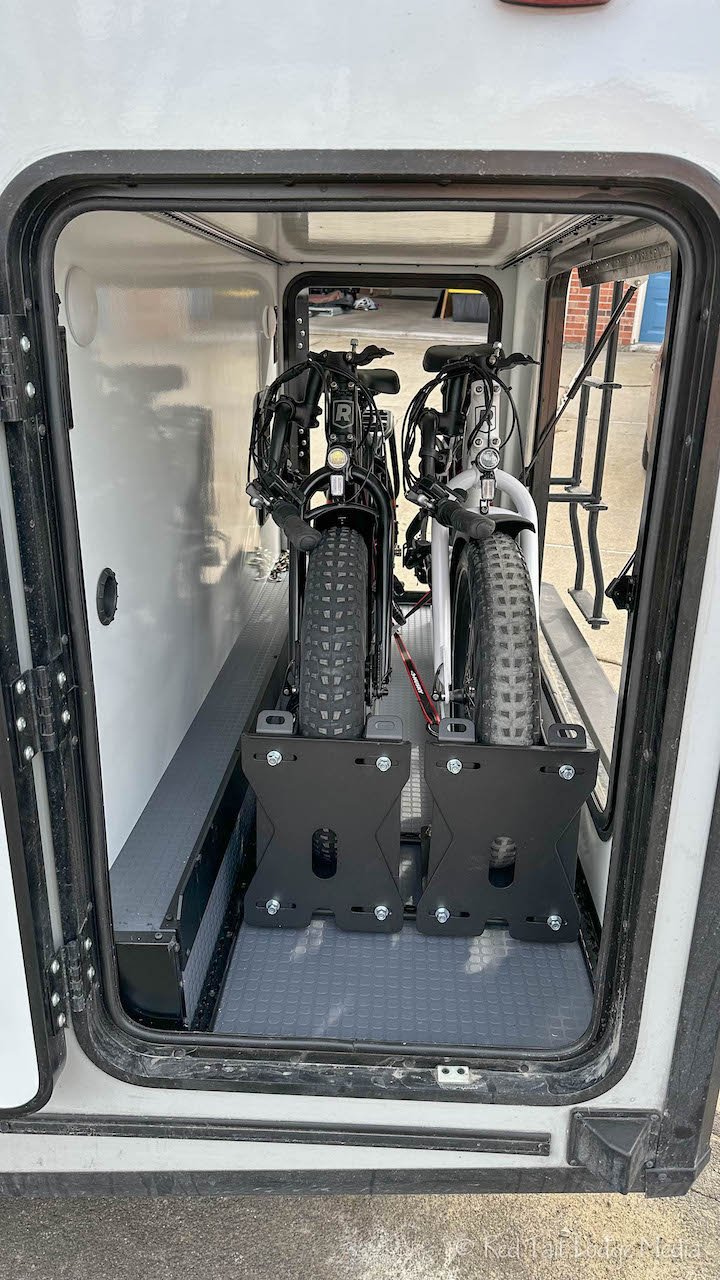
Even though our bikes have 4” wide tires instead of 3” like Judy’s, we were still able to use the same wheel chocks to secure the front tires. The wheel chocks (unpaid link) are adjustable. Instead of creating a plywood block to secure the chocks to, we bought a strip of L-track that we cut to fit between the two existing L-tracks along the sides of the gear garage floor. The wheel chocks are designed to be secured to an L-track. We used a combination of VHB tape and screws to secure the L-track to the floor of the gear garage. Judy had to file down a piece of the wheel chock to keep it from rubbing on the bike. We did not need to do that for our bikes. However, we did cut away part of the lip along the gear garage shelf to give the derailer on one of our bikes more room.
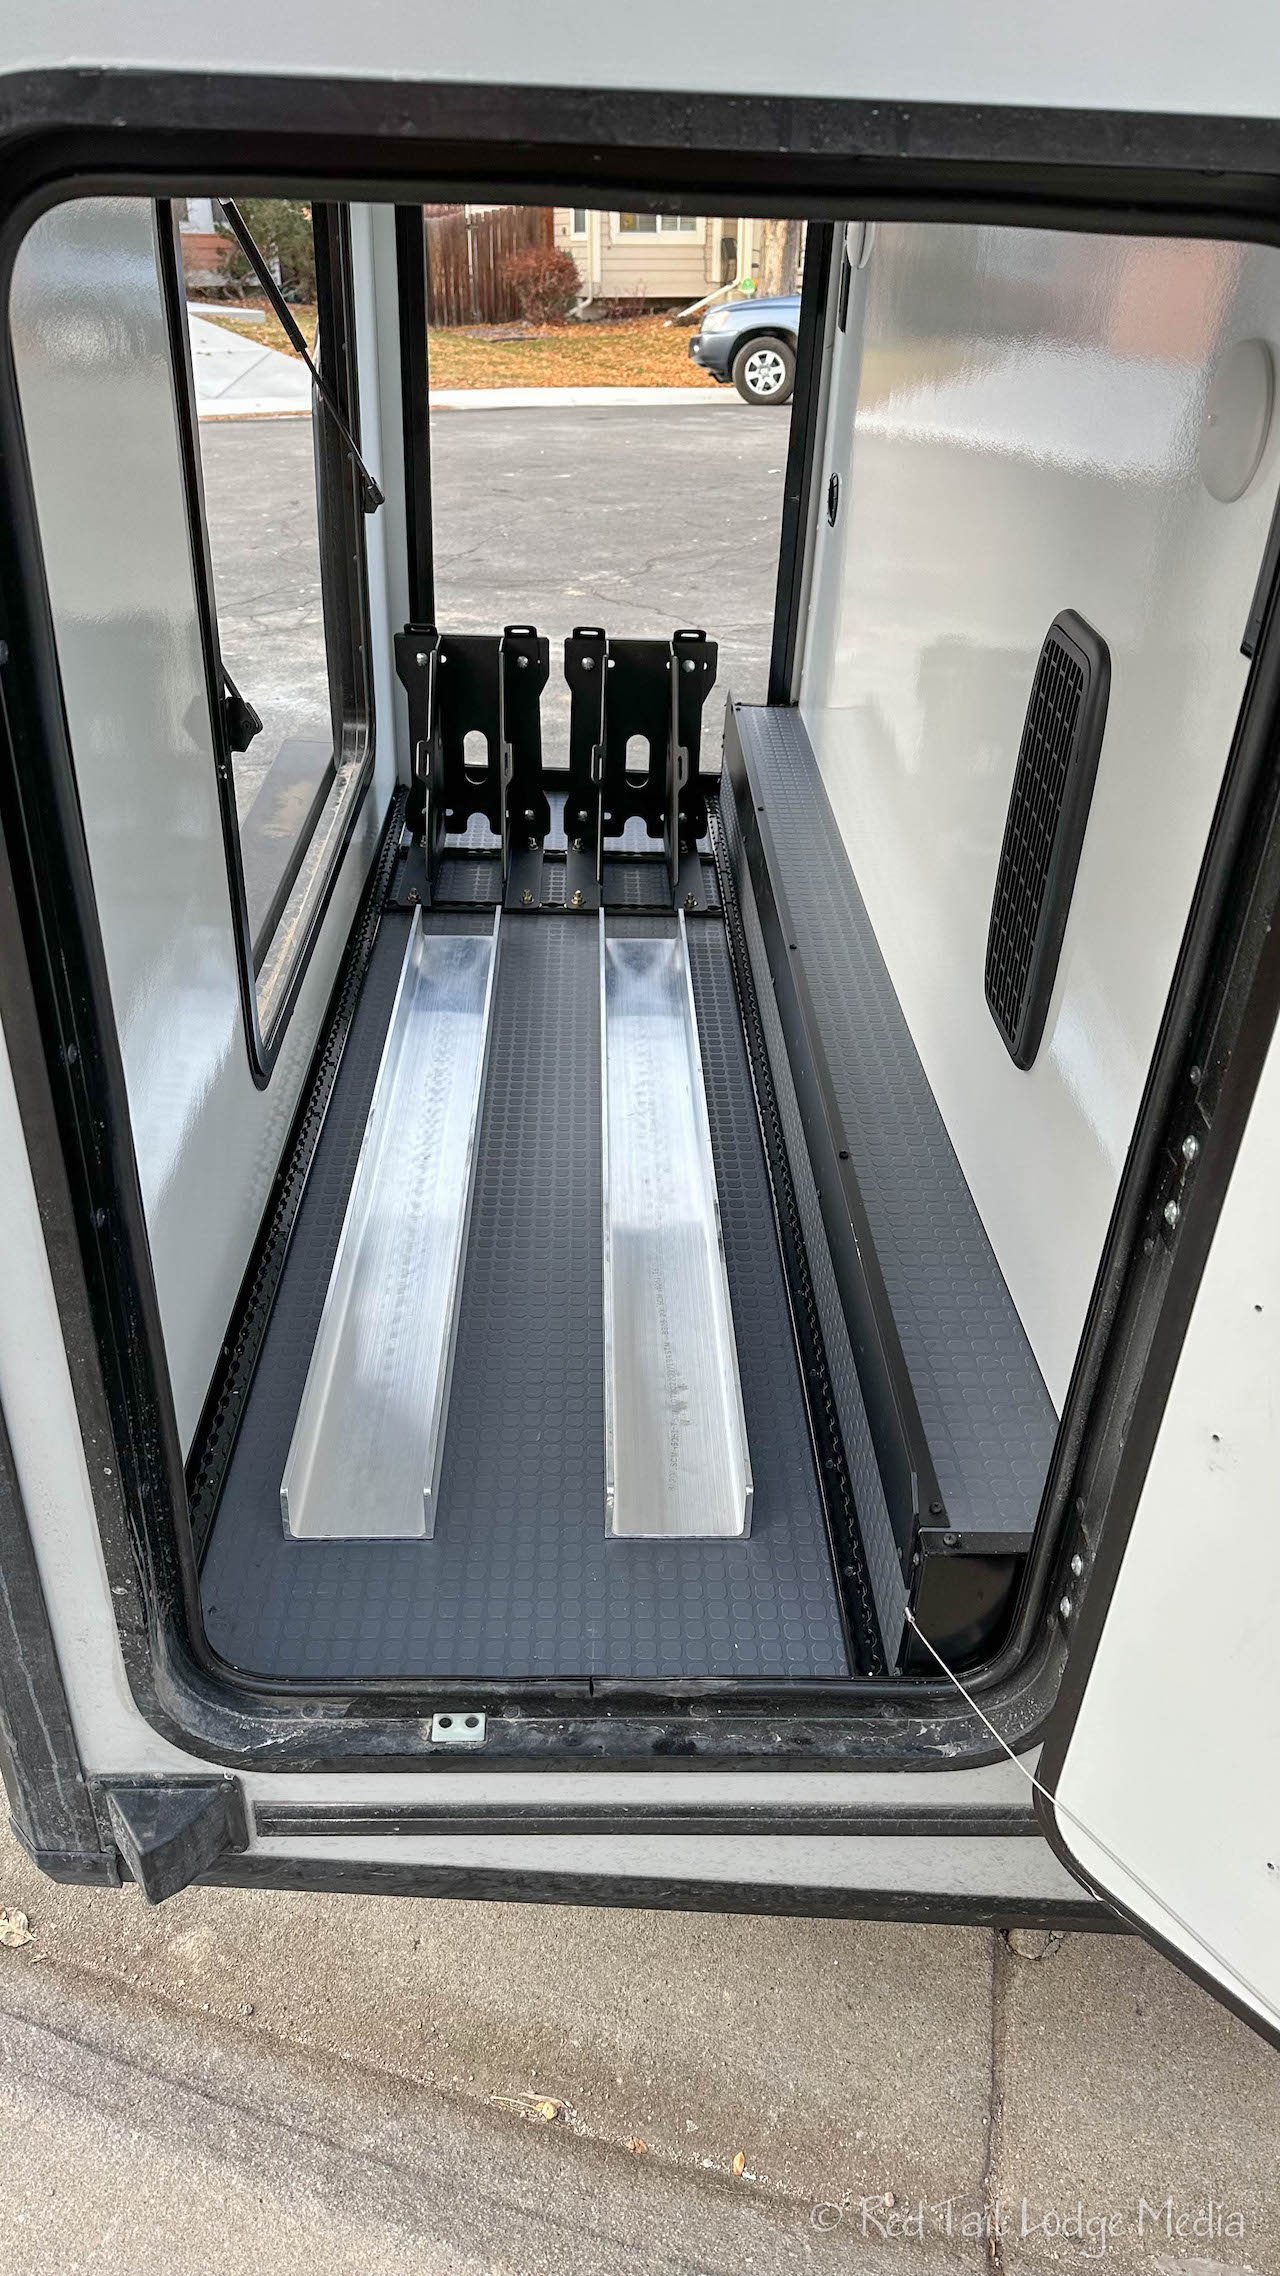
Similar to Judy’s design, we used two aluminum channels to help guide the bikes into the gear garage and into the wheel chocks. We ordered the 5 inch channels from Grainger (6061 Aluminum U-Channel, Item 795M33 - unpaid link). It was cheaper to order one 8 foot channel instead of two 4 foot channels. A miter saw cut the channel in half pretty easily. The aluminum channels are secured to the gear garage floor using double-sided VHB tape. Judy also used a motorcycle ramp to help get the bikes in and out. We opted to skip the ramp. Even though each of our e-bikes weighs 64 lbs (just 3 lbs less than Judy’s bikes), we found it rather easy to put the bikes in and out without a ramp. The rear wheel does not roll with the handle bars folded down, so, even with a ramp, you have to somewhat lift the back of the bike. Lifting the full weight of the bike is not necessary. We just lift the front wheel onto the aluminum channel while keeping the rear wheel on the ground. Then, when we lift the rear wheel, the front wheel rolls down the channel to the wheel chock without much effort.

Before putting the bikes into the garage, we remove the bike pedals (we bought quick-release pedals - paid link) and lower the bike seats (we both require them to be at the max height to ride). After the bikes are in place in the gear garage, we secure them with one ratchet strap each, anchored to the lower L-tracks on the sides and looped over the bike frame just above the pedal crank. Our bike helmets go in the Obie stretch net on the compartment door and the removed pedals go in our saddle bags and hang from the upper L-track on the rear wall.

The EKKO comes with a nice rubber floor mat. It was a shame to remove that, but we needed to for the e-bike storage. We didn’t let it go to waste, though. We cut it down so that it fits perfectly in the bottom of our coat closet in our house, to hold all our dirty boots and shoes.
Mod Fourteen: Installed paper towel holder.

The installation was simple, but figuring out where to install it was not that easy. There are not many practical places to install one inside the EKKO. The first thought is on the wall to the side of the galley counter. However, that is right above the propane stove. Putting flammable paper towels above an open flame? No thanks. The other spot that comes to mind is the wall behind the sink. However, that’s where we wanted to put a spice rack and we didn’t want water splashing up on the towels anyway. So where did we put it? Above the entry door. It doesn’t seem very logical, but it was the best we could come up with. It is right next to the kitchen, the most likely place where we would be using them, and we are both tall, so the reach is fine for us. Shorter people may have an issue with it.
The only other decision was what type to install. In an RV, you want something that doesn’t cause the roll to unwind while you drive down the road, so you don’t end up with a pile of towels on the floor by the time you arrive at your destination. In our camper van, which was filled with T-track, we just ran a bungee cord through the middle of the tube and attached each end to the T-track. The elastic of the bungee keeps the roll of towels tight enough against the T-track that it doesn’t unroll. In the EKKO, we bough a ratchet type of paper towel holder (paid link). It has the additional benefit of being able to tear off a sheet of towel using only one hand.
Mod Fifteen: Installed Everything Keepers.

For the small items that seem to get lost inside large storage compartments, we installed three Everything Keepers (paid link). Two are under the overhead cabinet in the dinette area and one in the bedroom. We’ll use these to hold items like an iPad, office supplies, and spare keys.
Mod Sixteen: Built another pantry shelf and added a velcro strap for one shelf.

The EKKO comes with two moveable shelves in the pantry cabinet. The pantry cabinet is a rather small and odd-shaped cabinet behind the dinette bench. As Ann tried test-fitting the pantry items that she likes to travel with, she quickly realized that two shelves were not enough. So Keith built a third shelf.
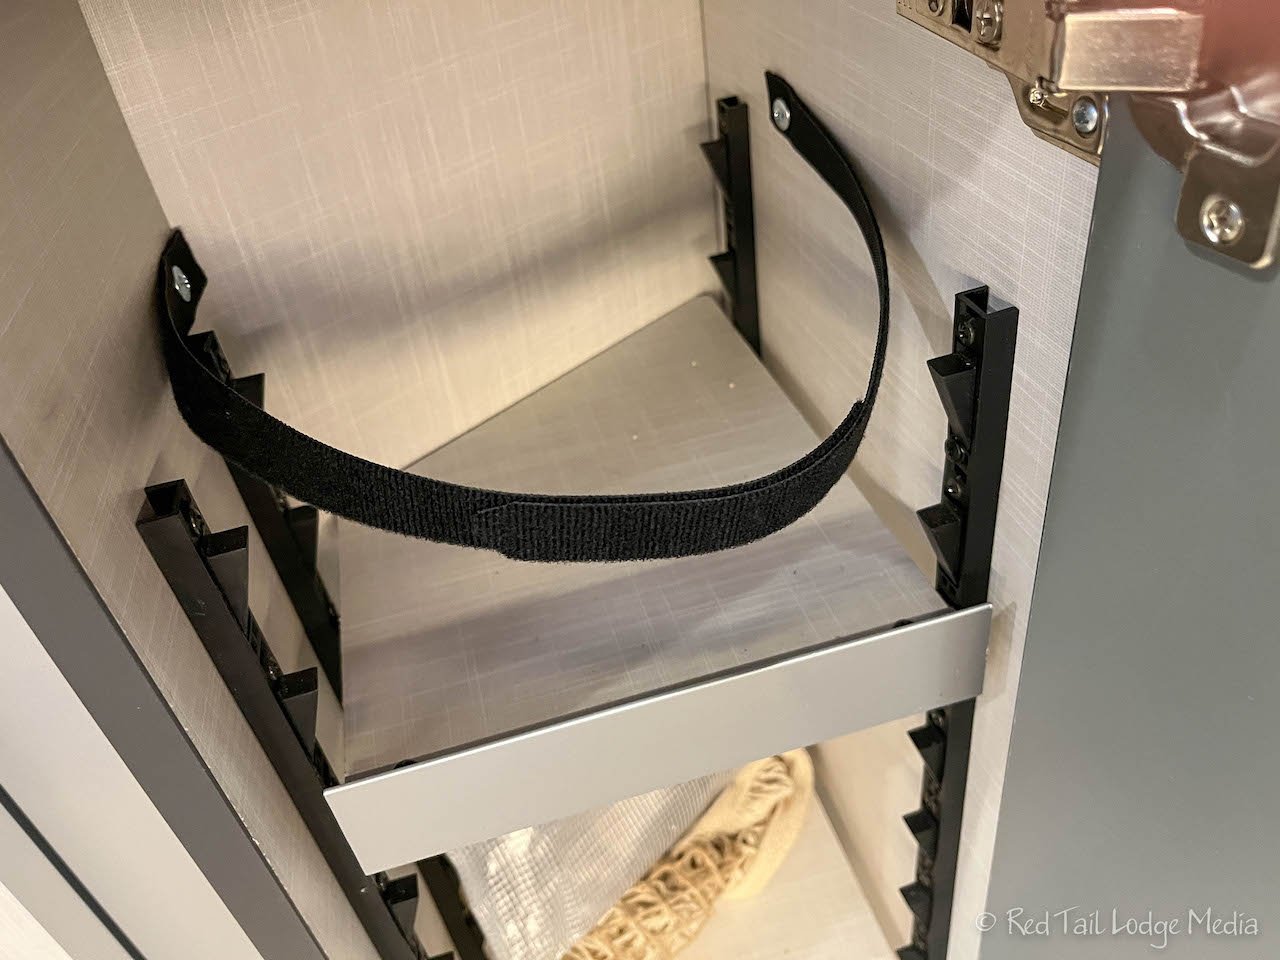
In addition, there are quite a few bottles of liquids that we travel with, such as oils and vinegars. They seem to all fit on one of the shelves, but we were concerned about them possibly falling over, especially when opening the pantry cabinet door. Having one of those break open, especially one of the glass ones, would make quite a mess. So we added a velcro strap, anchored to the side walls of the cabinet, near one of the shelves. Hopefully that should hold them in place while we travel.
Mod Seventeen: Installed a Super Slider for sewer hose and Americanizer.

This is another mod where we followed James’s lead (thefitrv.com: Sewer Hose Storage – Installing the SuperSlider in Our EKKO). The sewer hose (or stinky slinky) is not something we care to keep in the water compartment where the fresh water fill is. The Super Slider (paid link) is an adjustable length tube that can be mounted underneath the vehicle. Not only can we fit the sewer hose in there, the Americanizer (paid link) fits as well. The Americanizer is a product designed and sold by James to connect the toilet cassette to the sewer hose to make it easier to dump the cassette into an RV sani-dump. If you want more details about the installation, check out James’ post over on the Fit RV.
Mod Eighteen: Removed closet rods from both wardrobes.

The wardrobe closets inside the EKKO are too short to be able to hang anything useful from the closet rods, especially the wardrobe on the driver’s side. What was Winnebago thinking? We can make better use of the space by forgetting about using hangers. Both closet rods had to go.
Mod Nineteen: Removed cabinet door from passenger side wardrobe and added laundry hamper.

With the closet rod removed, we turned the passenger side wardrobe into our space for dirty clothes. At Bed, Bath & Beyond, we found a clothes hamper that fits pretty well in the space (Simply Essential Parker Hamper - unpaid link). Putting clothes into the hamper is something we will each do at least once a day, so making it as easy as possible was our goal. Having to open a cabinet door and then tip the hamper out to throw clothes in seemed like an extra, unnecessary step, so we removed the cabinet door.

There is still room behind the hamper to store some items. One of those items is a laundry backpack (unpaid link) that we picked up at Target. We know from experience that you sometimes have to schlep your clothes quite a distance to get to the laundromat or campground laundry. In Banff during Season Four, the closest available parking spot to the laundromat was over three blocks away. A backpack should make that easier. The hamper we bought has a cloth liner. So it should be a simple matter of pulling out the liner full of dirty clothes and putting it into the backpack. We’ll let you know how it goes.
Mod Twenty: Built a shelf for the driver side wardrobe cabinet.

Keith built a simple shelf out of plywood. The shelf is held into place with normal shelf pins. The height of the shelf allows a plastic bin to fit underneath for dirty shoes and a soft-sided bin on top for clothing. The shelf does not go all the way to the front of the cabinet, so there is still room left over for Ann’s laptop bag when she wants to store it out of the way.
Mod Twenty One: Built a shelf for the dinette overhead cabinet.

This was another simple plywood shelf. In order to determine what height to install it, we first bought the containers for storing the items, then determined the tallest item we would want to store in the cabinet. Our plan is to use this cabinet as more pantry space for food items. Instead of just shelf pins, we used L brackets for added strength. There are two brackets on each end and a fifth bracket in the middle along the back wall. There are no brackets along the front. We plan on only storing light items on top of the shelf, like bread, tortillas and bags of chips. Since no heavy items should go up there, we feel we can get away without brackets on the front. In addition, we don’t need to store the bread and chips inside containers, since there are not any heavy items to slide into them to smoosh or crush them.

We had a little issue with the cabinet door strut. When we initially built the shelf, we didn’t realize that the strut actually angles back behind the attachment point when the door closes. So the cabinet door would not shut. However, cutting a simple notch out of the shelf solved the problem.
Mod Twenty Two: Built a shelf for the cabinet under the stove.

This shelf was a little more complicated. Instead of using plywood, we returned to the familiar T-track and ABS plastic that we used extensively in our camper van. It was easier to get the structure we needed by using the T-track to work around the obstructions present under the stove. The ABS plastic allowed us to have a thinner shelf, giving us more room to fit the items we wanted into the space. To manage the space a little better, we were able to move the water filter back about an inch. We would have liked to move it back even further, but that would have required messing with the hoses, which we didn’t want to deal with. The shelf is mounted at the perfect height so that our stack of pots and pans (paid link) inside our dish rinse water bin and electric tea kettle (paid link) fit underneath and our induction cook top (paid link) and hand blender (paid link) fit on top. It is also set back from the front of the cabinet to allow bins to be attached to the cabinet doors. This was rather a puzzle to get all the dimensions right to make everything fit.
Mod Twenty Three: Installed bins on the doors of the cabinet under the stove.

We found some plastic bins (iDesign pantry bin & Linus Kitchen Drawer Organizer - paid links) that seemed to be the perfect size to mount to the cabinet doors. We mounted them with velcro. These will hold items such as dish soap and boxes of tea. We thought we were so clever, getting them to fit with the other items stored in the cabinet…until we tried to open the left cabinet door when the right cabinet door was closed. The bin wouldn’t clear the closed cabinet door and it is mounted as far away from the opening as possible. So we have to remember to open the right cabinet door first every time we get into the cabinet. We’ll see how annoying this will be over time. Maybe we’ll think of a solution before it drives us nuts.
Mod Twenty Four: Turned some of the compartment locks so they would be more consistent.

It seems that the locks on the exterior compartments were oriented randomly. We turned some of them to make them more consistent. Unfortunately, we only know how to rotate them 180 degrees. So some are oriented vertically, while others are oriented horizontally. At least now all the horizontal ones are oriented in the same direction and the all the vertical ones are oriented in the same direction.
Mod Twenty Five: Added glow-in-the-dark tape to bedroom steps and the entry door header.
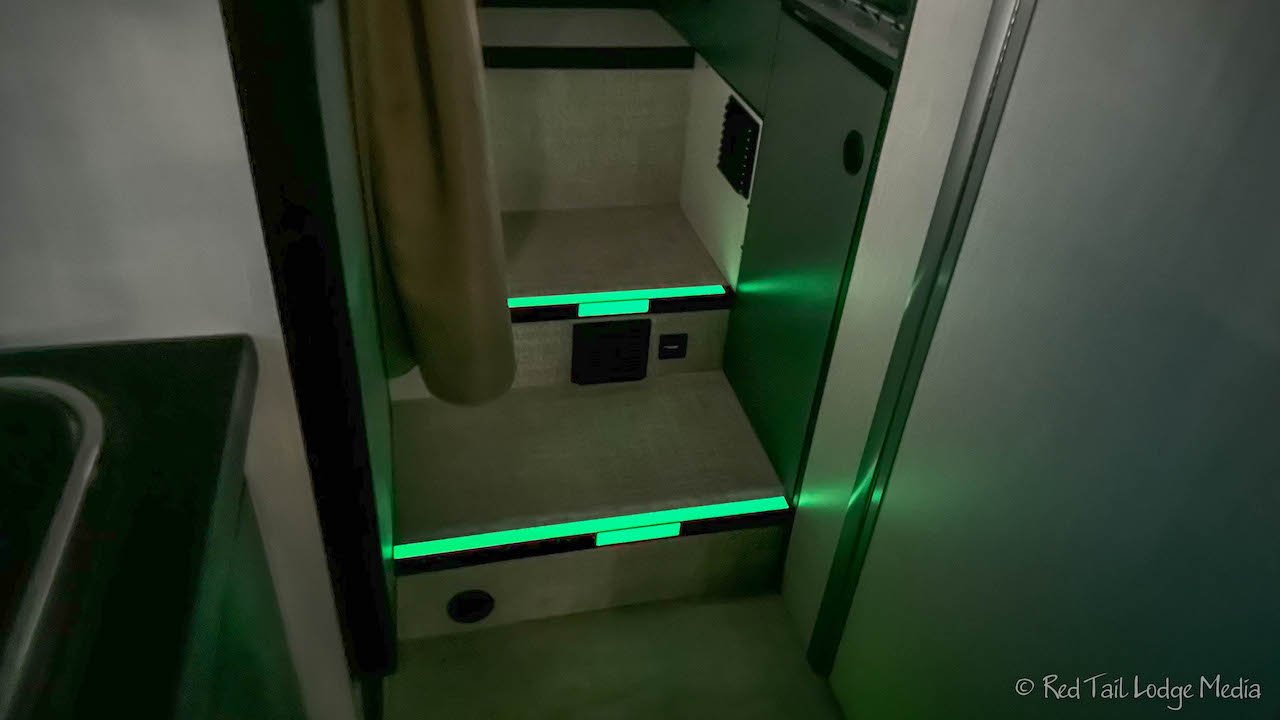
We’re not sure how much this will help as the tape (paid link) only glows for a limited time after turning off the lights. Hopefully it will keep us from tripping on the bedroom steps when we get up in the middle of the night. We’re also not sure if the tape on the entry door header will do any good either. We are both tall and Ann has already bumped her head on the thin metal header twice. Putting some kind of cushioning on the metal edge would be nice, but that would interfere with the entry door closing properly.
Mod Twenty Six: Removed hook on door of water compartment and installed an organizer.

The hook is removed by lifting straight up. This exposes another piece with screws that are easily removed. We also removed two more similar hooks on the water panel, just to get them out of the way. The organizer is from Organized Obie, their 36” x 12” Get Wet Organizer with the white rigid SNAD fasteners (unpaid link). We installed the organizer pretty flat against the door of the water compartment. We wish we would have mounted the fasteners a little closer together, giving the organizer pockets a little more slack to expand. Initially we added to screws, one on each side about half way down for extra support, but then we removed them because there wasn’t enough give in the pockets to load them. Instead, we just added a screw in the middle. If you install this, we would recommend loading the pockets with your desired items first, then attaching the SNAD fasteners to the door with the loaded organizer to make sure you have enough slack. The organizer holds our water-related gear, such as our water fill hose, the water siphon hose, a water filter, the AquaGo decalcification tablets, and the AuqGo Anti-Freeze Cartridge.
Mod Twenty Seven: Had ceramic tinting added to the cab windows.
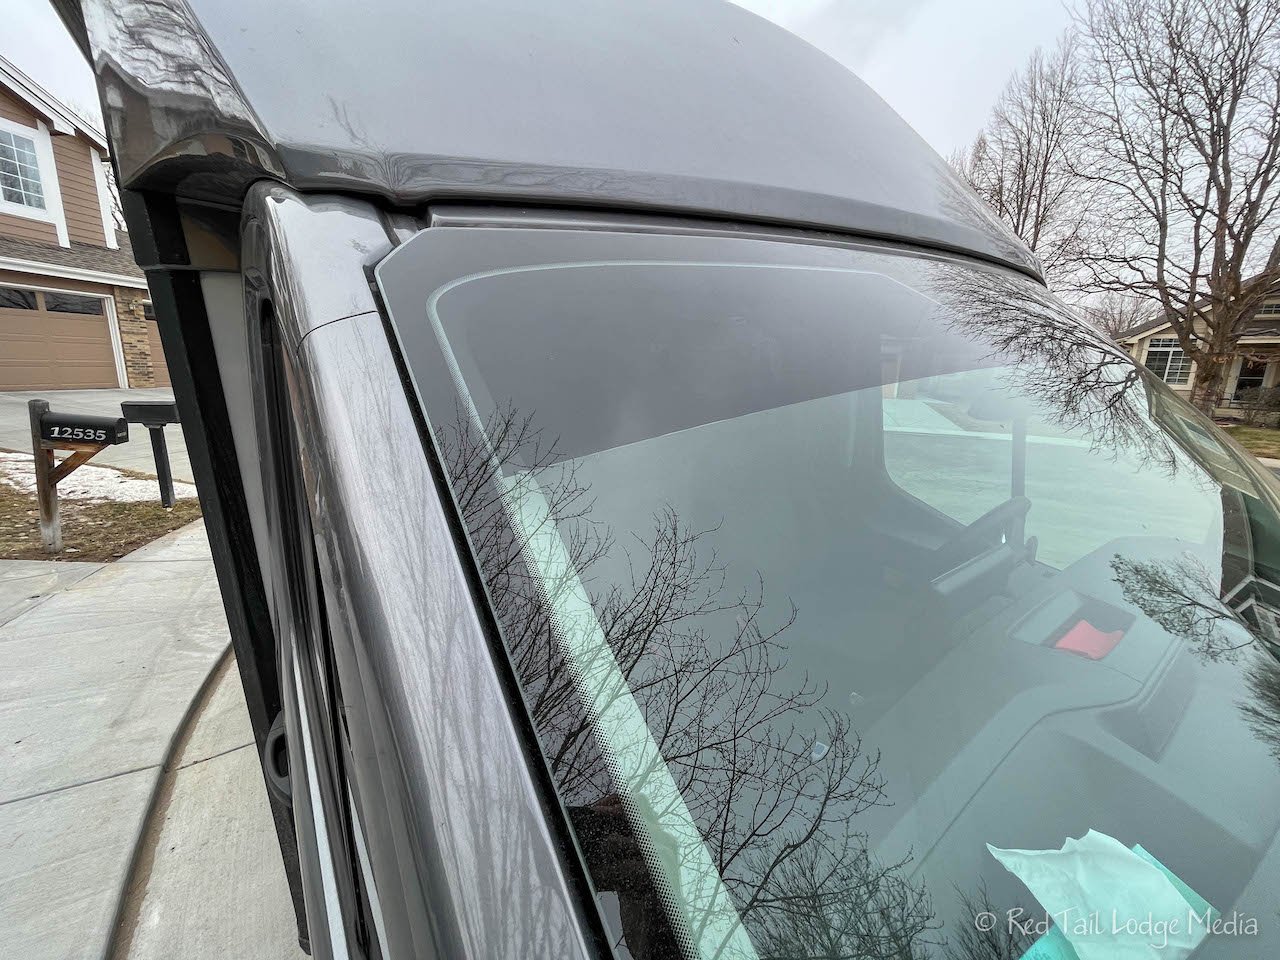
Our previous rig was also built on a Ford Transit, so we know how hot the sun can get shining through the front cab windows while we’re driving down the road. On our camper van, we installed a window tint film ourselves, but this time, for the EKKO, we had it professionally done. The tinting covers both front door windows along with an eyebrow across the windshield. With the ceramic tinting, you can greatly reduce the solar gain while keeping the tint level fairly clear. Unfortunately, even with the clear ceramic coating, it is still illegal to cover the full windshield, only an eyebrow is allowed, at least in Colorado. We kept it legal.
Mod Twenty Eight: Built a spice rack.

Measuring the wall space behind the sink, Ann was pretty sure she could fit all 15 of the spices that she likes to travel with. However, it would be pretty tight.

We also still had the broken fairing from our camper van. It was made from acrylic with a decorative decal on top. The decal removed easily to reveal the clear acrylic underneath. Building a spice rack out of acrylic would take up less space than building one from wood, with the added advantage of the clear acrylic allowing the labels on the spice jars to be easily seen. It also feels good to repurpose materials that might otherwise end up in a landfill.
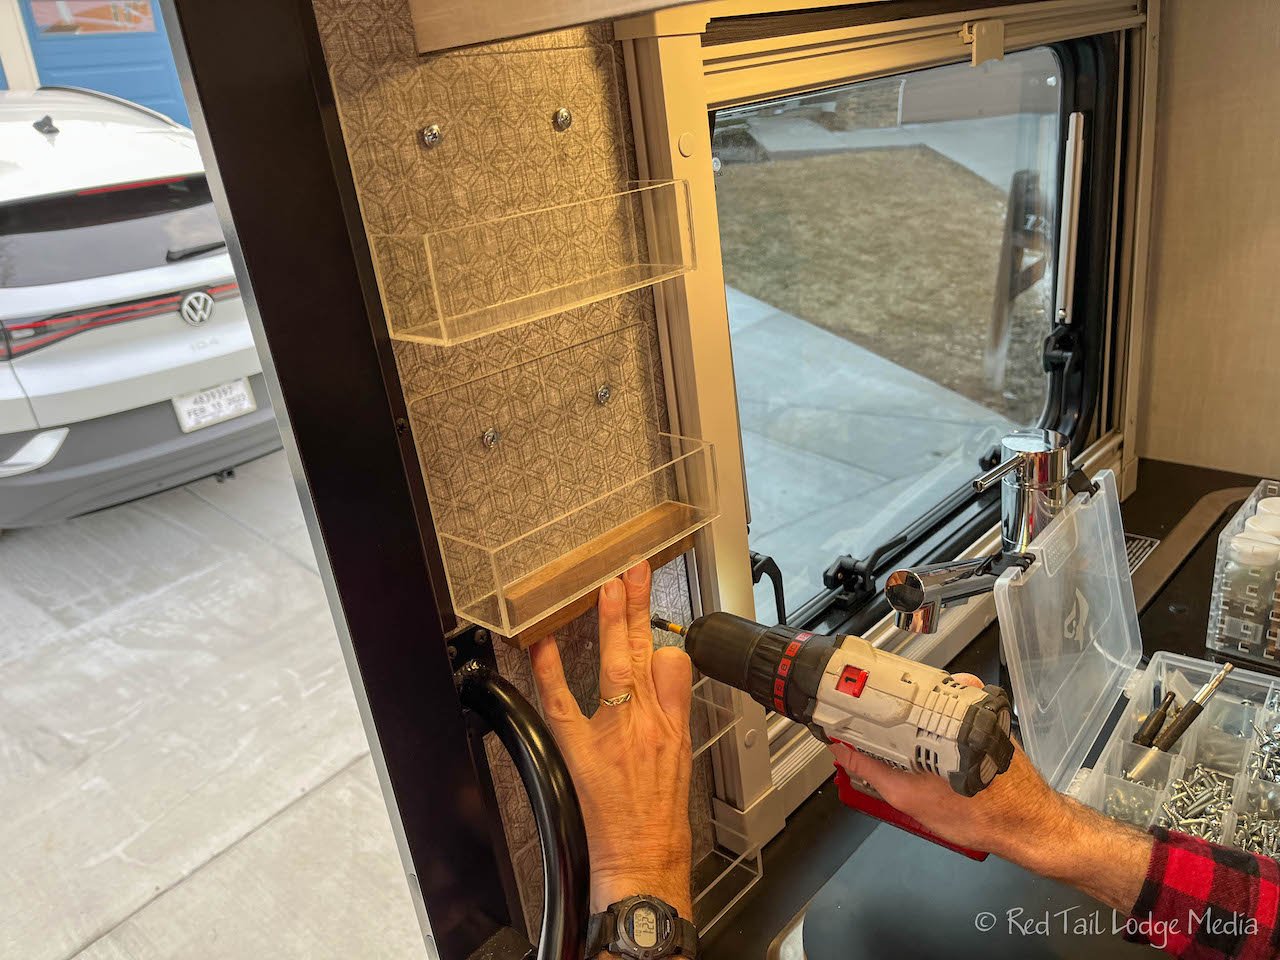
Keith had never worked with acrylic before, but, after watching a few YouTube videos and conducting a couple of experiments, he was able to easily build the needed spice racks. The difficulty was not the build itself, but getting the dimensions right because the space was so tight. The front piece of the rack on the bottom had to be cut a little shorter to allow enough space to get the spice jars in and out of the rack because there was not as much room between the bottom two racks as the others. Also, the outside edge of the cabinet above the racks prevents getting one of the spice jars directly in or out of the top rack. A jar next to it must be removed first. Ann will just need to put the least used spice jar there.
Mod Twenty Nine: Installed hooks under the microwave cabinet to hang our net bag.

The best way we have found to transport fresh produce is in a hanging net bag (paid link). It is not fun arriving at a camp site and discovering that the tomatoes you brought for the evening meal are split open and leaking. The hardest part is finding a location to hang the bag that is out of the way, conveniently located for preparing food, and is not too close to anything the bag will bump into while swinging around. Unfortunately, we could not think of a place that met all three criteria. So we opted for two different locations, one for when we are on the move, and another for when we are set up for camp. So we installed two hooks under the microwave cabinet for the net while we are on the move. It has plenty of swinging room and is not in the way while moving about the interior. However, it is in the way when cooking. Another two hooks were installed at the end of the cabinet near the spice racks for hanging the net while we are stationary. This is convenient to reach the items when cooking and out of the way for using the counter, stove and sink. However, it is too close to the wall for traveling. Having two locations instead of one is not ideal, but it should work. We like to minimize the number of steps for setting up and leaving camp. Moving the net bag has been added to our setting up camp and breaking camp checklists.

For hooks, we used ceiling hooks (paid link) that attach with four screws each. Since there can be quite a bit of weight in the bag, we wanted to make sure the screws did not pull out of the wood of the cabinet. Having four screws instead of just one or two distributes the load and helps prevent any torquing. To make sure the screws did not poke through the cabinet, we used shorter screws than what came with the hooks.
Mod Thirty: Built a shelf in the gear garage.

After loading and securing the e-bikes into the gear garage, there isn’t much space left for other things, like our camp chairs. The chairs are too tall to stand up vertically inside the gear garage, so the logical choice is to store them horizontally above the bikes. Initially we hung a Jeep roof hammock, that we had on hand from, the L-track. The chairs fit on it, but it was not easy to slide them in and out as they would get caught on the material. We were also concerned that they could easily slide off the hammock. We turned again to our familiar camper van materials of T-track (80/20) and ABS plastic to build a shelf. The T-track frame for the shelf is bolted to the L-track on both sides of the gear garage ceiling. Again, the trickiest part of the build is getting the measurements right. The rigid T-track is not forgiving and must align exactly with the existing L-track locations, so many test fits and adjusting were performed. Getting the height of the shelf right was also critical. The shelf needed to be low enough to allow the camp chairs to fit, but high enough to clear the loaded e-bikes. It was a tight fit. The shelf does not extend the full width of the gear garage to make sure it is not in the way while loading and unloading the e-bikes. The shelf not only holds our two camp chairs, but also holds our Moon Shade.
Mod Thirty One: Removed the two bedroom cushions and replaced with two soft-sided storage boxes.

The EKKO comes with two cushions in the bedroom that can be used to fill the space between the two twin beds to make a queen-sized bed. The other side of the cushion is hard so that it can be used as a place to set things, such as drinks. However, we like to sit in the beds with our backs against the front wall of the bedroom, so we don’t see ourselves making use of these cushions. It just seemed like another space we could use for storage. We replaced the cushions with two soft-sided storage boxes (paid link) to store more clothing items. The box lids still allow us to set something on top, like a laptop for viewing YouTube videos while sitting in bed.
Mod Thirty Two: Had a vinyl decal added to the back of the EKKO.

On our previous rig, our VanDOit camper van, we had a partial vehicle wrap with some of our logos and a large picture of a red tailed hawk, from one of Ann’s photos. Ann wanted to put something on our EKKO, especially the hawk, but Keith was not too keen on the idea. We settled on something a little more subtle, a small decal that fits on the rear door of the gear garage that has the hawk and our Backroad Buddies logo. FastSigns printed the decal and installed it for us. It was much cheaper than the vehicle wrap we had before. Now the EKKO really feels like our Red Tail Lodge Two.
Mod Thirty Three: Installed screen across hole behind dinette bench.

There is a long, open slot behind the dinette bench that we are assuming is there to provide ventilation for the inverter that is located under the bench (the inverter is in an exterior compartment in earlier models of the EKKO). We store the Lagun-type table top behind the bench and sometimes the leg of the table slips down into the hole. We were also concerned that other items might fall down in there, so we covered the hole with a metal screen. The screen still allows air to flow through, but prevents all but the smallest of things from falling through.
Mod Thirty Four: Mounted Red Tail Lodge collage in bedroom.

We needed a personal touch inside Red Tail Lodge Two to make it feel more like our own. What better way than a collage as a tribute to Red Tail Lodge (One), our camper van. We used Shutterfly to print the collage on acrylic. Acrylic is lighter than wood, metal, or a framed picture and shouldn’t break if it falls off the wall.

The hardware that came with the collage uses screws to mount it to the wall. We didn’t want more holes in our RV walls and were concerned that the screws make work themselves loose over time. So we decided to mount it using Command picture hanging strips (paid link). Unfortunately, there are holes in the corners of the acrylic which accept the aluminum barrels and hide the mounting screws. We didn’t want the empty holes, and attaching the barrels causes the picture to not sit flush against the wall. So we sawed off the ends of the stems of the aluminum caps that screw into the barrels, so the stems would not stick out the back, and super glued the caps over the holes. Now that the acrylic picture sits flush on the wall, we can use the Command strips.
Mod Thirty Five: Replaced DC power switch.

This mod may have been premature, but we’ve read several people on the Winnebago EKKO Owners and Wannabes who have accidentally shut off the DC power. The switch sits on the side of the galley cabinet, in the pathway of the entry door. Purchasing a simple switch that locks, along with a simple install, seemed like a good preventative measure.
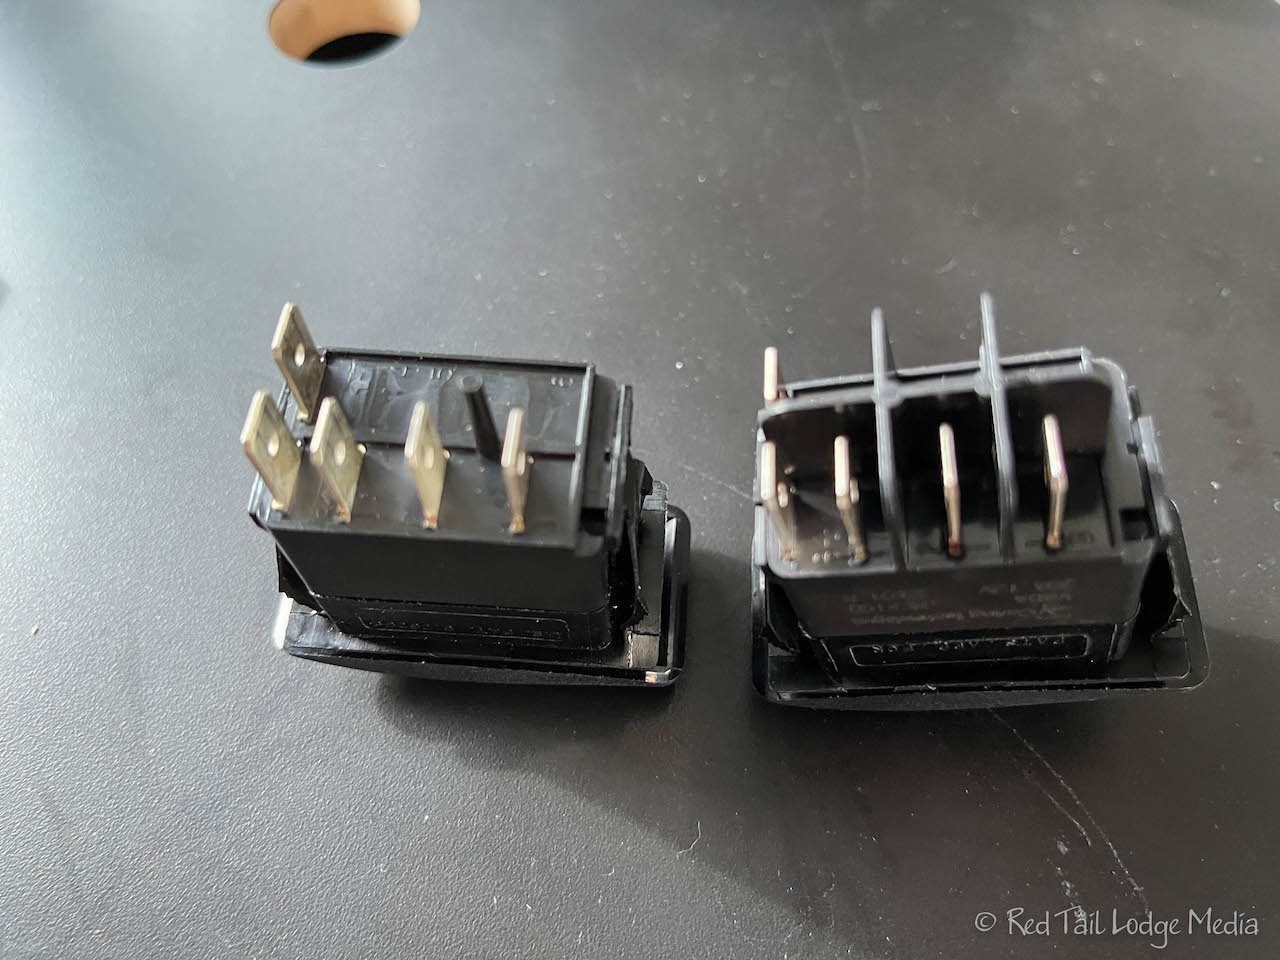
One of the Facebook group members, Bill Gobie, found the compatible switch at Spemco (spemco.com/v8dahw6b-ad100-0-locking-rocker-double-momentary-spring-return-to-center-off-black-lock/?fbclid=IwAR1DE3C2enZzs1KE65JEEtDI8Ne86Arr9C9wu7T-5Y5IsK3rBb8JVipNtvM - unpaid link). Thanks Bill! The hardest part of the install was removing the plastic blades on the new switch. They needed to be cut down flush in order for the wiring harness to reattach completely.
Mod Thirty Six: Installed inside screen door latch.

The first thing we noticed during our shakedown trip was how complicated the entry doors were. Coming from a camper van, it was hard to believe that not having a handle on the inside of the screen door to open it was standard practice on an RV. We know how convenient the magnetic screen opening on our van was, going in and out the door multiple times, carrying supplies and food to a picnic table. We could imagine what a pain that would be with a screen door that requires sliding open the small opening to access the screen door handle each time, and sliding it back closed to keep the bugs out. We copied the FitRV and bought the Camco screen door opener (paid link).

The instructions call for a 9/16” inch drill bit, but the largest bit we own is a 1/2” bit. So we had to use a step drill bit (paid link), the same one we used to drill holes in the bottom of our camper van when we were installing the Espar heater (Espar Heater Installation: Campervan Project #6). If you do enough projects, eventually you get to reuse some of the tools you purchase!
So there you have it. Will we never need to make another modification to Red Tail Lodge Two? We would like to say that we won’t, but we know that is not realistic. Would we recommend making all these modifications and perhaps more, to your EKKO or rig? No. Everyone has different priorities and comfort levels. Everyone likes to travel differently and haul different types of gear. We recommend you travel in your rig first and discover your preferences and pain points. Hopefully this list of modifications will give you some ideas on how to solve the issues you may have with your rig and your desired lifestyle.
Check out our related video: Our EKKO Modifications
(Ann)