
More EKKO Mods for Season Eight
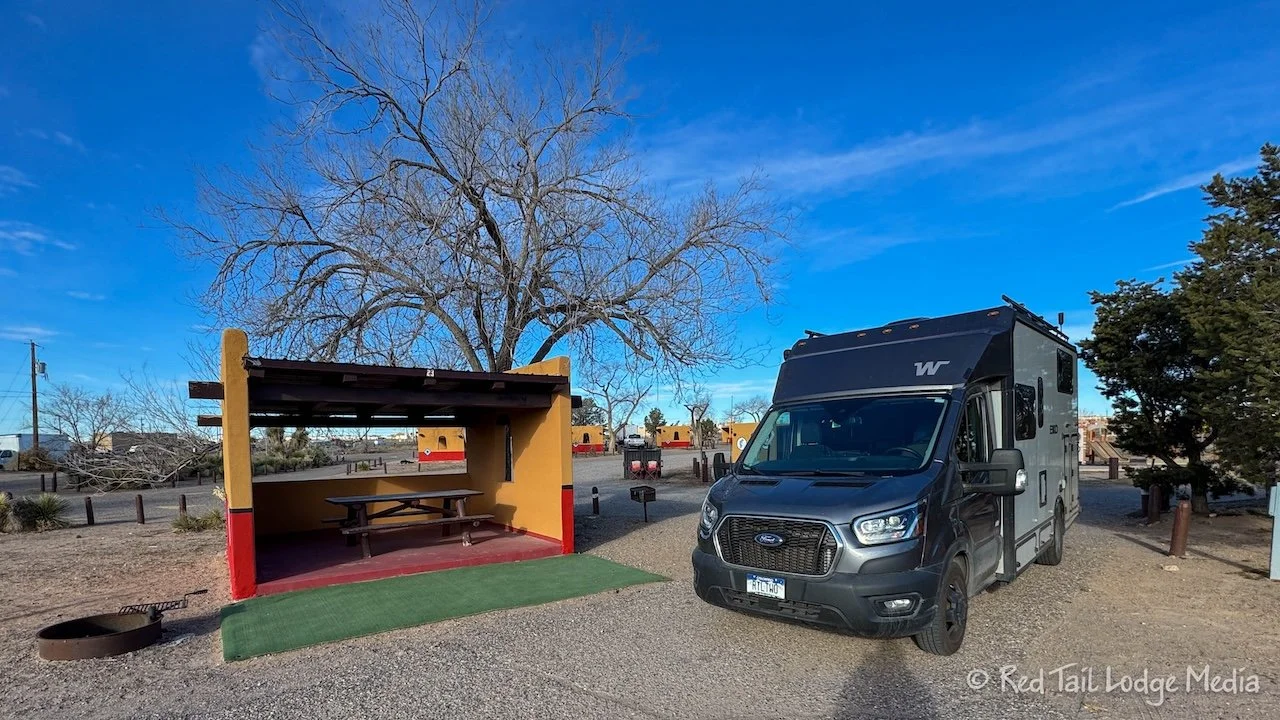
We’re sharing the modifications we’ve made to Red Tail (our Winnebago EKKO) for Season Eight, 2026, in hopes that they might help you. Since we didn’t RV during Season Seven, we had two winters home to make lots of mods, so this is part 2 of 2. The first post (EKKO Mods for Season Eight) covered the mods we made during Season Six (2024) and after we returned home from Season Six before leaving for Europe for Season Seven (2025). This post covers the mods we made after we got home from Europe, before starting our Season Eight travels for 2026.
Mod Twelve: Replaced Gray Tank Sensor
Mod Thirteen: Installed Peplink
Mod Fourteen: Replaced Exterior Compartment Door Seals
Mod Fifteen: Fixed Rear Camera
Mod Sixteen: Changed Shoe Storage
Mod Seventeen: Replaced Broken Superslider door
Mod Eighteen: Installed FitRV Window Shades
Mod Nineteen: Replaced Balmar Alternator with Nations Alternator
Mod Twenty: Solar Wiring Recall
Mod Twenty One: Re-organized Tools
Mod Twenty Two: New height/width/length/tire pressure Labels
Mod Twenty Three: Replaced Seat Grommets
Mod Twenty Four: Fixed Delamination on Dining Table
Mod Twenty Five: Installed Phone Mounts for Dash
Mod Twenty Six: Replaced Broken Freezer Door
Mod Twenty Seven: Installed Flip Up Mount for weBoost antenna
Mod Twenty Eight: Made New Bedroom Storage Boxes
Mod Twenty Nine: Made New Bedroom Curtain
Mod Thirty: Had Shroud Crack Repaired
Mod Thirty One: Had Cracked Dinette Window Replaced
Mod Thirty Two: Fixed Gulper Pump
Mod Twelve: Replaced Gray Tank Sensor
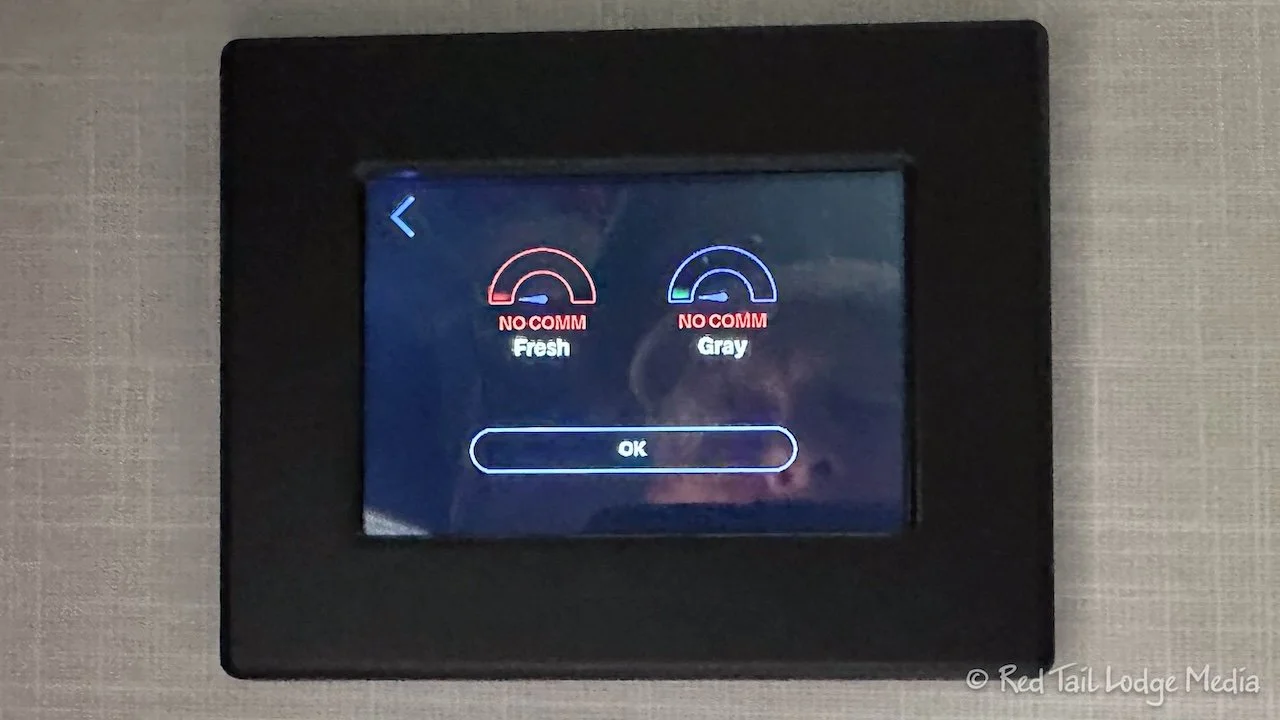
As we mentioned for Mod Nine: Old School Fresh Tank Monitor in our previous EKKO Mod post (EKKO Mods for Season Eight), both our fresh tank and gray tank sensors had stopped working during Season Six. Mod Nine only addressed the monitoring of the fresh tank, not the gray tank. So we replaced the sensor on the gray tank. However, we don’t have high expectations that it will last for very long. That is not a big concern for us, because we always dump our gray tank every time we fill our fresh tank. Since they are approximately the same size and we never directly hook up to city water, we should never overflow our gray tank.
Mod Thirteen: Installed Peplink

Also in our previous EKKO Mod post, Mod Two: Starlink was the purchase, installation, then removal of Starlink. After coming back from our Season Seven European trip, we decided not to get Starlink again, at least for now. At the end of Season Six, we also got rid of our Verizon Jetpack, as it was getting rather old and not performing very well. That left us with just our AT&T cell phones for connecting to the internet.
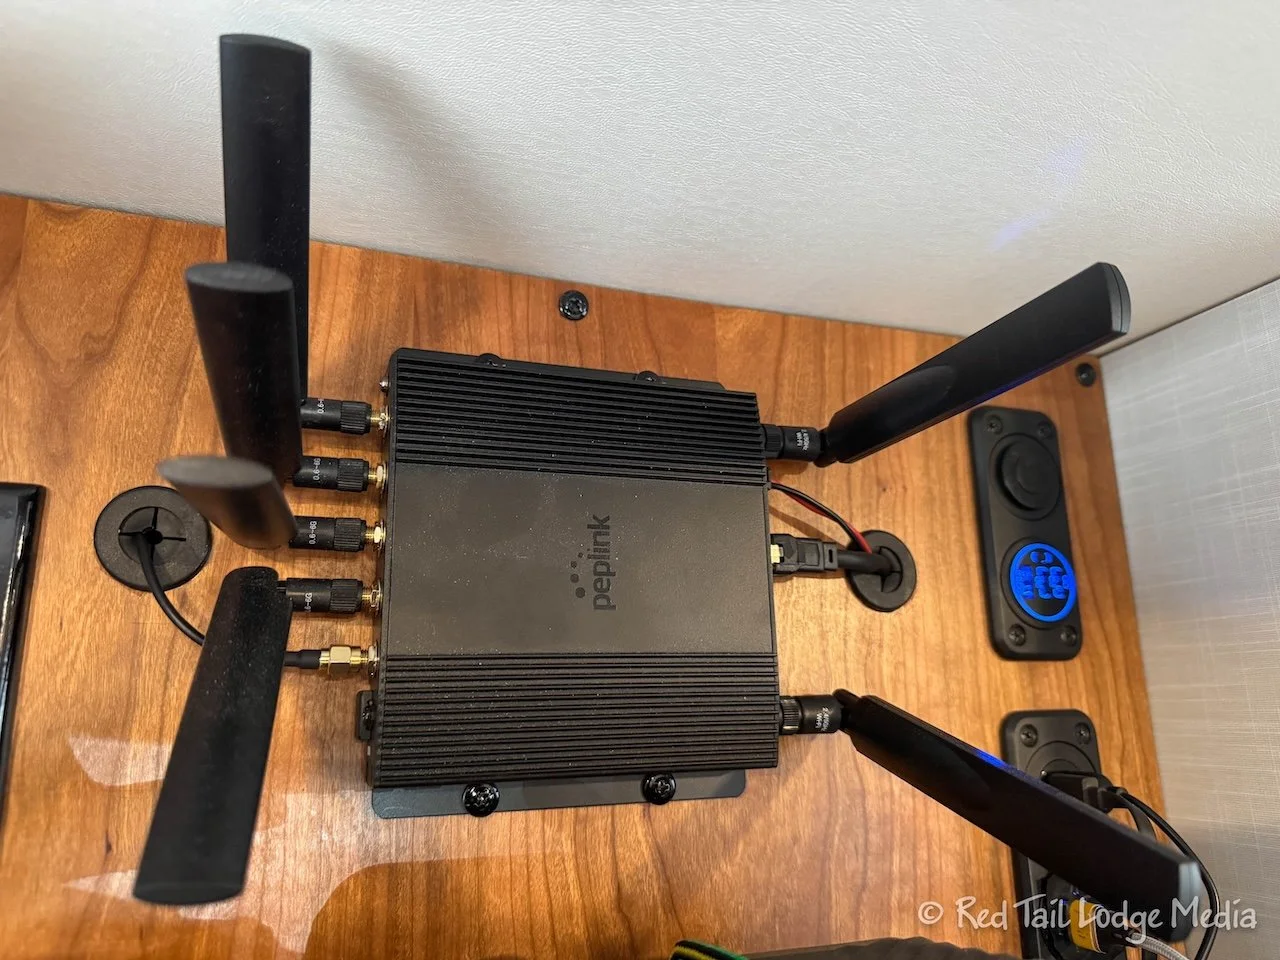
After doing some research, especially at the Mobile Internet Resource Center, we decided to give Peplink a try. Peplink has a line of router products that combine multiple networks together, such as cellular, Wi-Fi, and Starlink, for increased performance and reliability. The router we chose was the Peplink MAX BR1 Pro 5G All-in-One Solution (paid link).
The router itself doesn’t provide internet connectivity by itself. So we also signed up for an unlimited 5G T-Mobile plan through the Calyx Institute (unpaid link). They provided the SIM card that we put into our Peplink router. We like having at least two different cell carriers, because different areas around the country have better coverage for different carriers. For now, we just plan to have the T-Mobile and AT&T (from our phones). Peplink will allow us to add other carriers or satellite options later, if we feel we need it. However, we’ve already taken a short trip with the Peplink/T-Mobile and we were seeing download speeds approaching what we were getting with Starlink. So far, we are impressed. We’ll see how it goes and we get more experience with it.
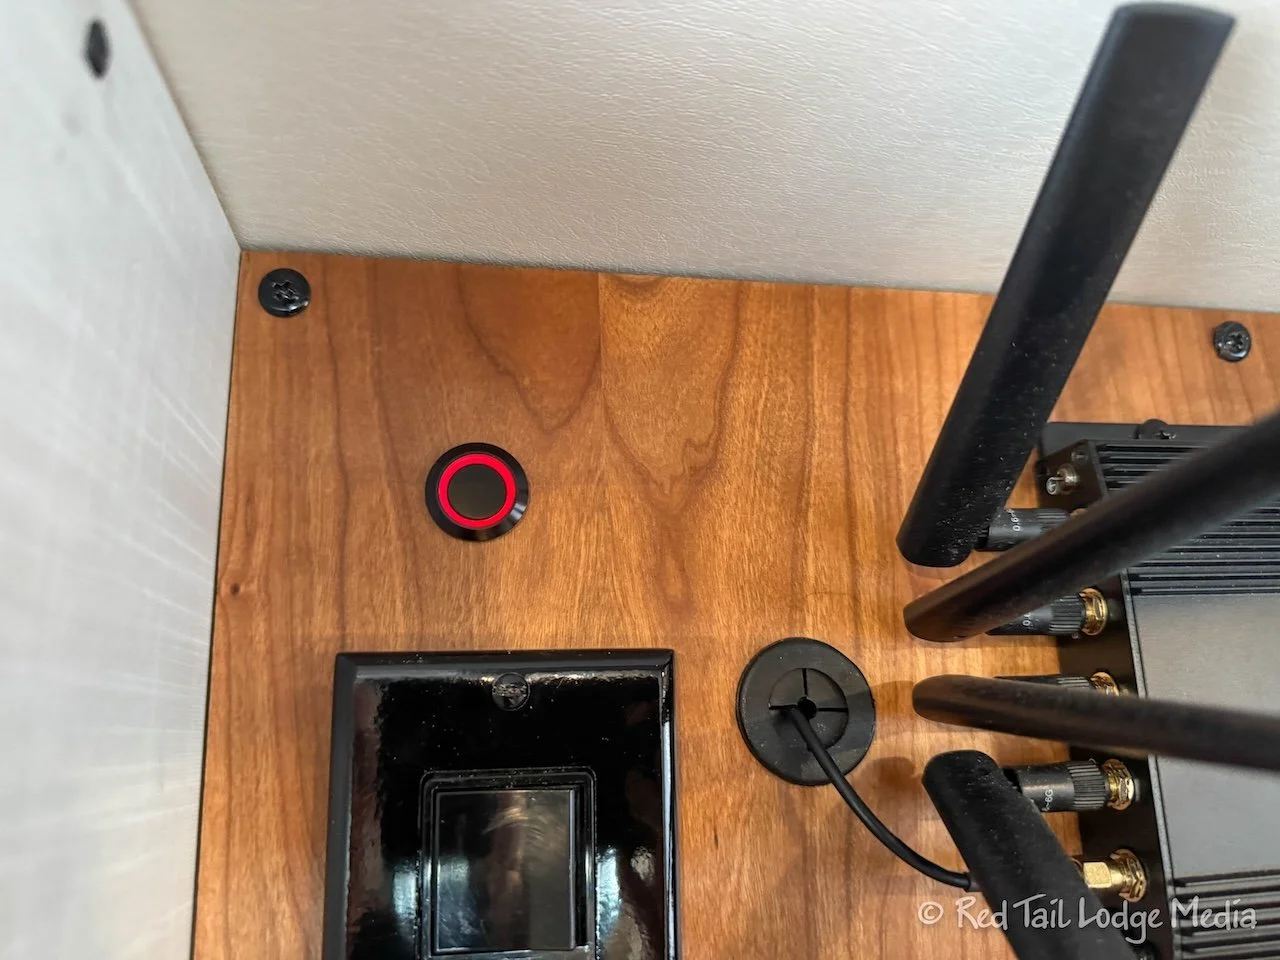
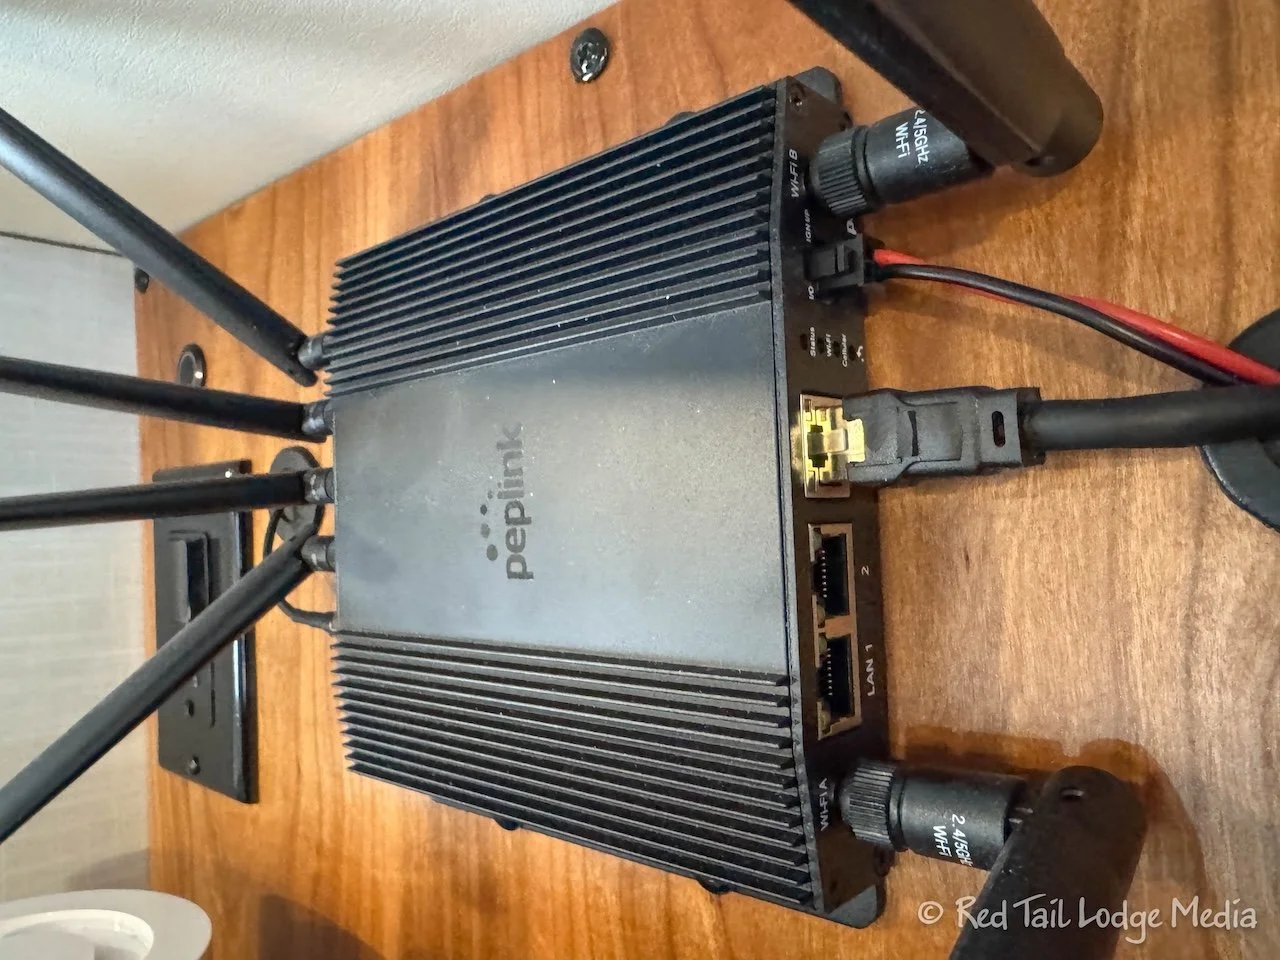
We installed the Peplink router on the wall above the shelf between the beds, where we had the Starlink router before. To make it look a little nicer, we replaced the wall panel (which had many holes in it by now) with a piece of nice plywood. We connected the Peplink router to a 12V circuit and mounted a lit push button switch so we could easily turn the router on and off and see at a glance whether it was powered or not.
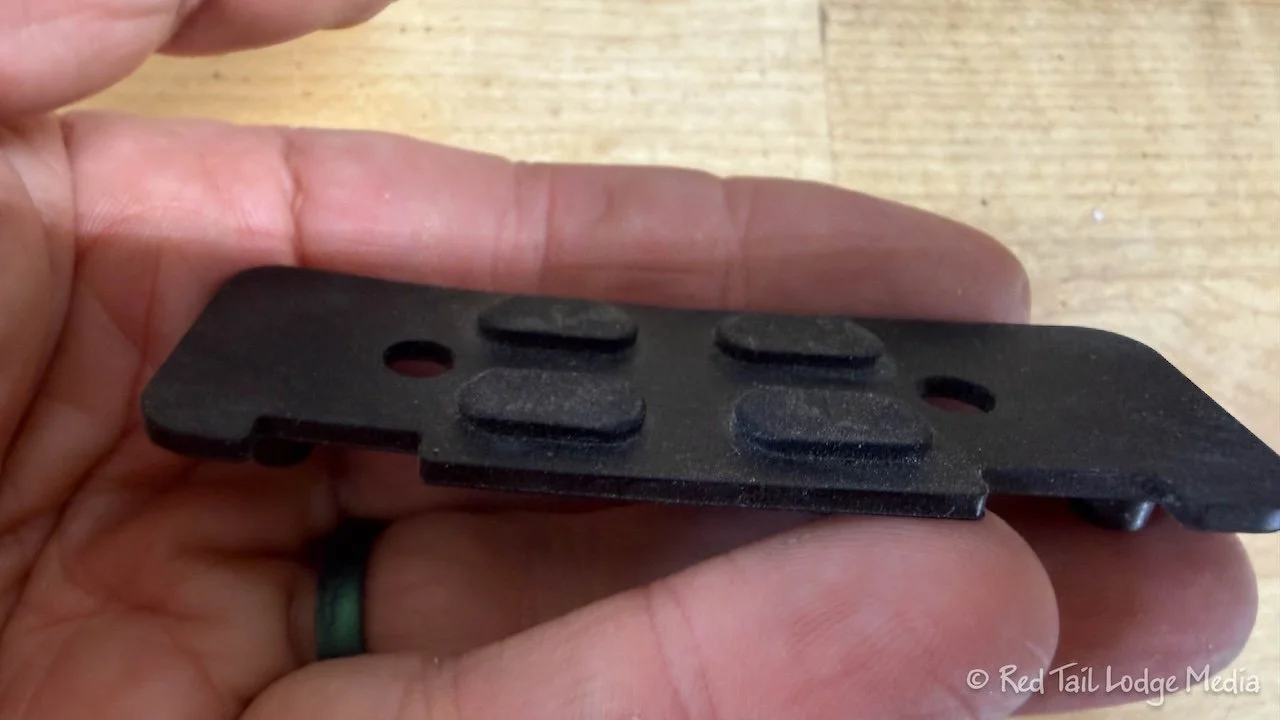
Mod Fourteen: Replaced Exterior Compartment Door Seals
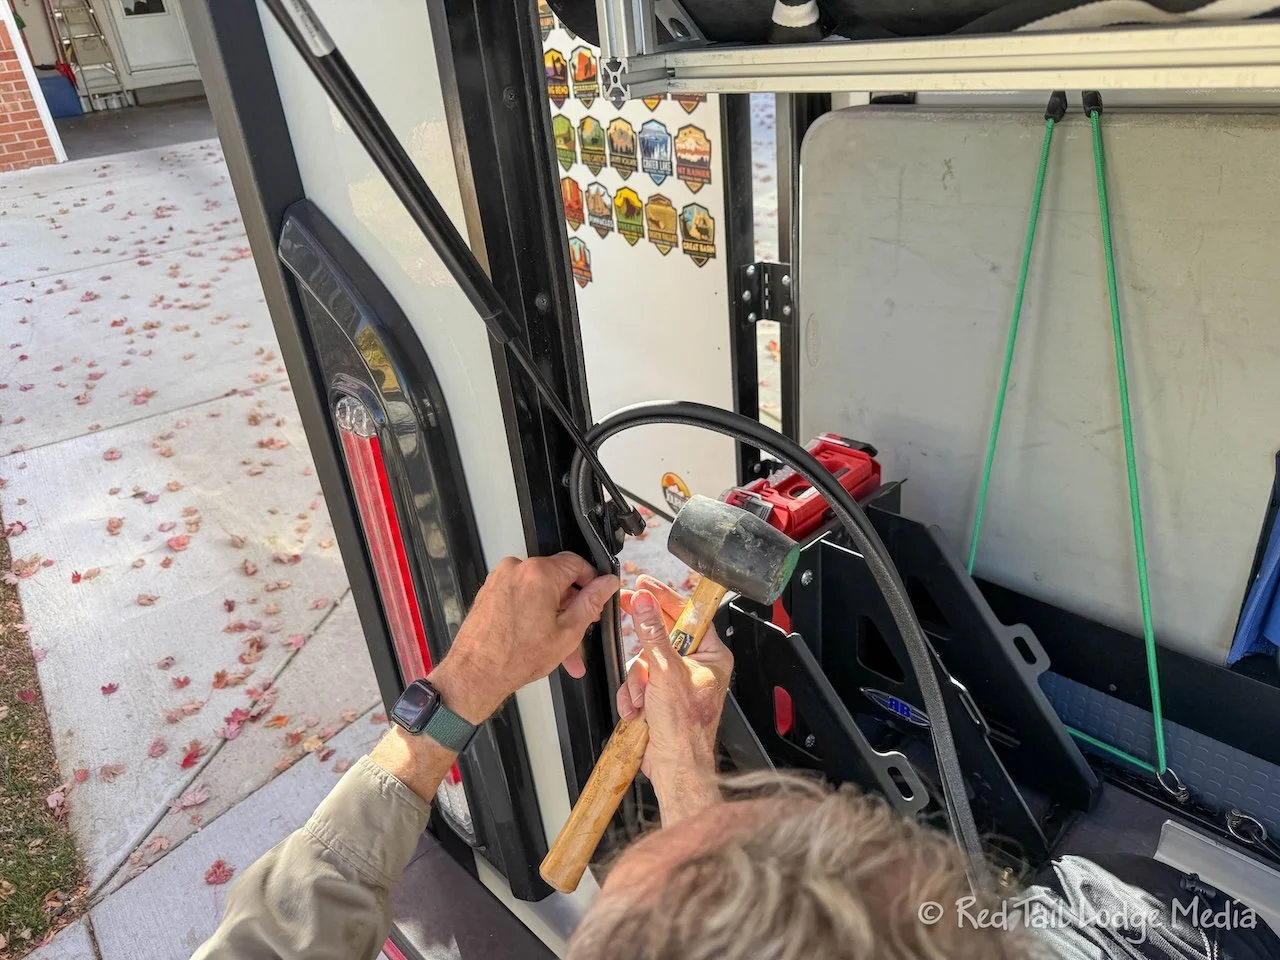
Over the course of a couple of years, the seals on the doors of the exterior compartment doors were starting to come loose. Keith repaired them a couple of times, but then decided on a more (hopefully) permanent solution. The original seals were attached using an adhesive, which was failing. James over at the Fit RV found a better seal that attaches using a pinch clamp (https://www.thefitrv.com/rv-tech/upgrading-door-seals-on-our-ekko-with-freedomvango/). Thank you, James! It was a pretty easy install, with the only tricky part being the garage rear door, as there were a couple of struts to work around.
Mod Fifteen: Fixed Rear Camera
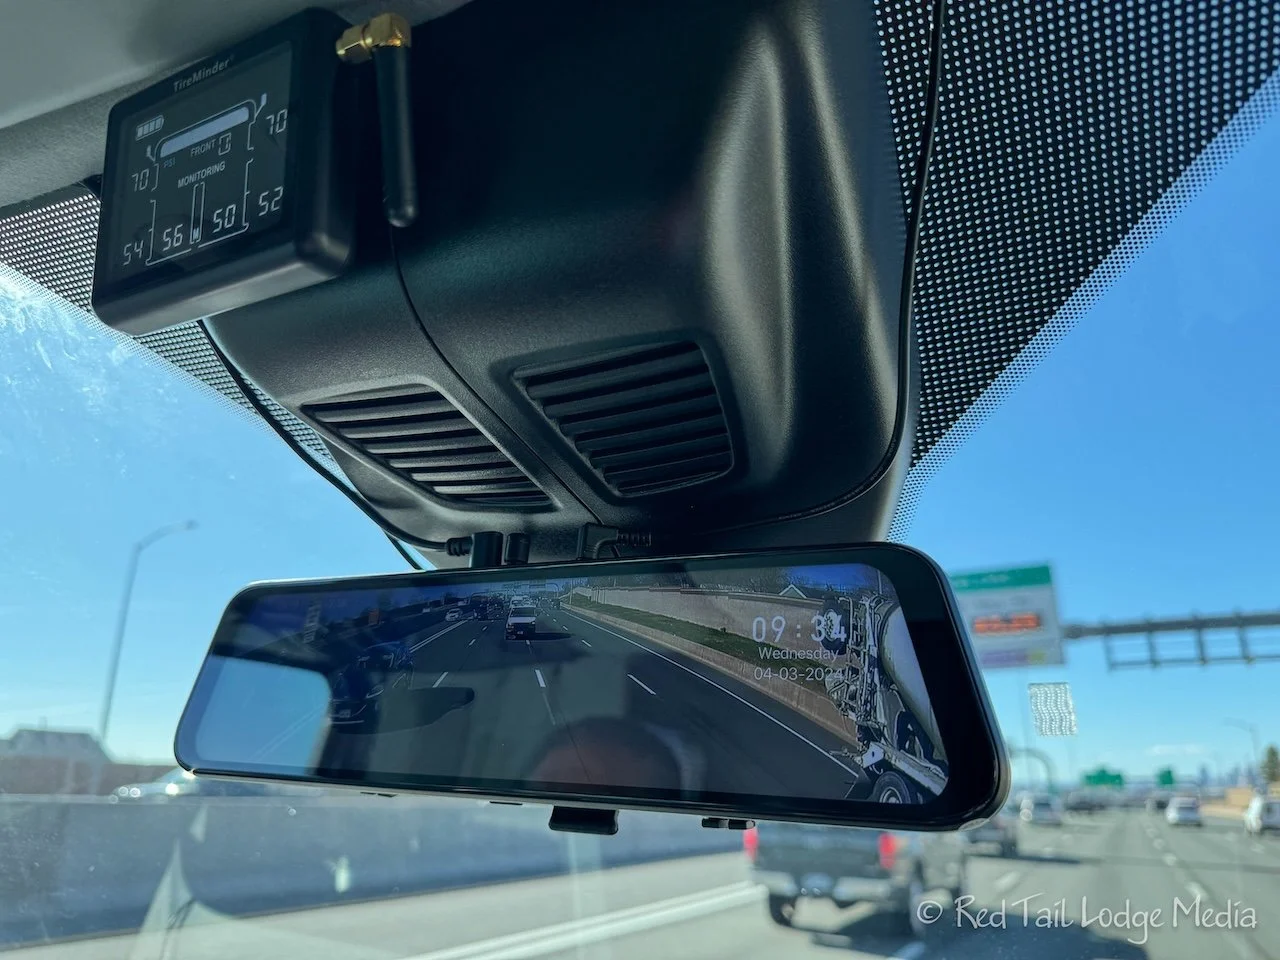
For Season Six (2024), we had installed a rear view mirror camera, the Wolfbox G900 (paid link). We love being able to see what is behind us as we are driving down the road, just like we had a real rear view mirror (that wasn’t blocked by the rear wall of the RV). However, part way through Season Six, the rear camera started intermittently failing (but the front facing camera was working fine). Then the rear camera stopped working altogether. We contacted Wolfox and they sent us a new rear view mirror display. When we got home, we replaced the display, but that didn’t fix the problem. So we ordered a new backup camera. But replacing the camera didn’t fix the problem either. The problem had to be the wiring from the display back to the camera. The wiring was the hardest thing to replace, which is why we were hoping it was either the display or the camera.
So we bought new wires and re-ran them. It wasn’t too bad as we could pull the new wires through by attaching them to the old wires.
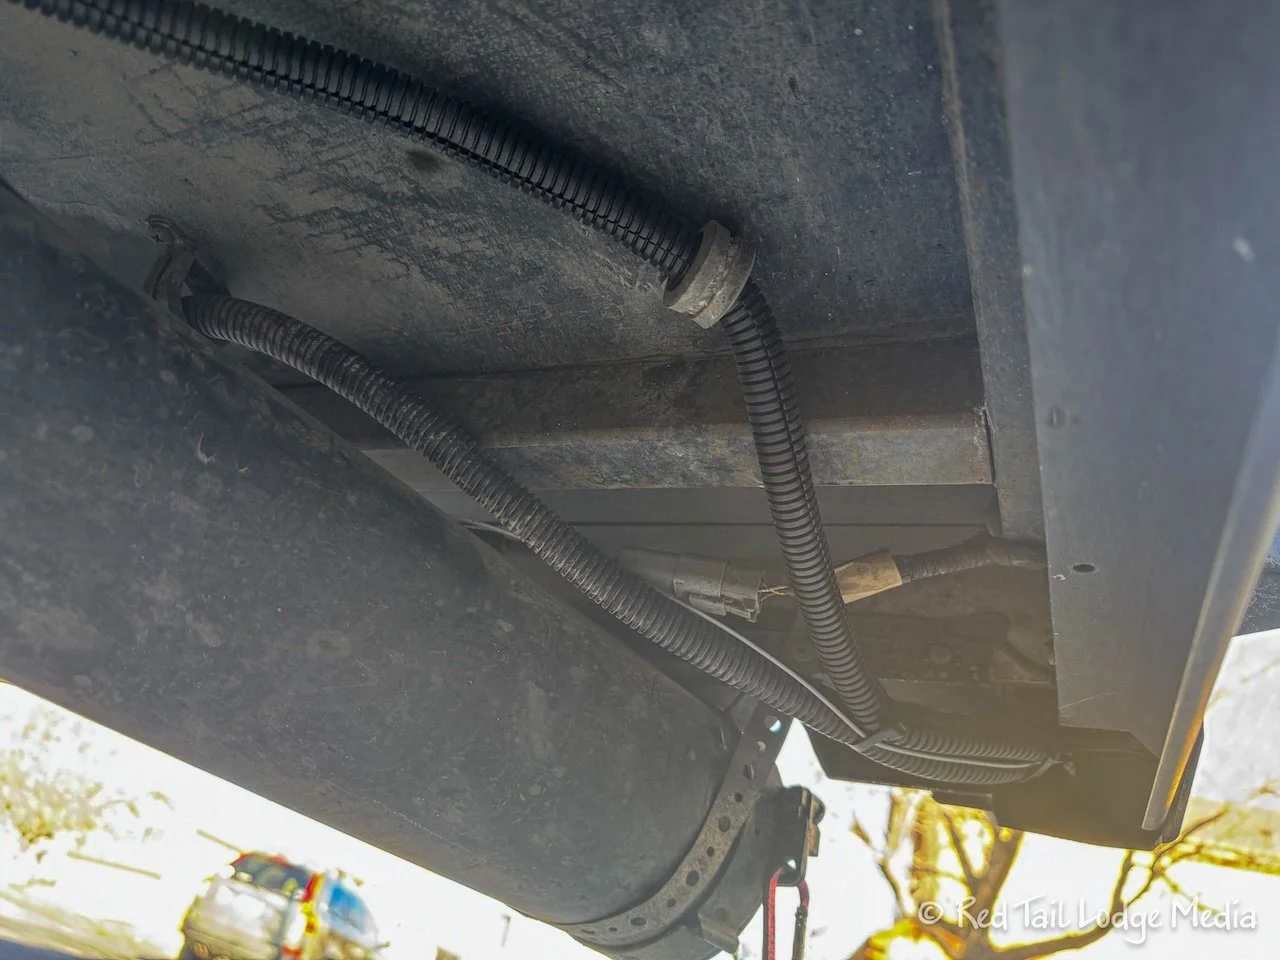
This time we encased the new wires in a plastic wire loom. We’re suspecting that the wires were damaged either by the heat from the catalytic converter or from rodents. The wire loom should help with that along with making sure the wires were routed further away from the catalytic converter.
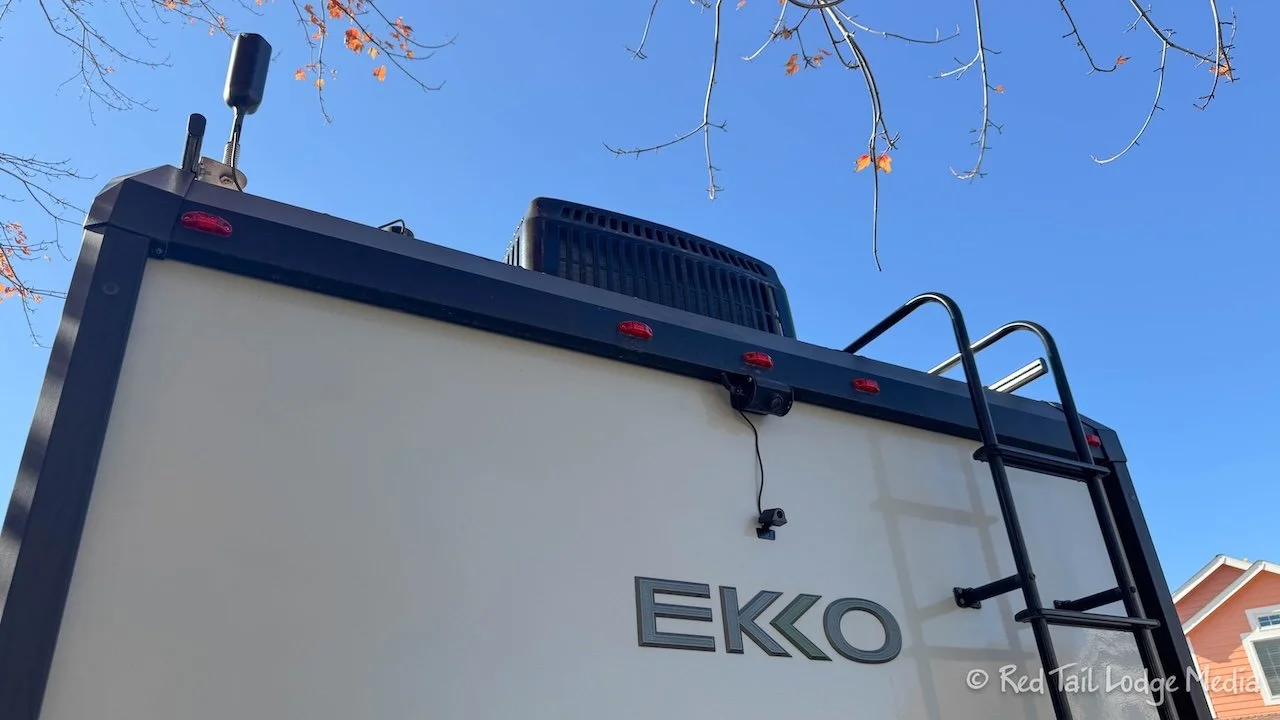
While we were at it, we decided to lower the location of the rear camera just a little. Originally we had it above the Ford back up camera, up on the black plastic trim. We moved it down closer to the EKKO logo on the white panel. We believe this gives us a better view of the road behind us.
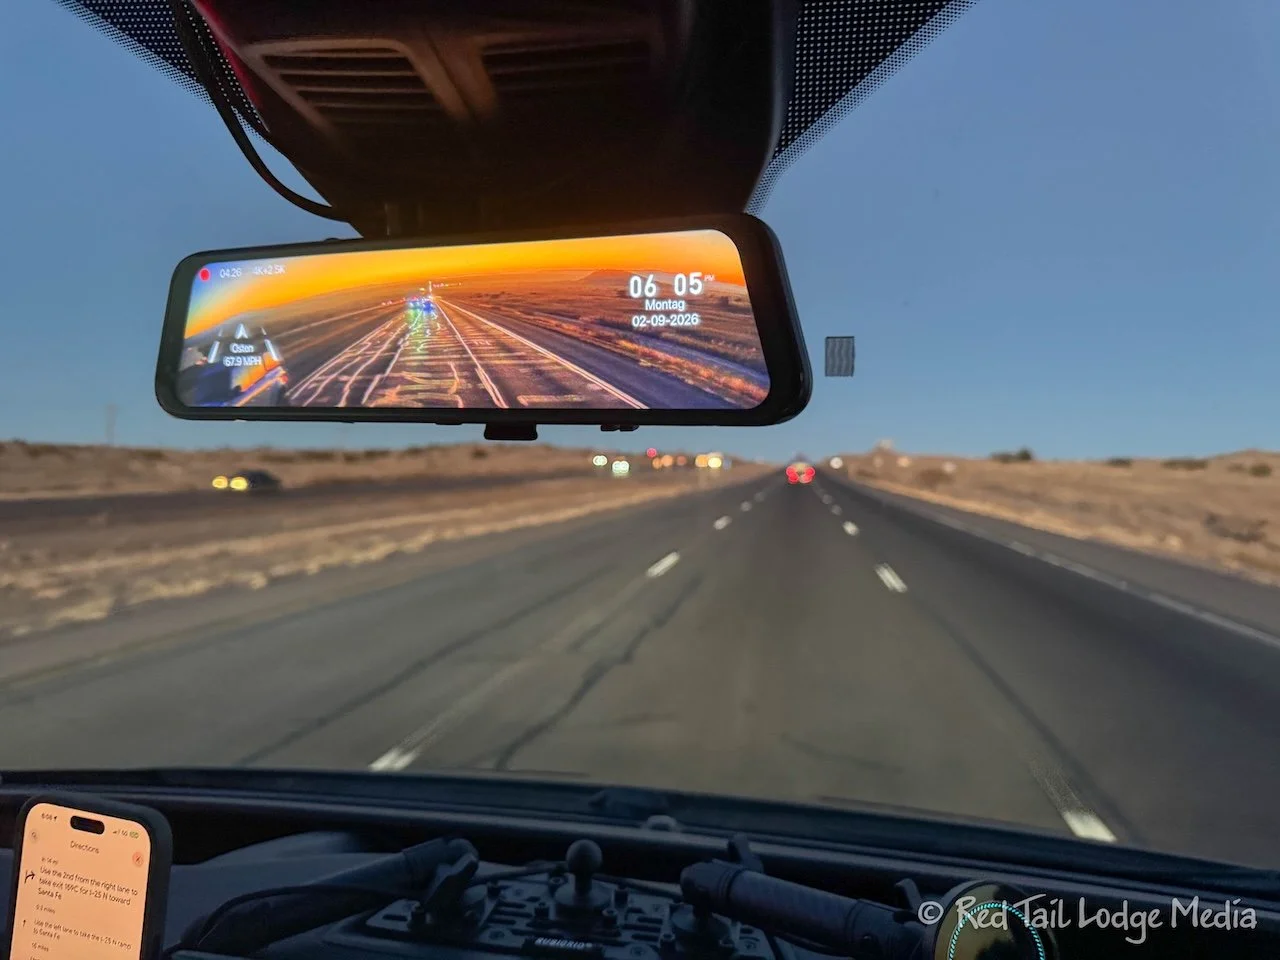
After replacing the wires, the system started working again. Yay! We’re keeping our fingers crossed that we won’t have any more problems. While we were at it, we added the Wolfbox Anti-glare film, which seems to make a noticeable difference for the better.
Mod Sixteen: Changed Shoe Storage
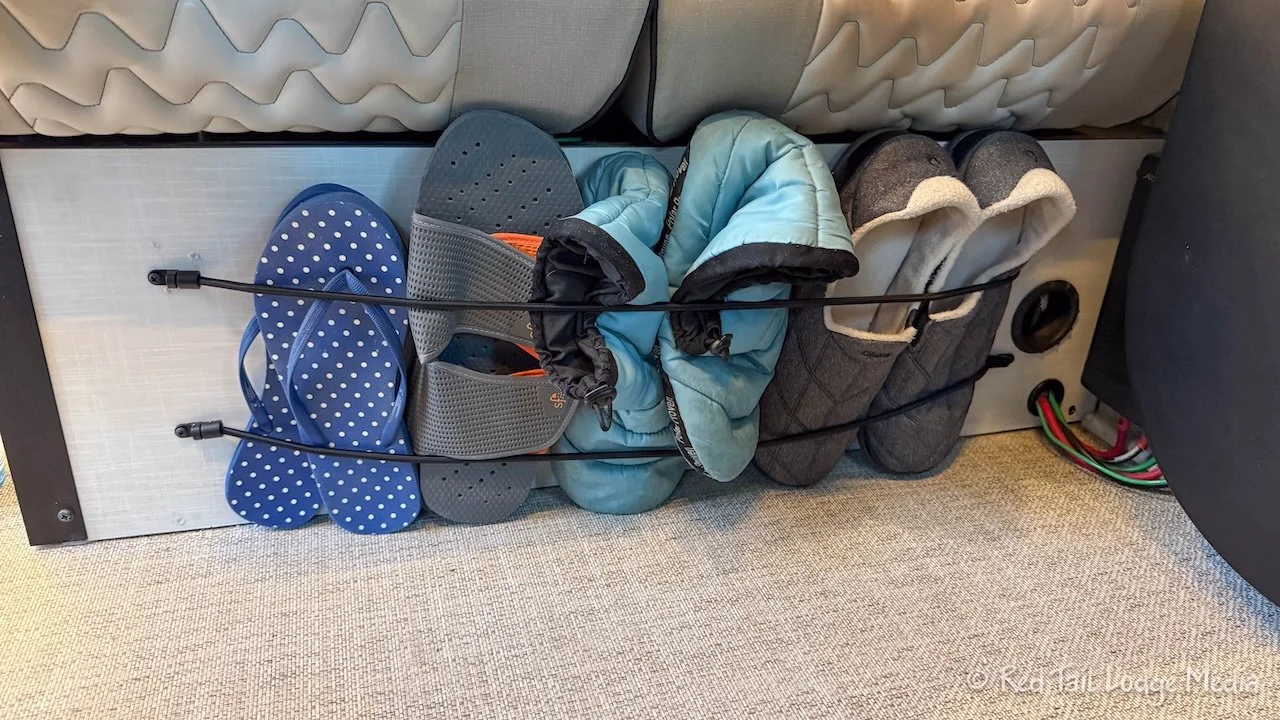
Back when we prepared our EKKO for Season Five (2023), we added a stretchy net on the front side of the bench seat in the dinette area, near the floor (Our EKKO Organization - Ten: Dinette). It held our slippers and shower shoes, keeping them out of the way, but still easy to access. However, over the next couple of years, the net stretched out and didn’t hold the items very well any more. Instead of just replacing the net with a new one, we came up with a simpler solution. We just strung two bungee cords across. It holds the shoes well and is a much cleaner look, in our opinion anyway. Hopefully, the bungee cords will last longer than the stretchy net did. At least they should be easier to replace.
Mod Seventeen: Replaced Broken Superslider Door

The Superslider (paid link) is a tube that we mounted underneath Red Tail to hold our sewer hose. During Season Six (2024), we had scraped the Superslider on a steep slope, which deformed the tube and broke the little door that closes off the end of the tube. Keith was able to bend the tube back into shape and carabiners held the door on until we returned home. It was a simple matter of ordering a new part and installing it.
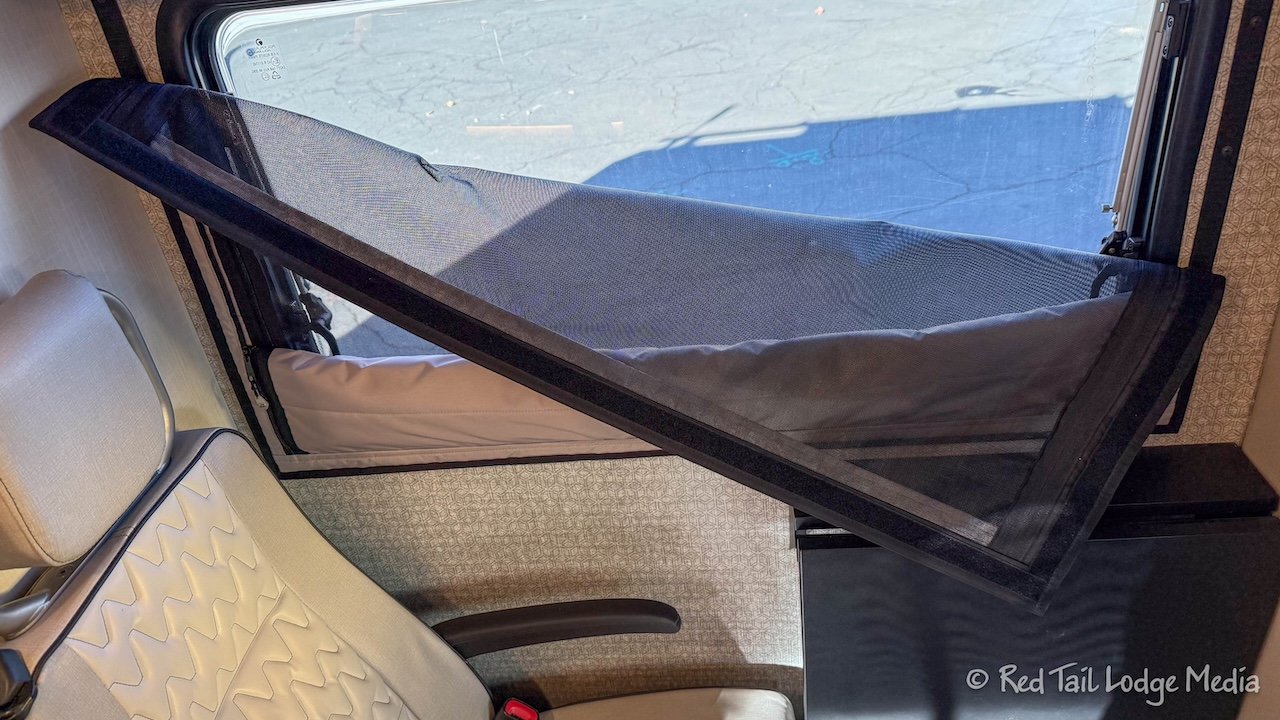
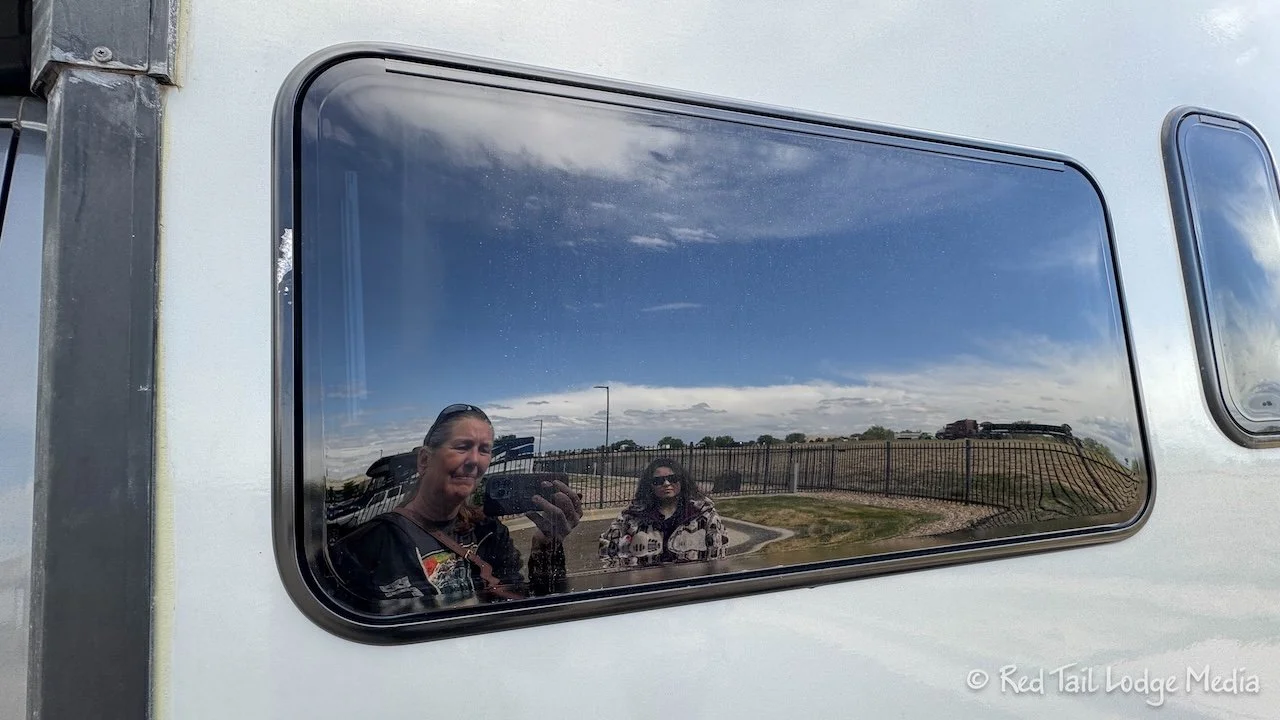
Mod Eighteen: Installed FitRV Window Shades
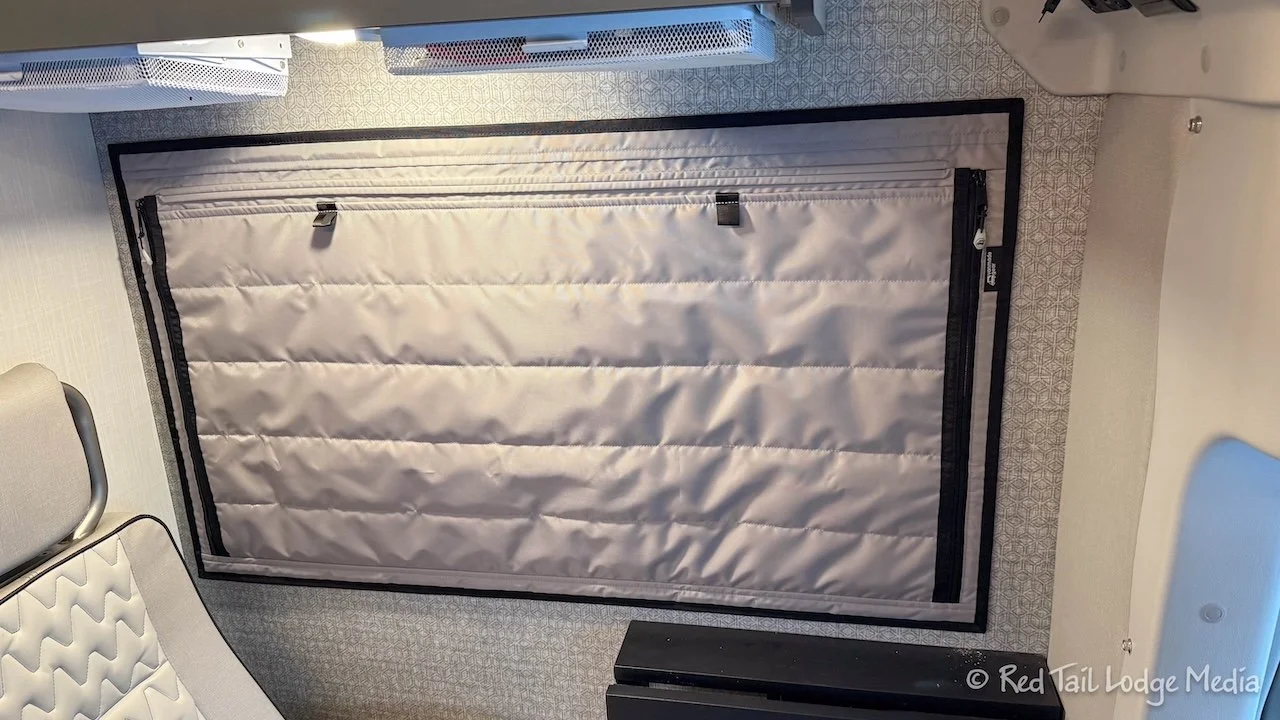
The Winnebago EKKO comes with typical RV cassette shades over the windows. A screen pulls down to cover the window and a shade pulls up. During our first year of ownership, the strings in both the bedroom shades had broken and Winnebago replace both shades as part of the one year warranty. We stored Red Tail for eight to nine months during 2025 while we toured Europe. The RV was stored outside. When we retrieved our EKKO out of storage, the window shades on the south side of the rig were a little stiff and brittle. We figured it wouldn’t take long before they started failing. So we decided to replace all the shades with something better, The FitRV Window Shades.
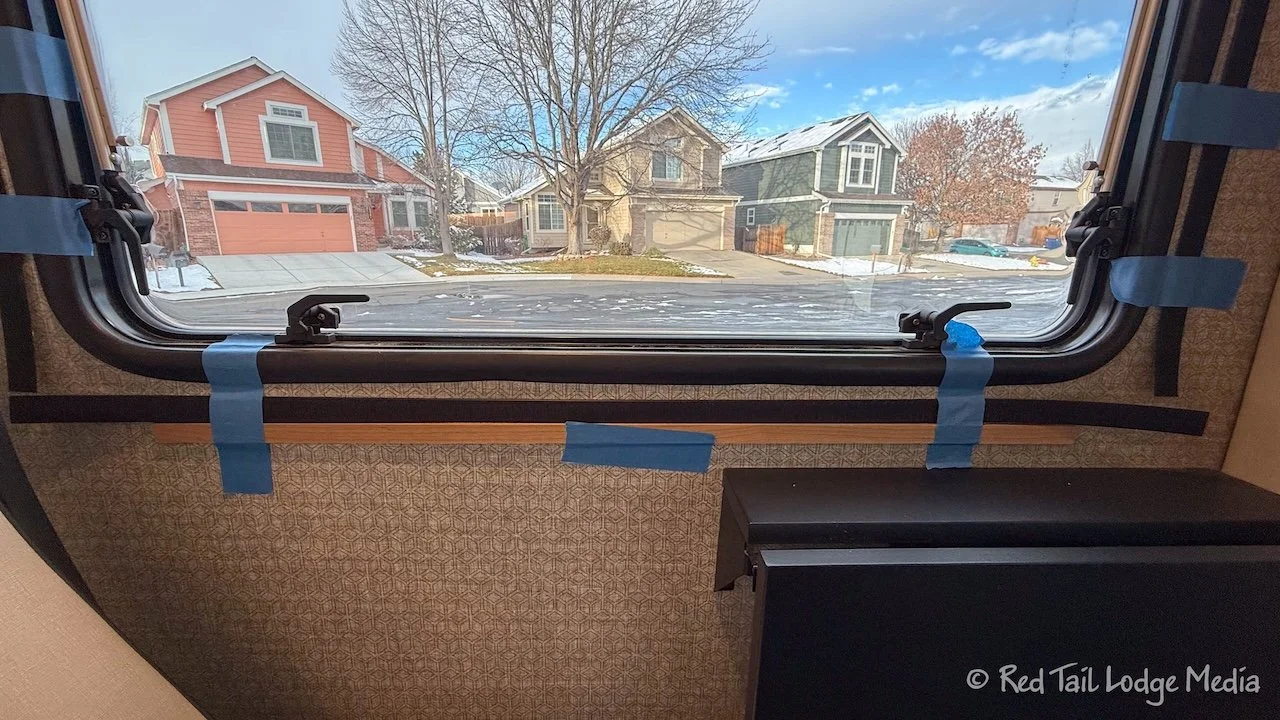
James and Stephanie at the FitRV partnered with VanMade Gear to design better window shades for the EKKO (https://www.thefitrv.com/rv-tech/our-window-shades-now-available-through-vanmade-gear/). We bought them from VanMade Gear and installed them. The installation was pretty simple. The cassette shades easily unscrewed from the wall, removing the five screws in the face frame. The new shades go on with velcro strips that mounts to the wall using screws. Keith used painters tape to temporarily hold the velcro strips in place as he verified the exact positions.

The shade for the kitchen window and the bedroom shade on the passenger side needed to be installed slightly off-center. The spice rack we have in the kitchen prevented the centering of the kitchen shade. The issue in the bedroom was the cup holder we had mounted on the wall was in the way.
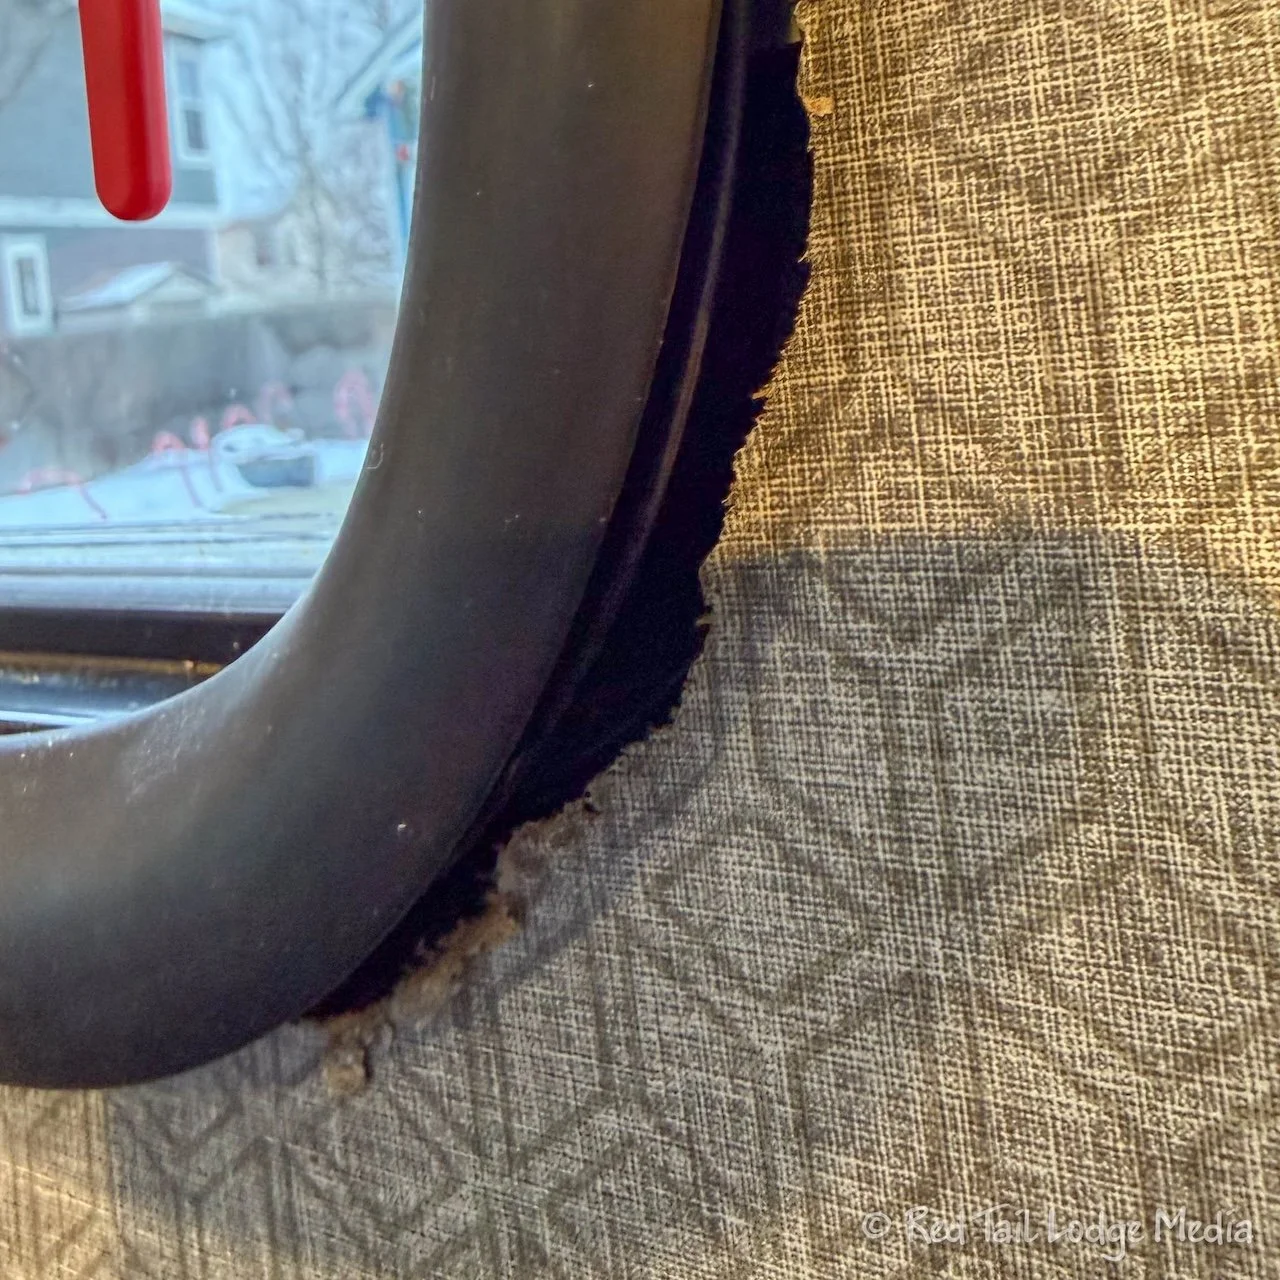
Once we removed the cassette shades, we were surprised to see gaps around the windows that were hidden by the shades. The new shades covered up those gaps for the most part.
The shade for the dinette window was missing the velcro strips at the top to hold the rolled up screen securely. We shipped it back to VanMade Gear and they shipped us a new one.
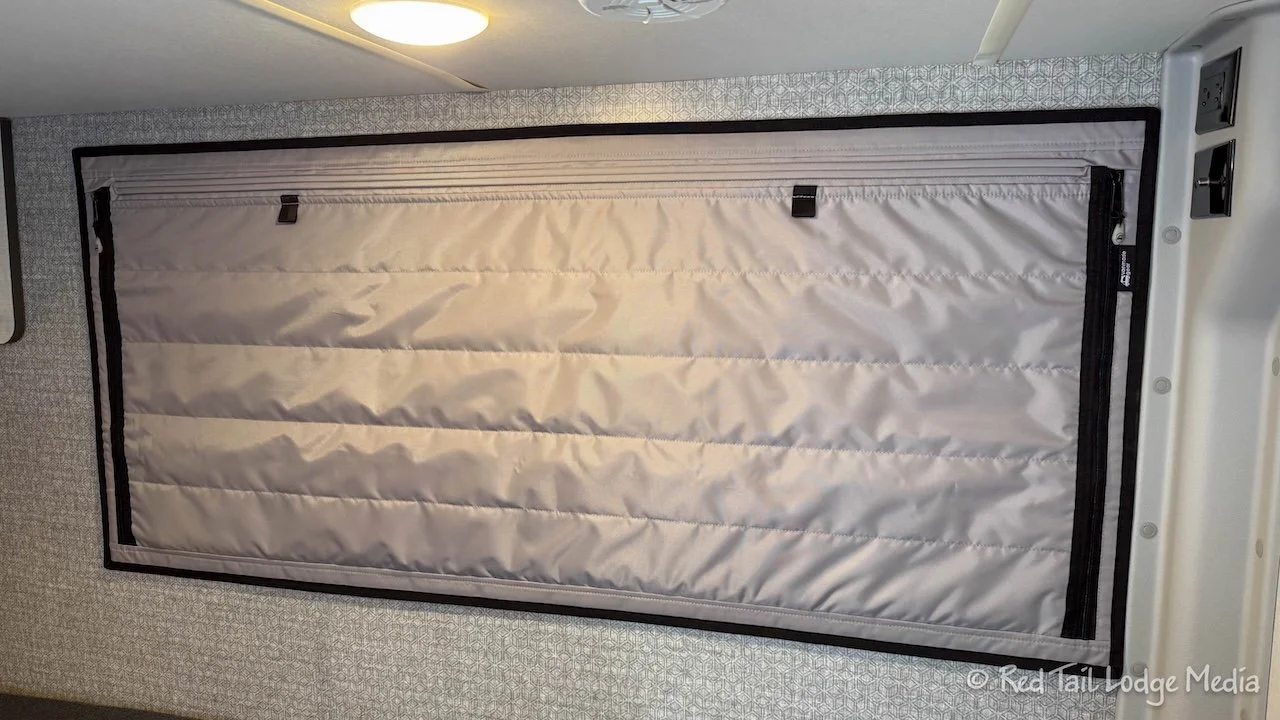
So far, we are really happy with the new shades. They insulate better, block out the light better, and do a better job at keep in the bugs out. They take just a little more effort to open and close than the original shades, but not by much.
Mod Nineteen: Replaced Balmar Alternator with Nations Alternator
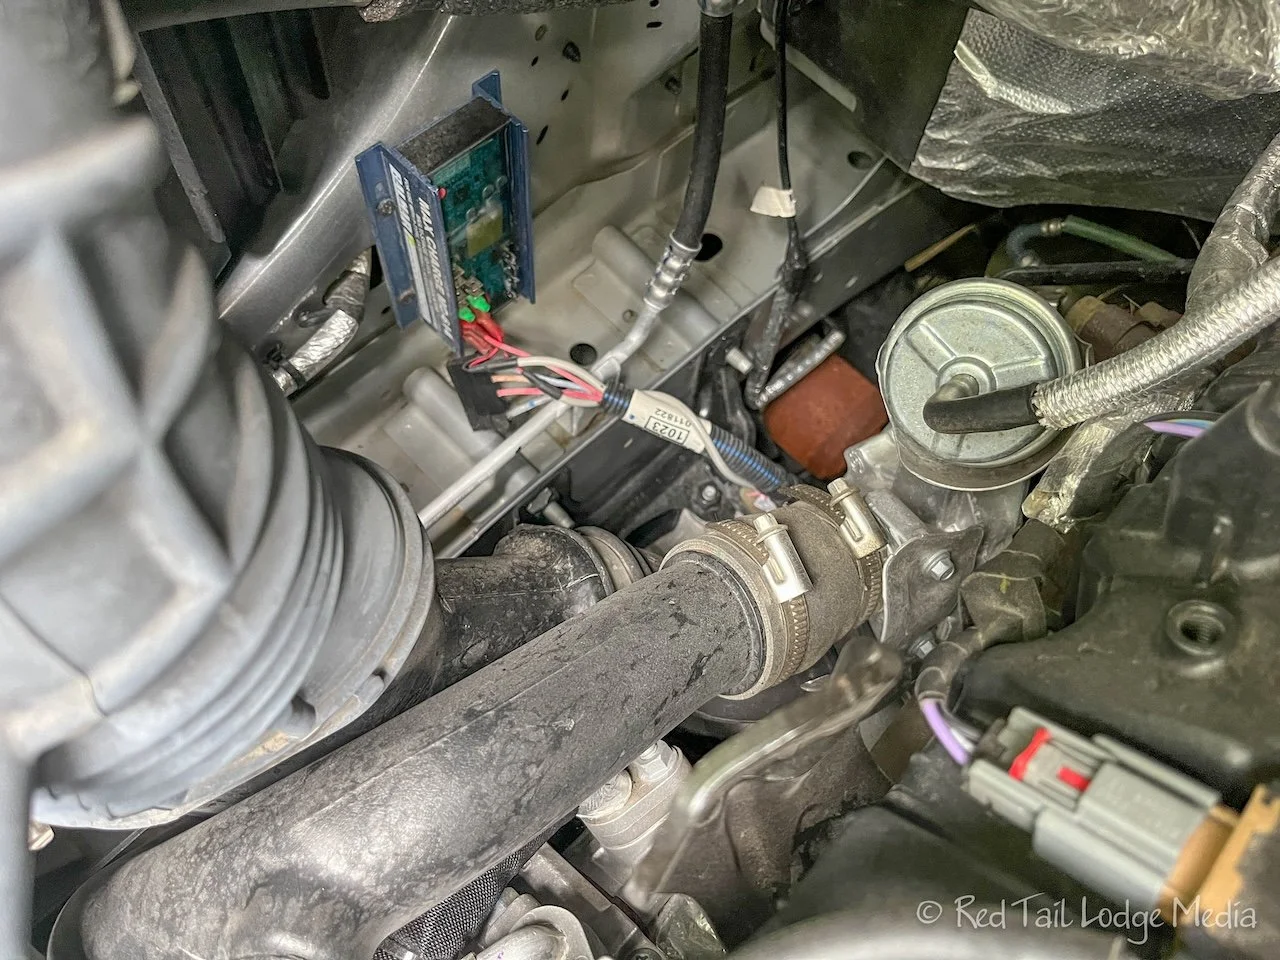
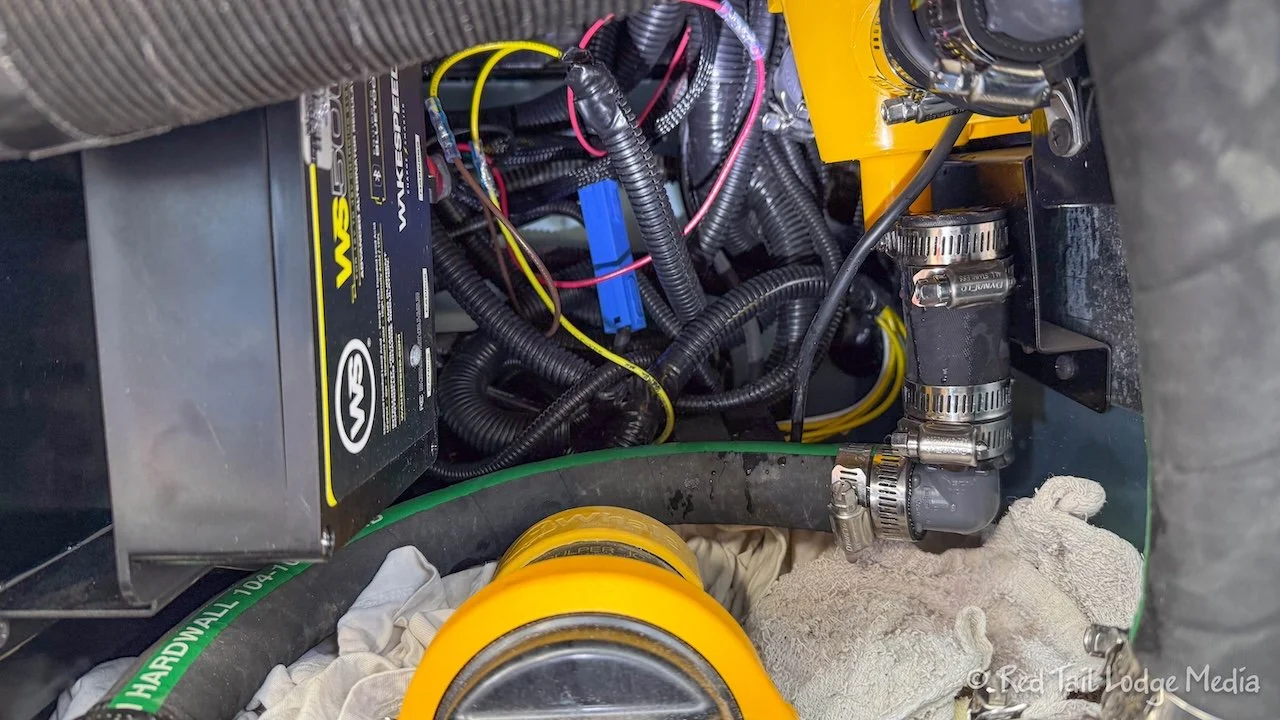
Since the beginning of the EKKO model, at least the one built on a Ford Transit, Winnebago has had troubles with the second alternator, the Balmar brand. The second alternator was added to direct power from the engine to charge the house batteries while driving. The Balmar had a tendency to overheat and sometimes catch on fire. Winnebago tried several recalls to try to remedy the issue. During our first year of travels with Red Tail (2024), we installed a KISAE DC to DC charger (paid link) ourselves when we started hearing noises coming from the Balmar, as we didn’t want to take a break from our travels to have recall work done.
When we returned from Europe in 2025, there was another Balmar recall, which just changed a setting to reduce the output of the alternator. We performed that recall ourselves, as it was pretty simple to do. However, that didn’t seem like a good solution to us. We had heard that some people had switched to the Nations alternator and weren’t having any issues with that one. So we decided to go that route.
We were driving Red Tail to Forest City in Iowa to have a solar wiring recall done in November of 2025, so we asked Winnebago if they would swap out the alternators for us. In addition to the alternator, we also wanted to swap out the controller to a Wake Speed. The Wake Speed controller is a smart controller, delivering the precise voltage that the batteries are asking for. The quote we received back from Winnebago was charging us $4140.65 for the National alternator (250 A) and the Wake Speed controller, plus $209 per hour for labor, expecting it to take about 4 hours to install, for a total of $4976.65. That seemed too high for us, since we could order the kit direct from Nations Starter & Alternator (EKKO-250XM-WS) for $1995.95. We asked Winnebago if we could bring the parts with us and just pay them install it. They said yes, but they would not give us a warranty on the parts and labor. We accepted that offer.
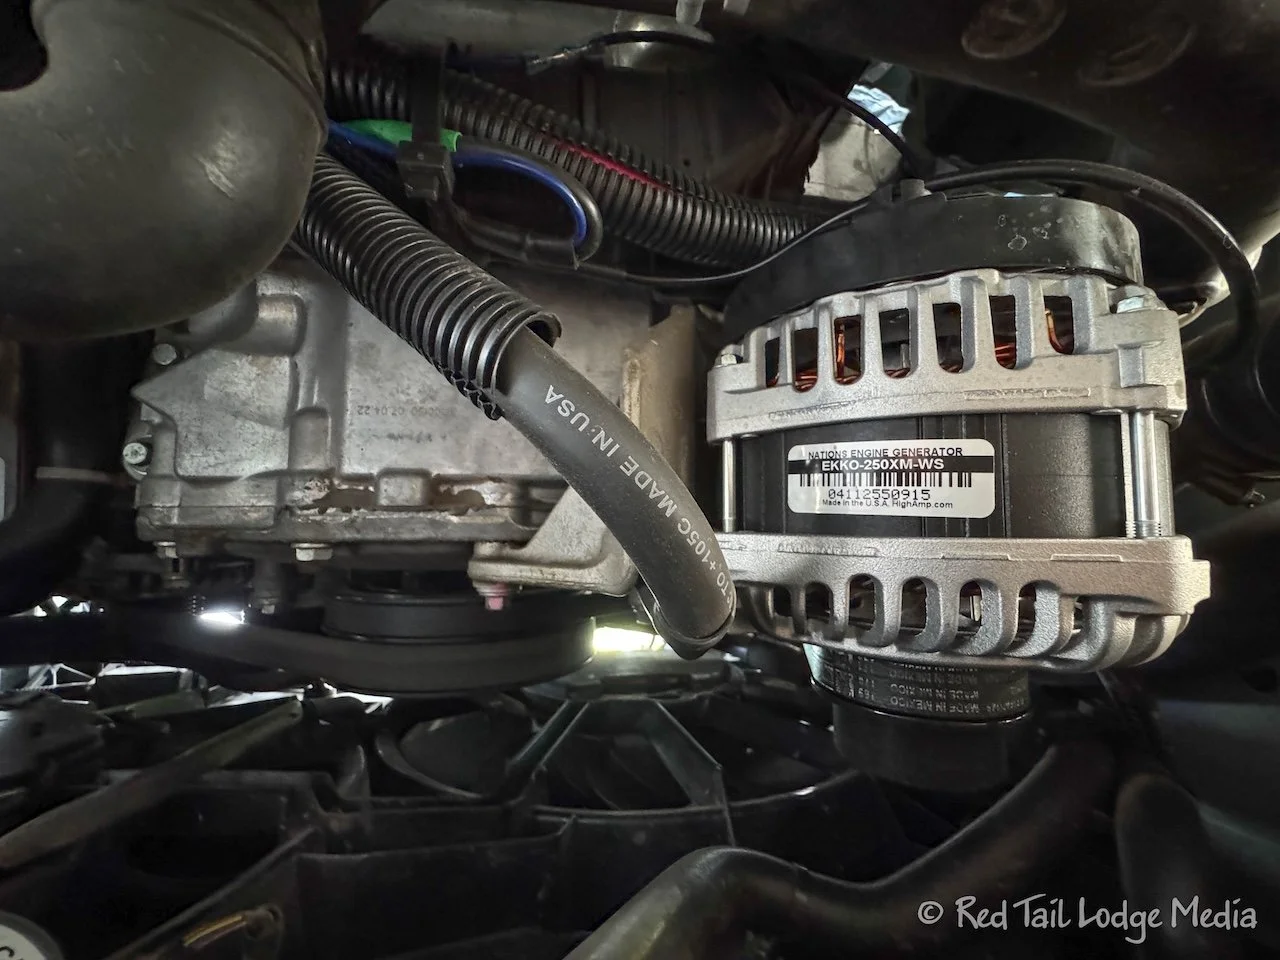
However, after they installed the parts for us, they did not charge us for the labor. So we’re not sure where the warranty stands on that. But we were grateful that they covered the labor costs. We had also bought a serpentine belt ($14.50) and brought that with us because we thought it was needed for the install. It turned out that there was already a serpentine belt in the kit from Nations, so that purchase was not necessary. Now we have a spare part.
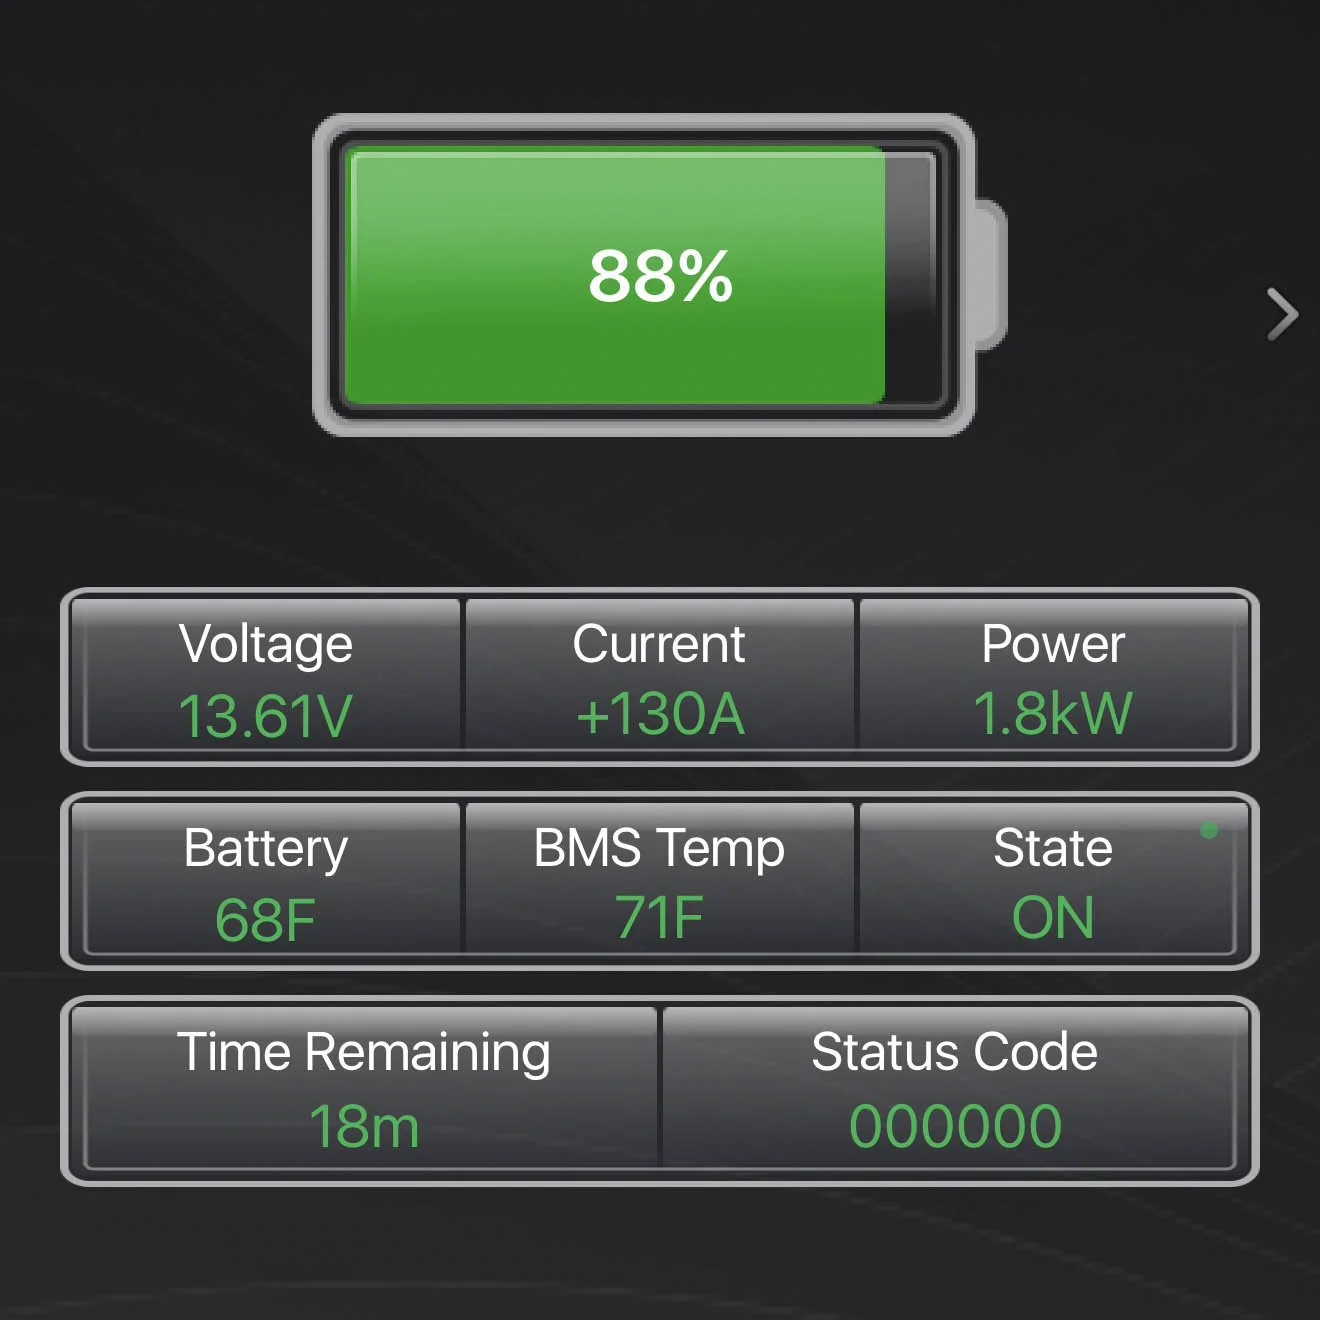
We tested out the new alternator on the way back home from Iowa. We still have the KISAE DC to DC charger installed, so both the alternator and the charger were charging our two 320 Ah batteries. Ideally, the KISAE can produce 50A and the Nations alternator can deliver 250 A (compared to the Balmar which was 170 A before derating it). We’ll try to do a more detailed test later on how fast our batteries recharge. Hopefully, this will be the last time we have to deal with alternator issues.
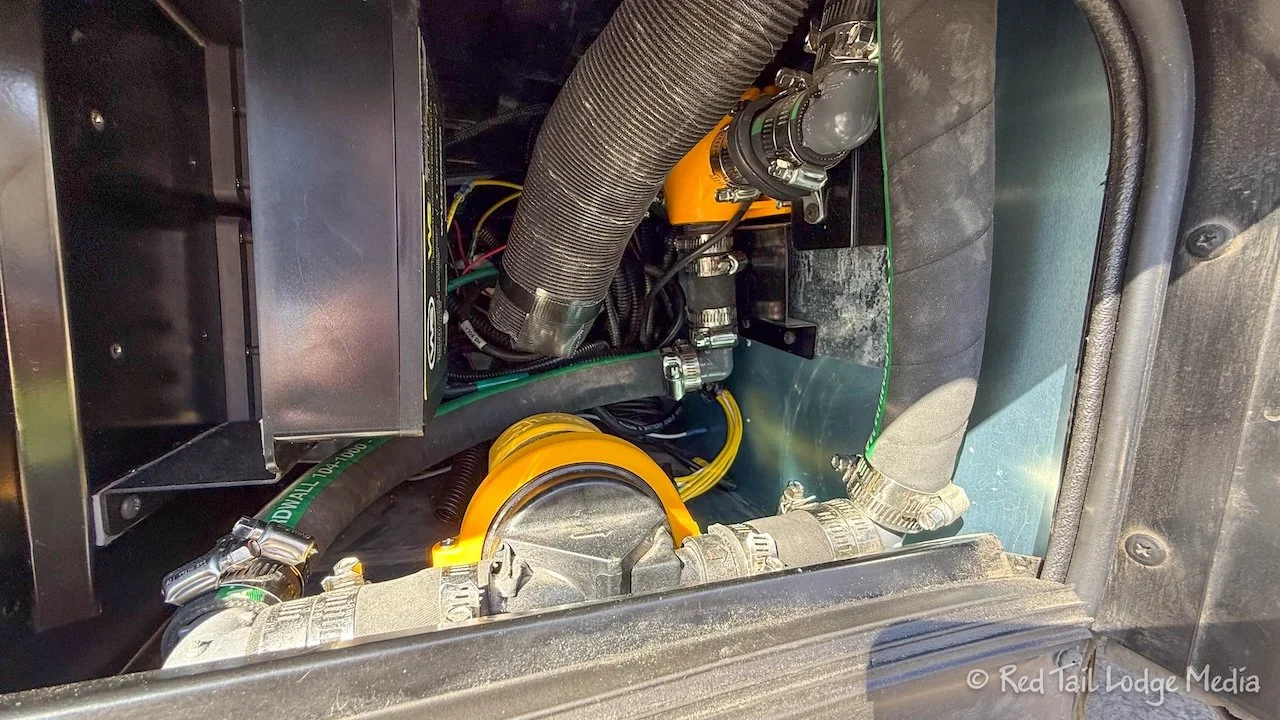
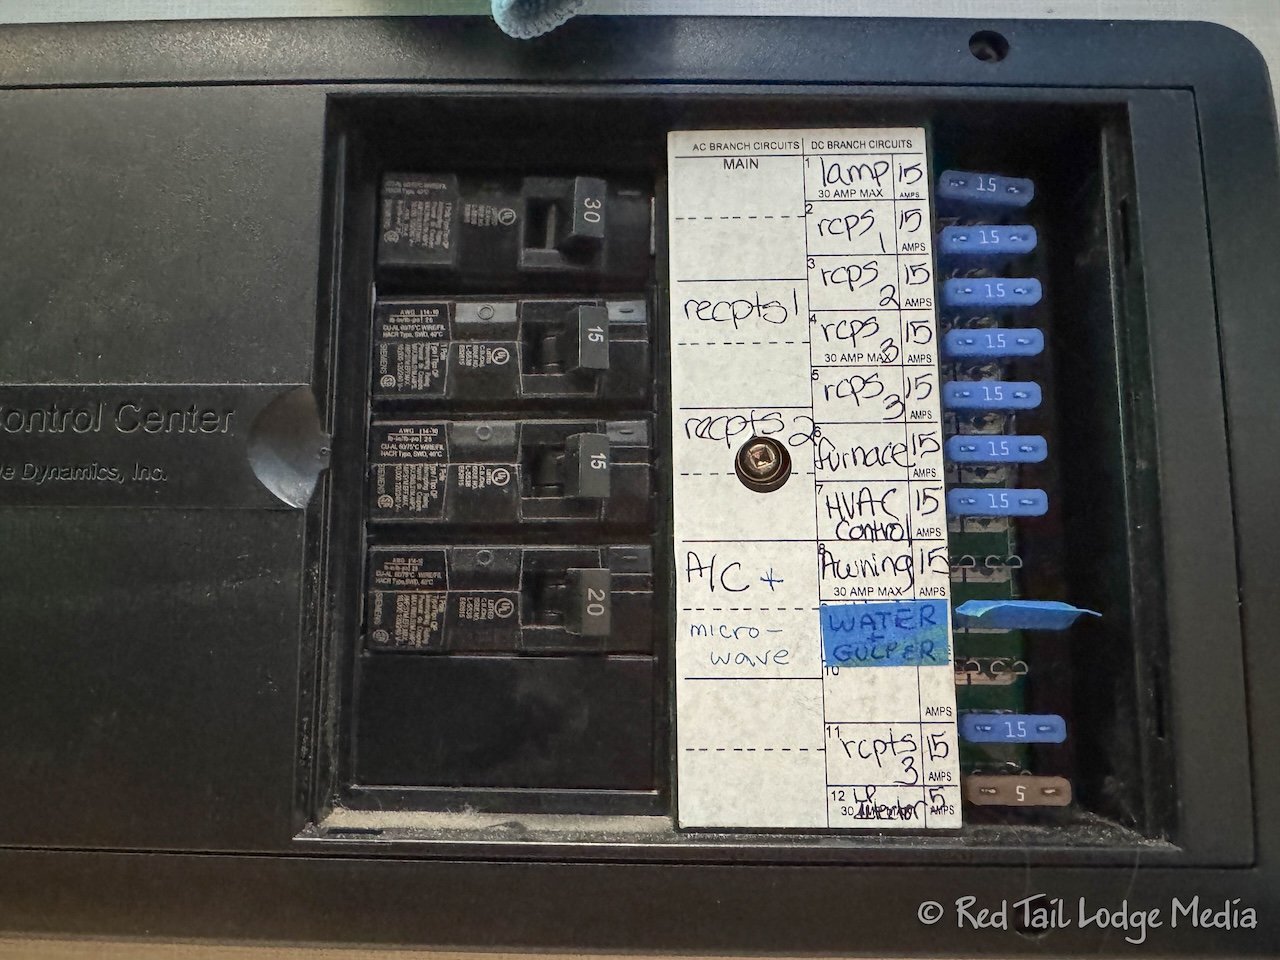
Mod Twenty: Solar Wiring Recall
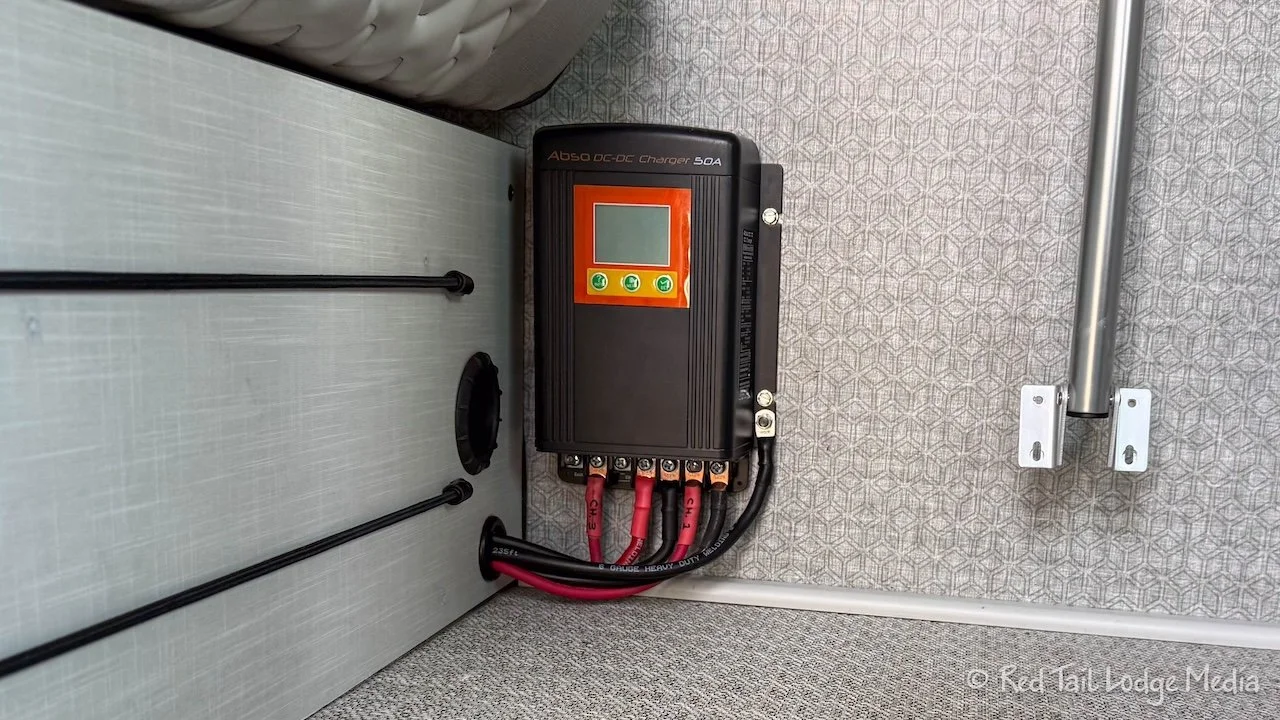
There was a recall issued for the solar wiring in the EKKO that we had put off having done for quite a while. We had previously modified the solar wiring to bypass the solar controller supplied by Winnebago and routed it to the solar controller in the KISAE DC to DC charger. We were not happy with the Zamp solar controller, as it is a PWM (Pulse Width Modulator) controller which is an older, less efficient technology. The KISAE included an MPPT (Maximum Power Point Tracking) solar controller, which is a newer, better technology. We were familiar with the different types of solar controllers, as we previously had converted our VanDoIt camper van (Red Tail Lodge One) from AGM batteries to Lithium-Ion batteries (Upgrading to Lithium Batteries: Part 2).
Since we heard the solar wiring recall was rather involved and because we had altered the solar wiring, we felt more comfortable having Winnebago do the recall work instead of a dealer. So we made an appointment for November in 2025 and drove Red Tail up to Forest City, Iowa.
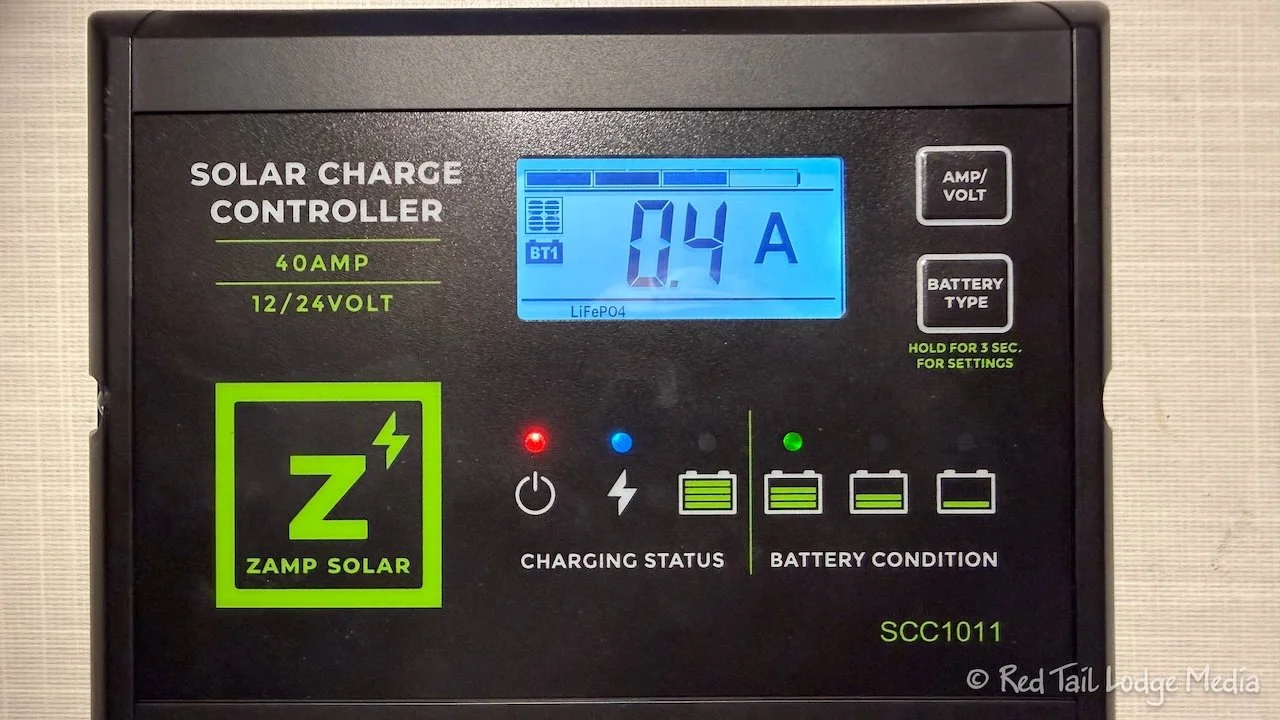
We had previously removed the Zamp solar controller, but had kept it. We brought it along thinking Winnebago may require it to do the recall work. Sure enough, they ran the new solar wiring to the Zamp solar controller. So we had some work to do when we got back home to re-route the new wiring to the KISAE solar controller again.
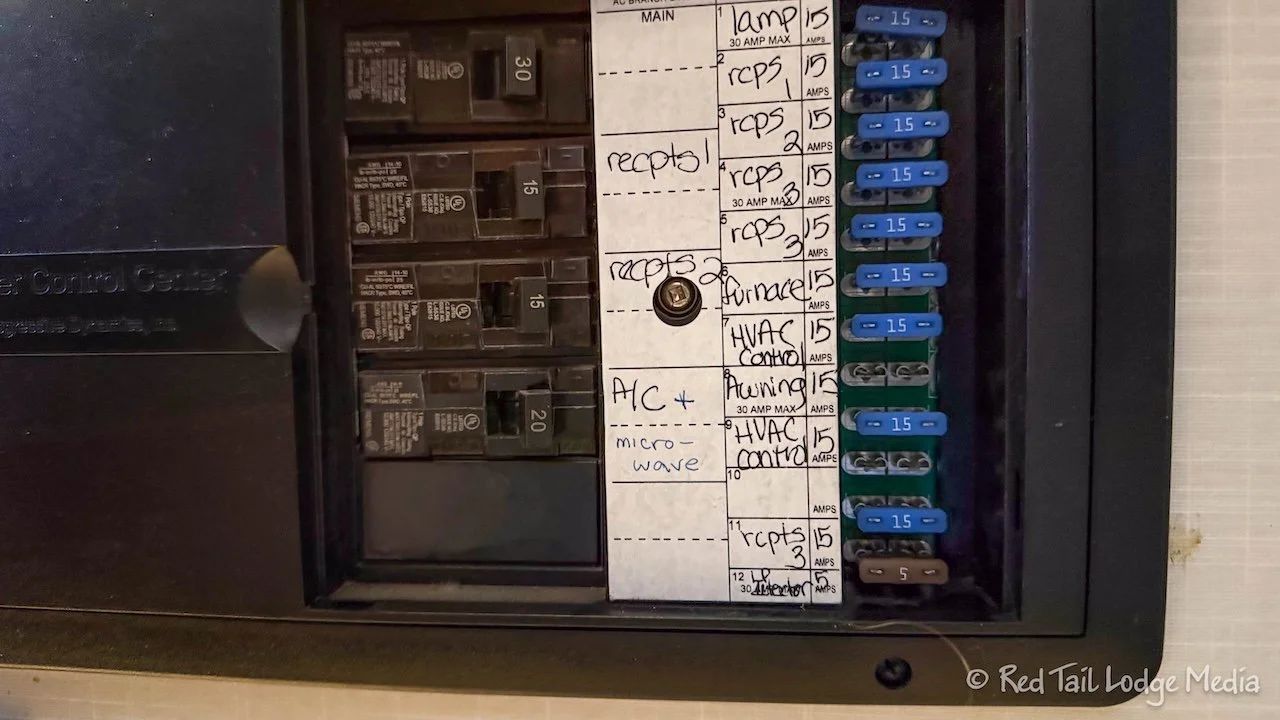
It was more of a struggle this time, as they routed the wires slightly differently than before and there isn’t much room in the battery compartment to maneuver. However, Keith managed to get it done.
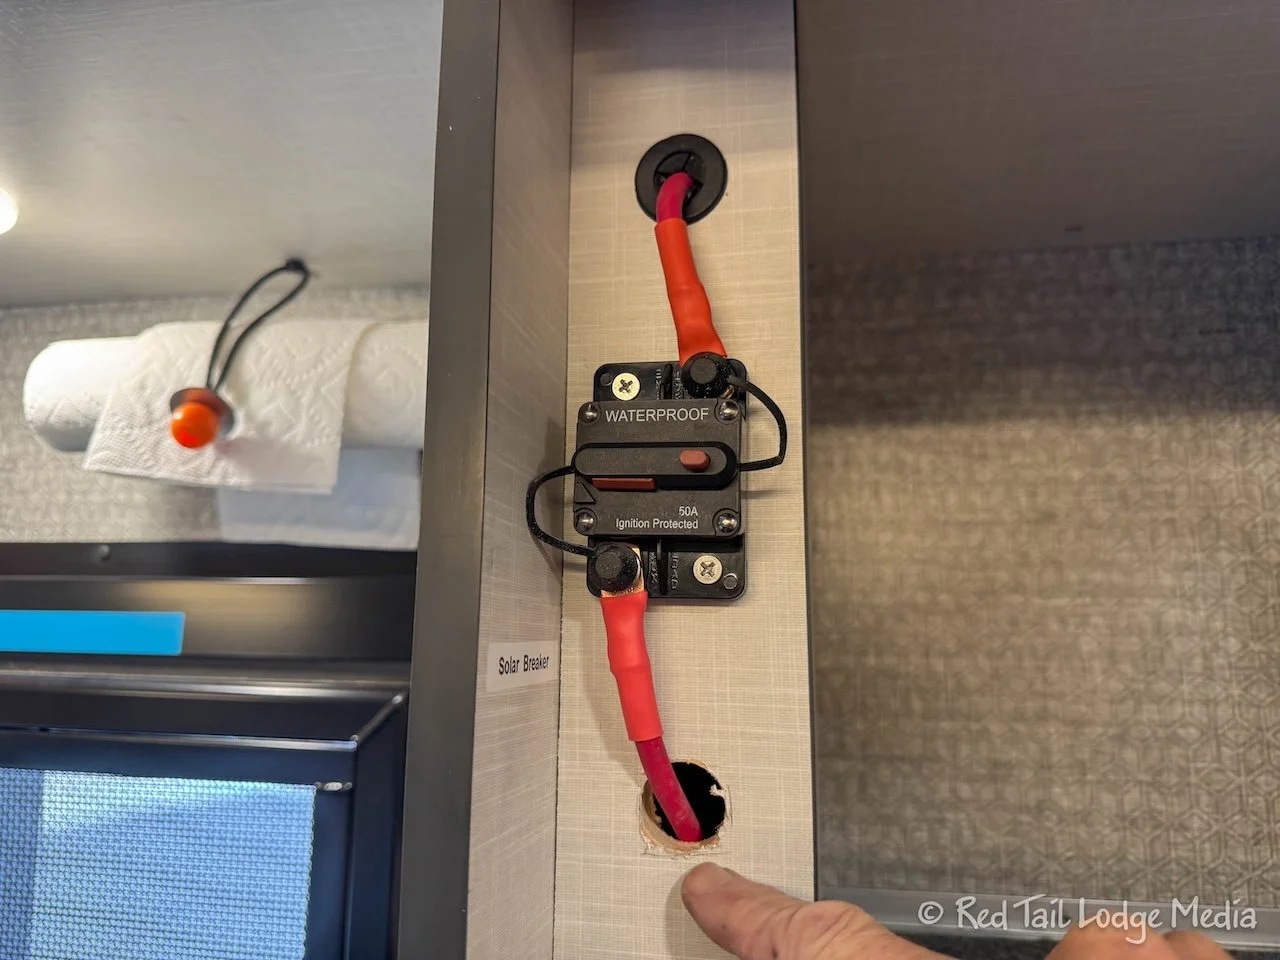
While he was at it, he replaced the fuses in the wiring to breakers. Most of the breakers are located under the bench seat in the dinette area, but one is in the left upper cabinet in the kitchen, just behind where the Zamp solar controller was located. This breaker will allow us to easily disconnect the solar panels if we ever need to do any more electrical work. We just need to be careful not to bump the switch as we get things in and out of the cabinet.
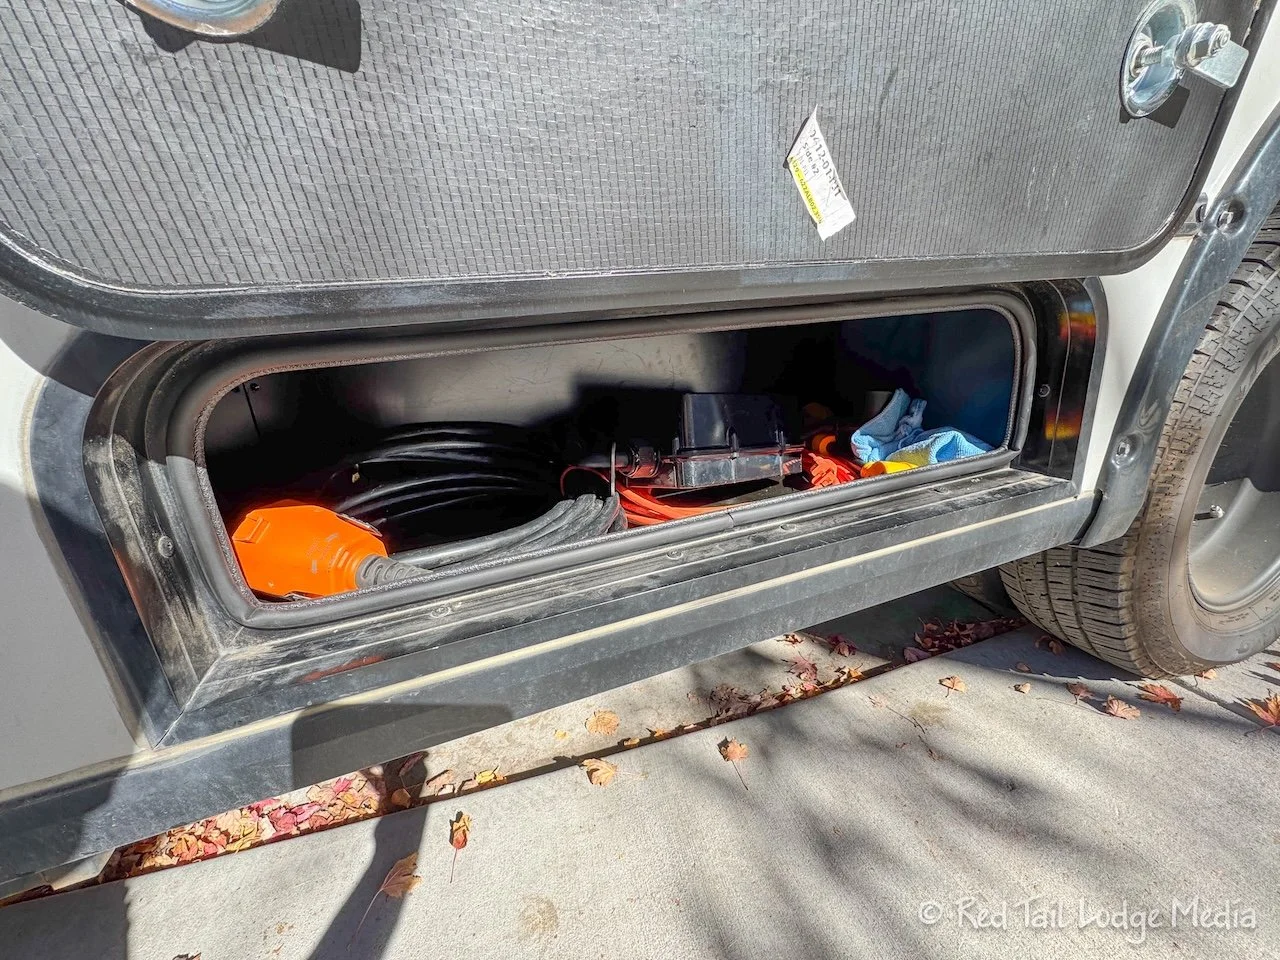
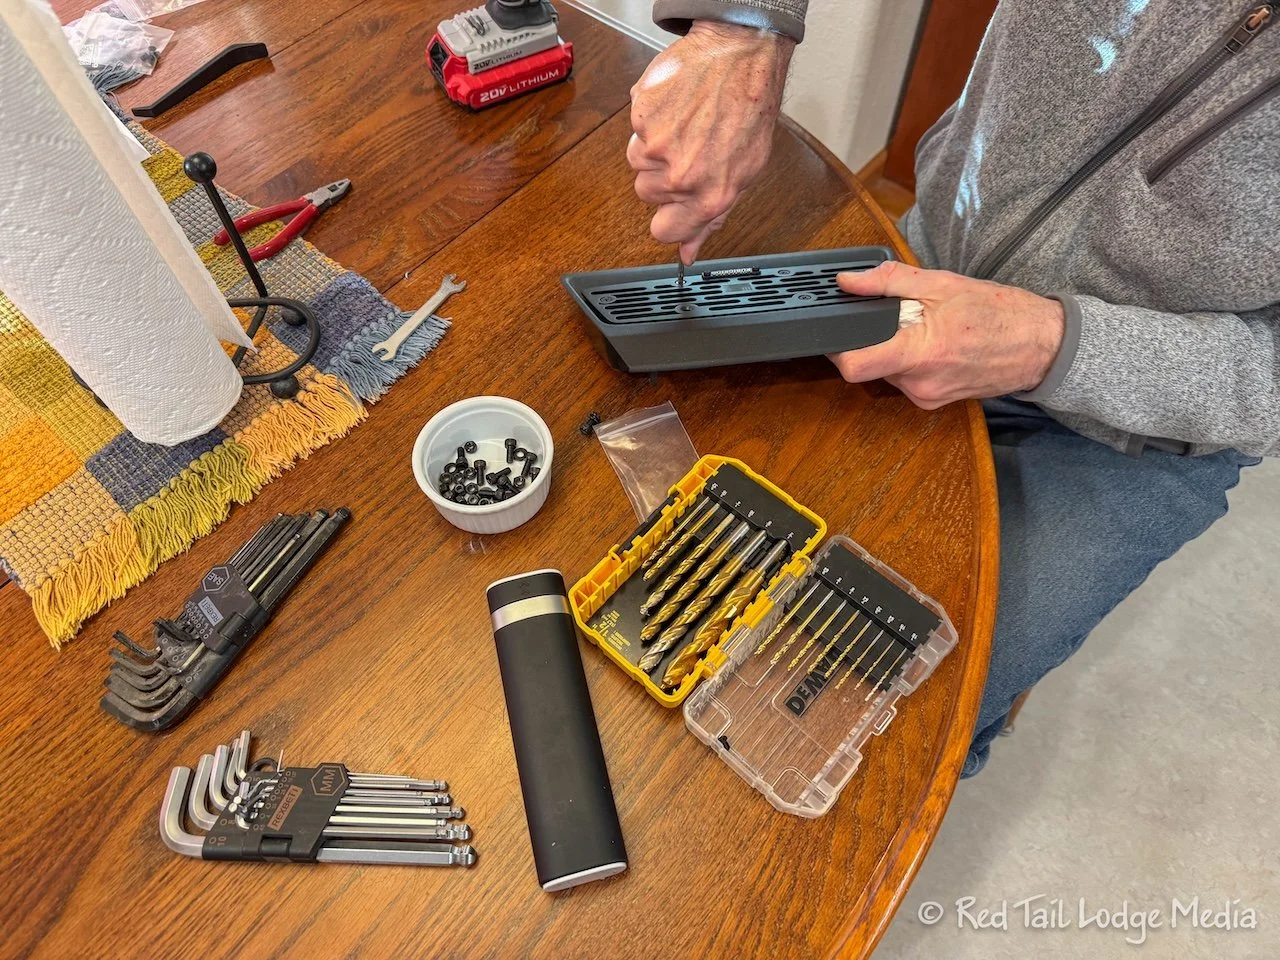
Mod Twenty One: Re-organized Tools
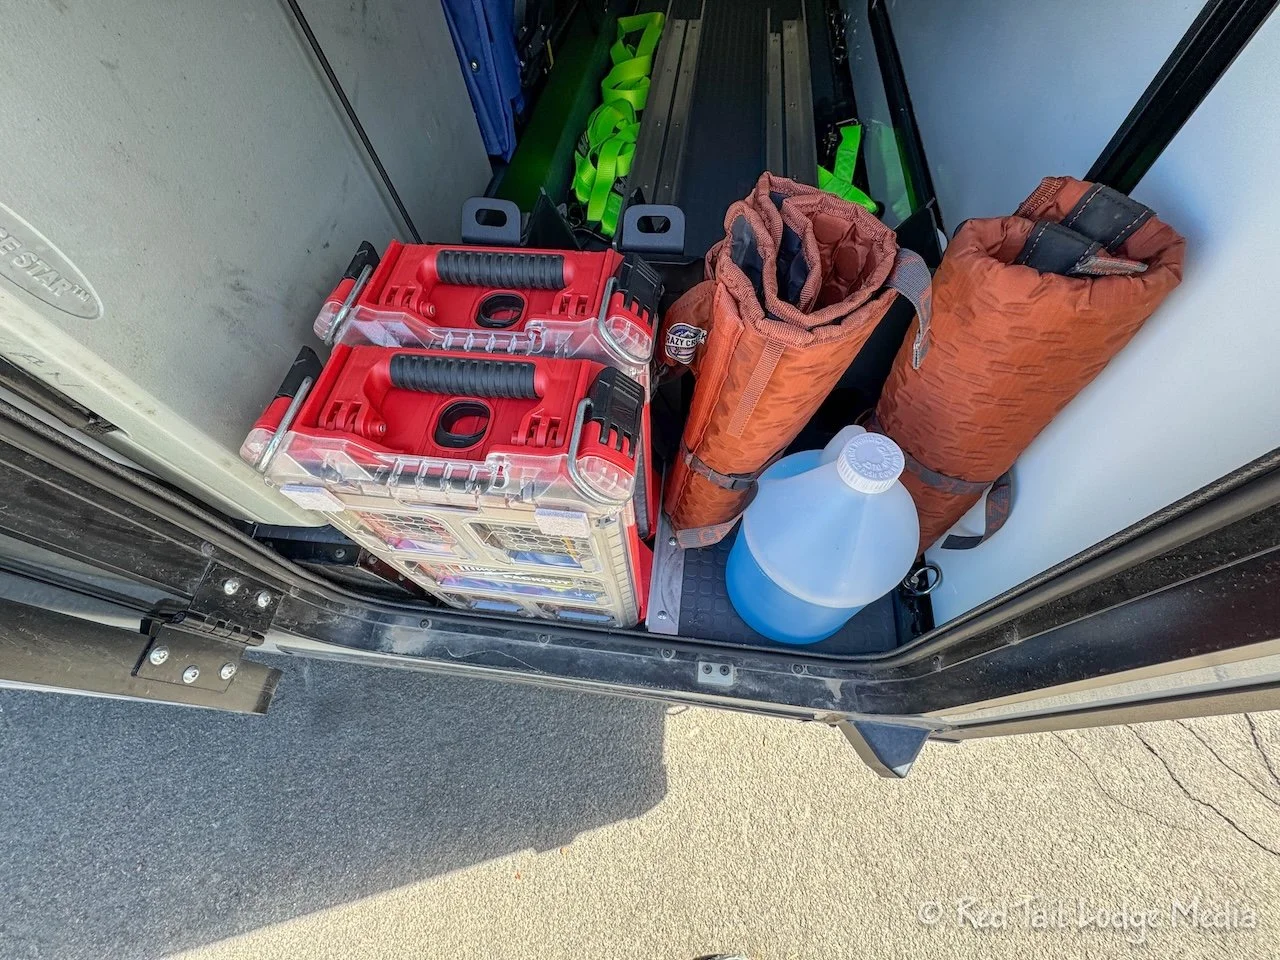
Re-organizing our tools isn’t much of a mod, but it did make a noticeable difference. Previously, we had two Milwaukee boxes, another large clear plastic container along with a small open square container and a small open rectangular container, all filled with tools. Keith was able to re-arrange things and remove some tools to get it down to just two Milwaukee boxes and a small Milwaukee bag. The open rectangular container is now used to contain the cans of Boeshield T-9 and rubber conditioner which were previously just loose in the gear garage compartment.
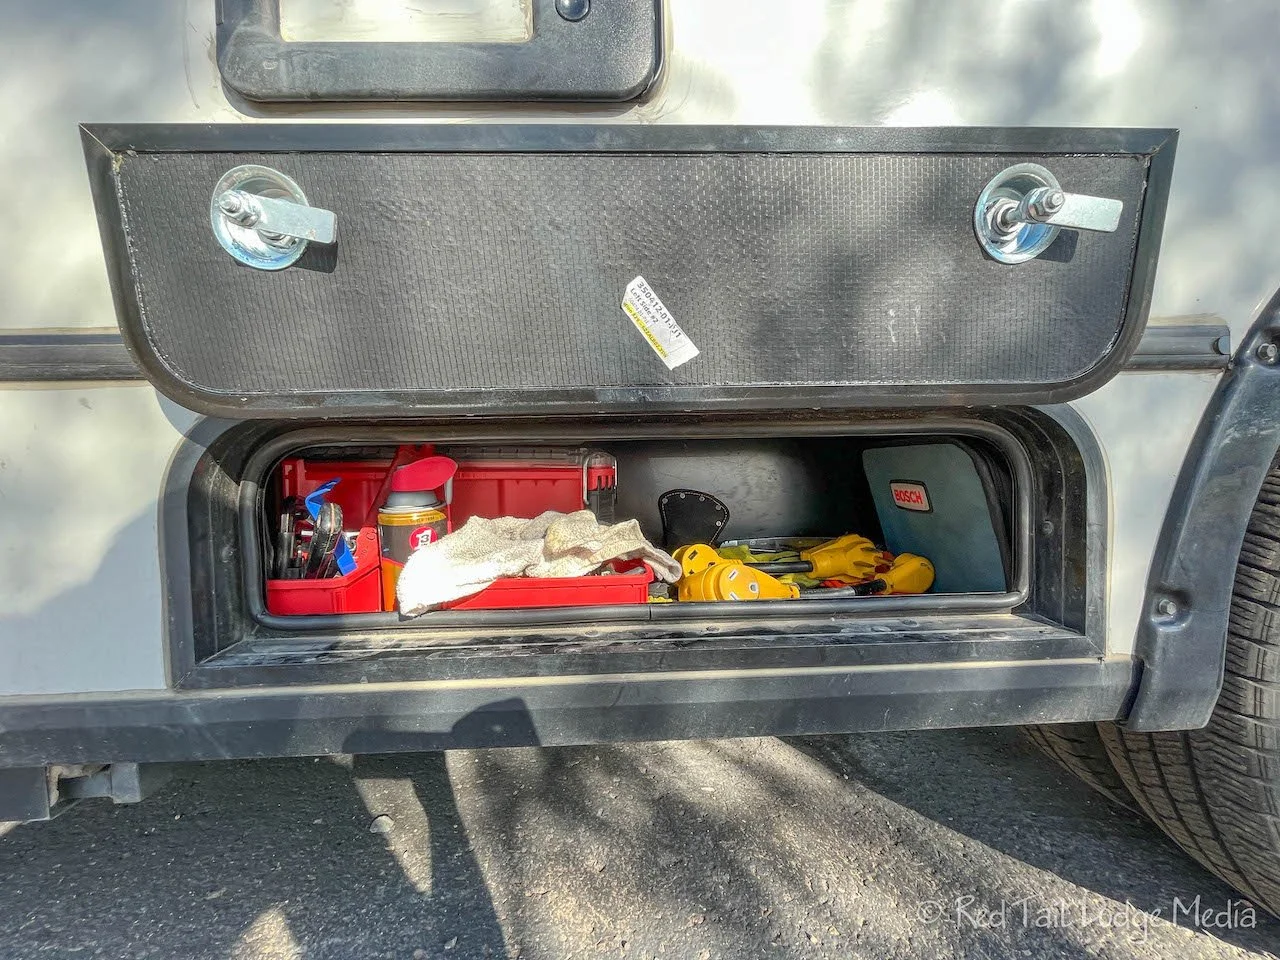
We also moved where the tools are stored. They originally were in the generator compartment along with our electrical cords, doggones, and surge protector. We now have the tools in the gear garage compartment, with the Milwaukee boxes sitting vertically instead of horizontally. That makes it easier to get our electrical cords in and out. It also makes the tools easier to get in and out, since we no longer have three large boxes sitting on top of each other. Keith installed an L-bracket to hold the Milwaukee boxes in place.
Maybe at some point, we will list what tools we are currently carrying. We’ve posted that before, back during Season Five 2023 (Our Tools), but we haven’t done a recent inventory. That’s due to how differently Ann and Keith work. Ann loves her packing lists which she adjusts every season. But Keith likes to lay everything out on a table in front of him every year and decide what to take and what to leave behind. Ann has given up trying to keep track of the tools in a list.
Mod Twenty Two: New height/width/length/tire pressure Labels
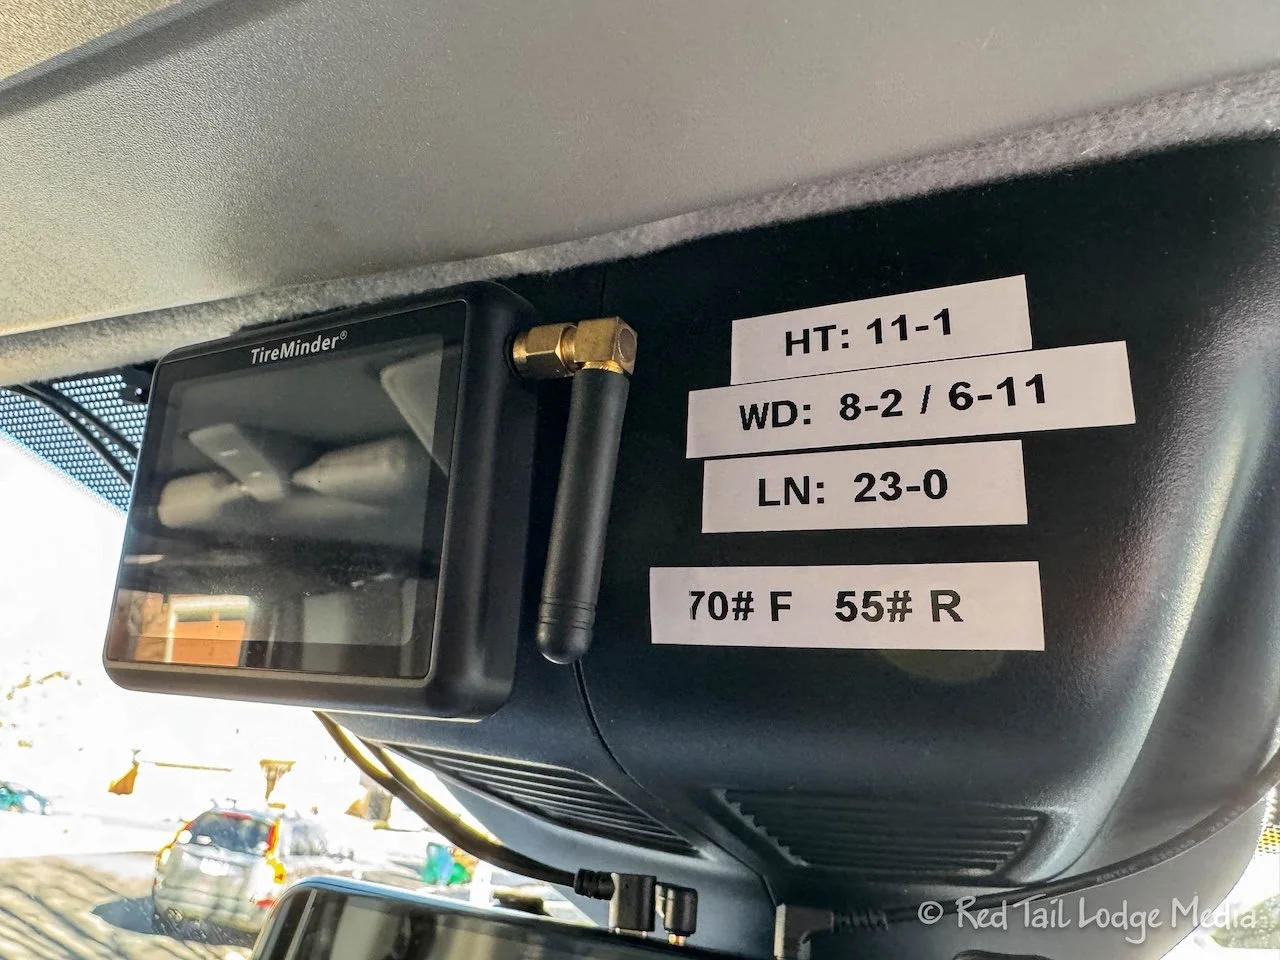
This is another one that wasn’t much of a mod. We like to keep labels of Red Tail’s height, width, length, and recommended tire pressures in a place that is visible from the driver’s seat. We were putting the labels in the upper left corner of the windshield, but the labels would deteriorate due to the sun exposure. As we replaced the faded labels this time, we moved them to the plastic molding above the rear view mirror. Hopefully, the new location will let the labels last longer.
Mod Twenty Three: Replaced Seat Grommets
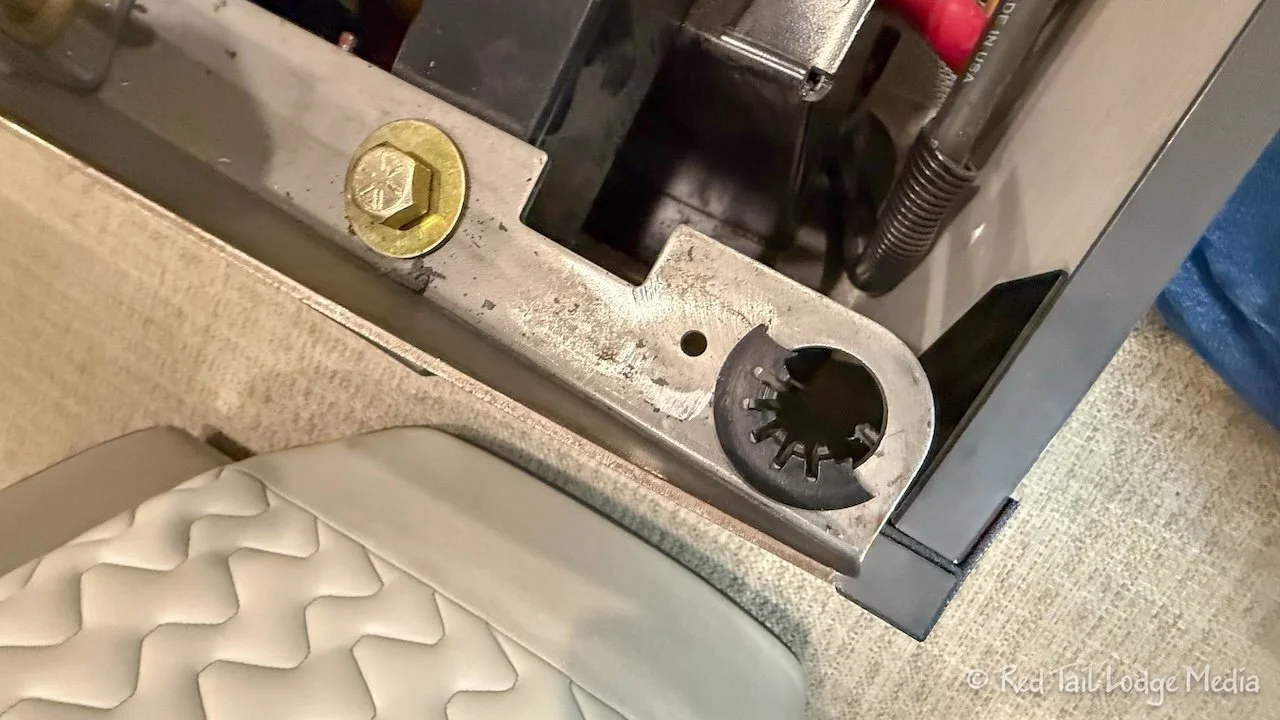
The bench seats in the dinette area snap into a set of grommets. Over the years, most of the grommets have broken, so the seats were rather loose. While we were in Forest City, we bought a set of replacement grommets from Winnebago. They were an easy install and now the seats fit tightly again. We’ll see how long the new grommets last.
Mod Twenty Four: Fixed Delamination on Dining Table
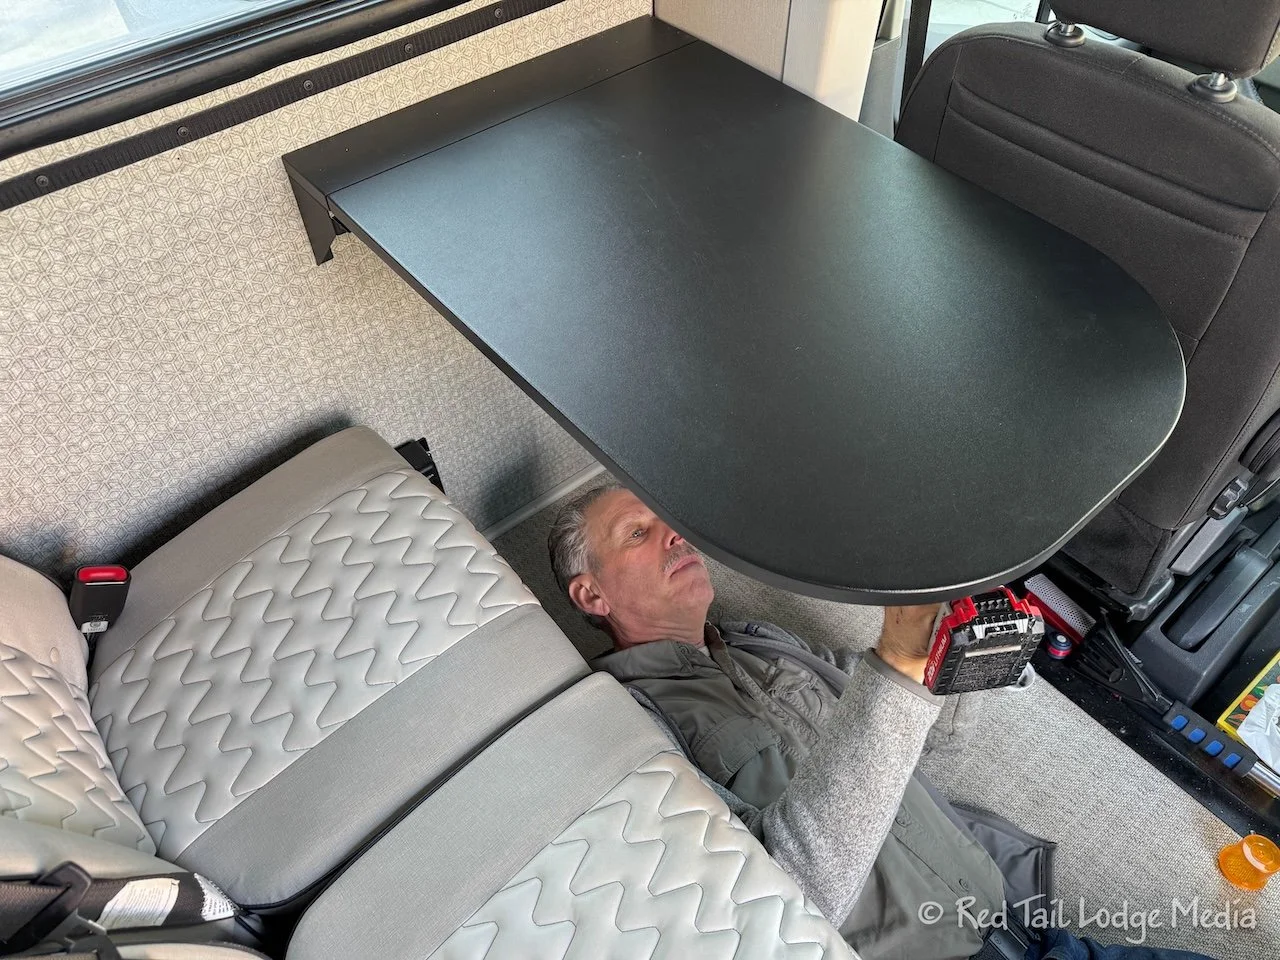
The edge of the table in the dinette area started pulling off. It was a pretty easy fix to super glue it back on. Keith removed the table from the rig so he could take it into his workshop and clamp it properly while the glue dried.
Mod Twenty Five: Installed Phone Mounts for Dash
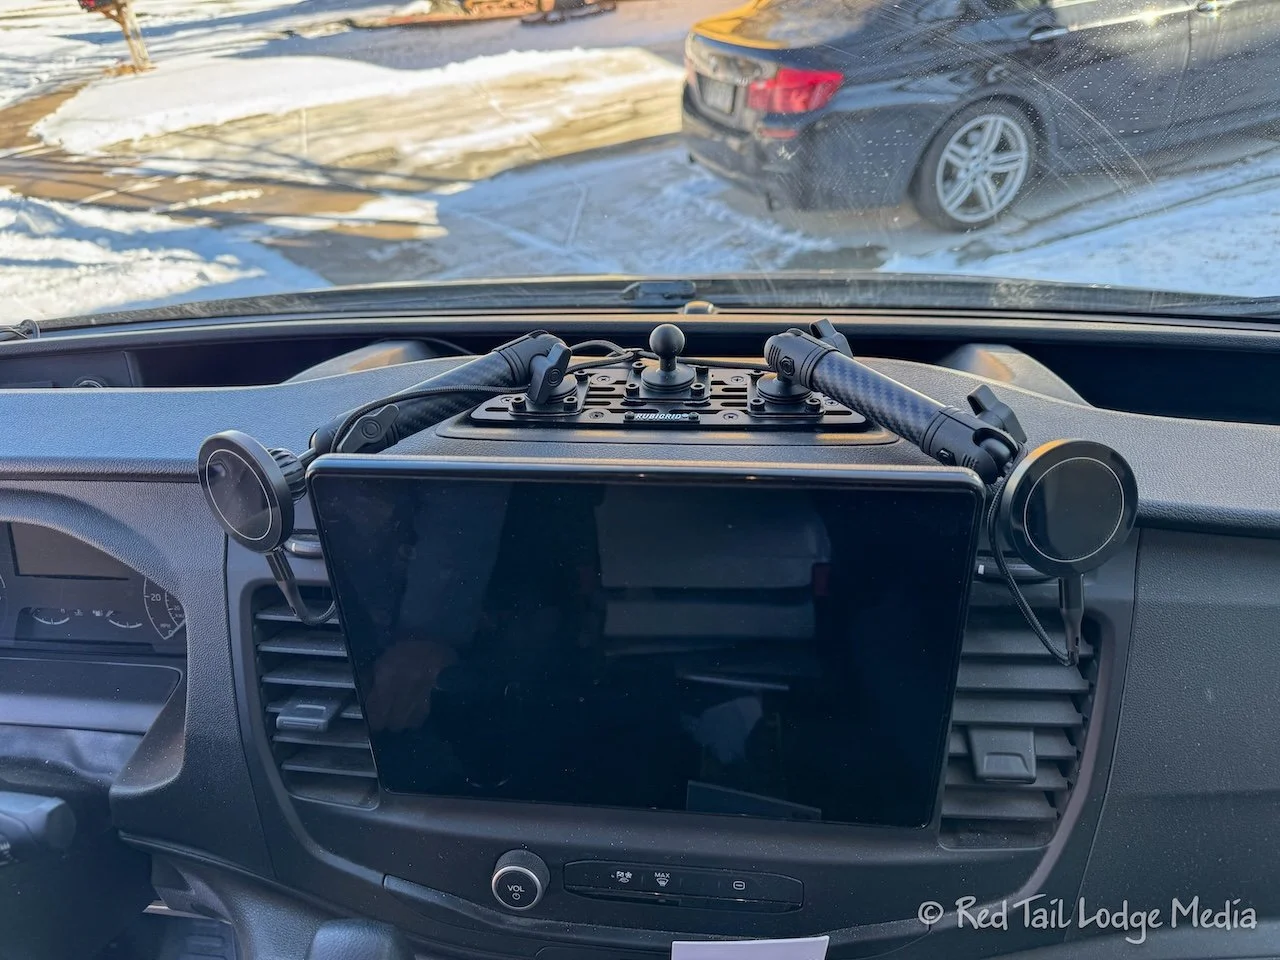
We’ve tried using several different types of phone mounts for our dash over the years and haven’t really liked any of them. We ended up just putting our phones in the tray below the center display when we wanted to plug them in to charge. But we ended up with a tangle of wires and a lot of fumbling around when we wanted to pick up one of the phones to use it.
Then someone in the EKKO Facebook group posted about the RubiGrid Dash Mount for the Ford Transit (unpaid link) from Bullet Point Mounting Systems. The base of the mount screws into the little recessed center tray on top of the dash of the Ford Transit. Ball mounts screw into the base and movable mounting arms attach to the ball mounts. We then bought two magnetic wireless charging phone holders (paid link) that attach to the ball mounts on the mounting arms.
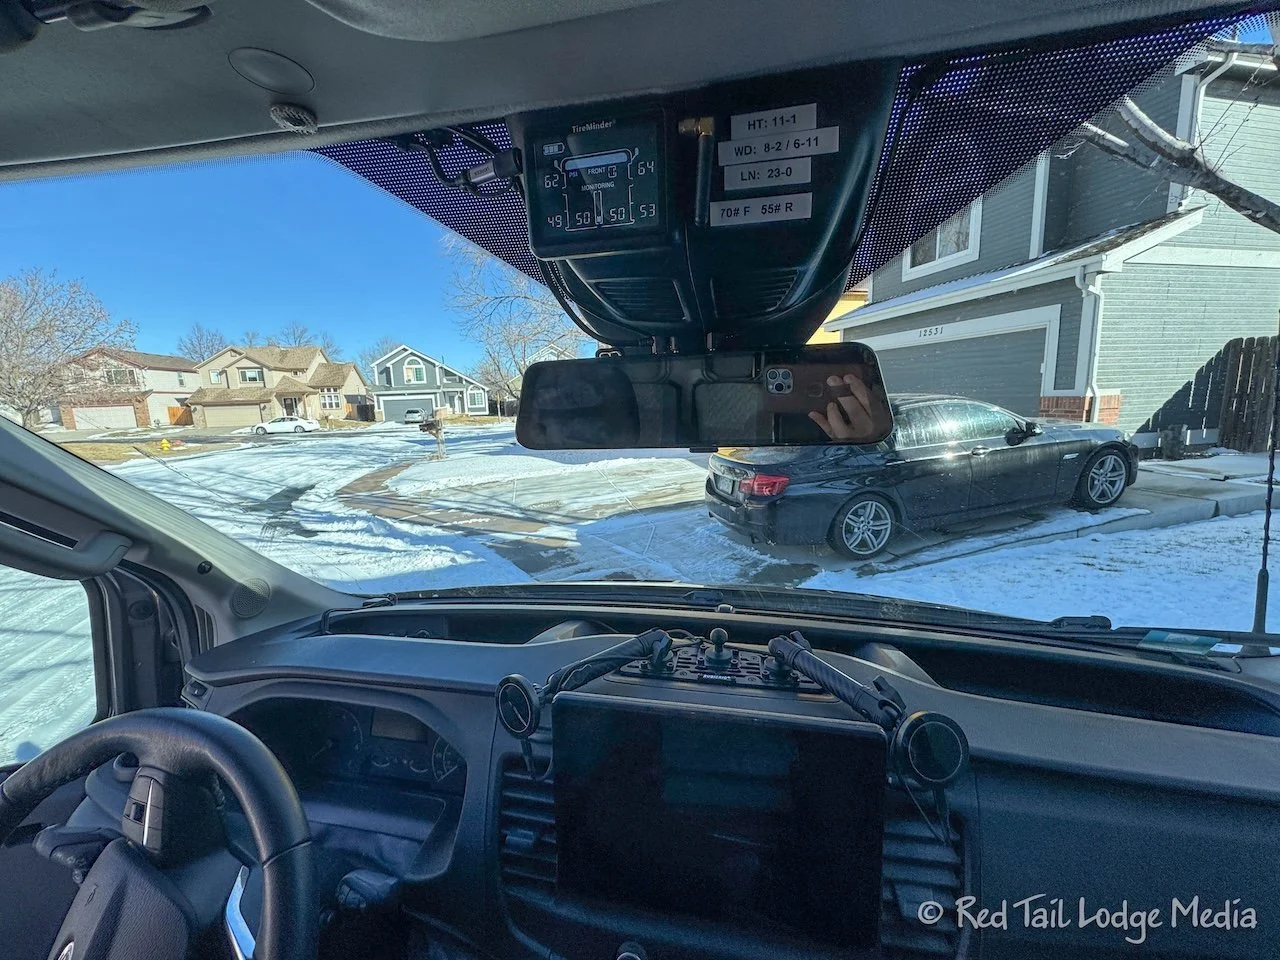
We used a USB-C to USB-C Y cable to run the power from the phone holders, along the mounting arms and over to the cigarette lighter power plug in the dash on the driver’s side. The power for the Wolfbox Rear View Mirror was using the cigarette lighter, so we had to switch that power cable to a USB-C so it could share the cigarette lighter with the phone holders. While we were at it, we ran a power wire from the TPMS (Tire Pressure Monitoring System - paid link) over to the USB outlet next to the cigarette lighter plug. Previously, we were just plugging the TPMS in whenever the charge on its battery was getting low, letting the wire just hang down from the display.
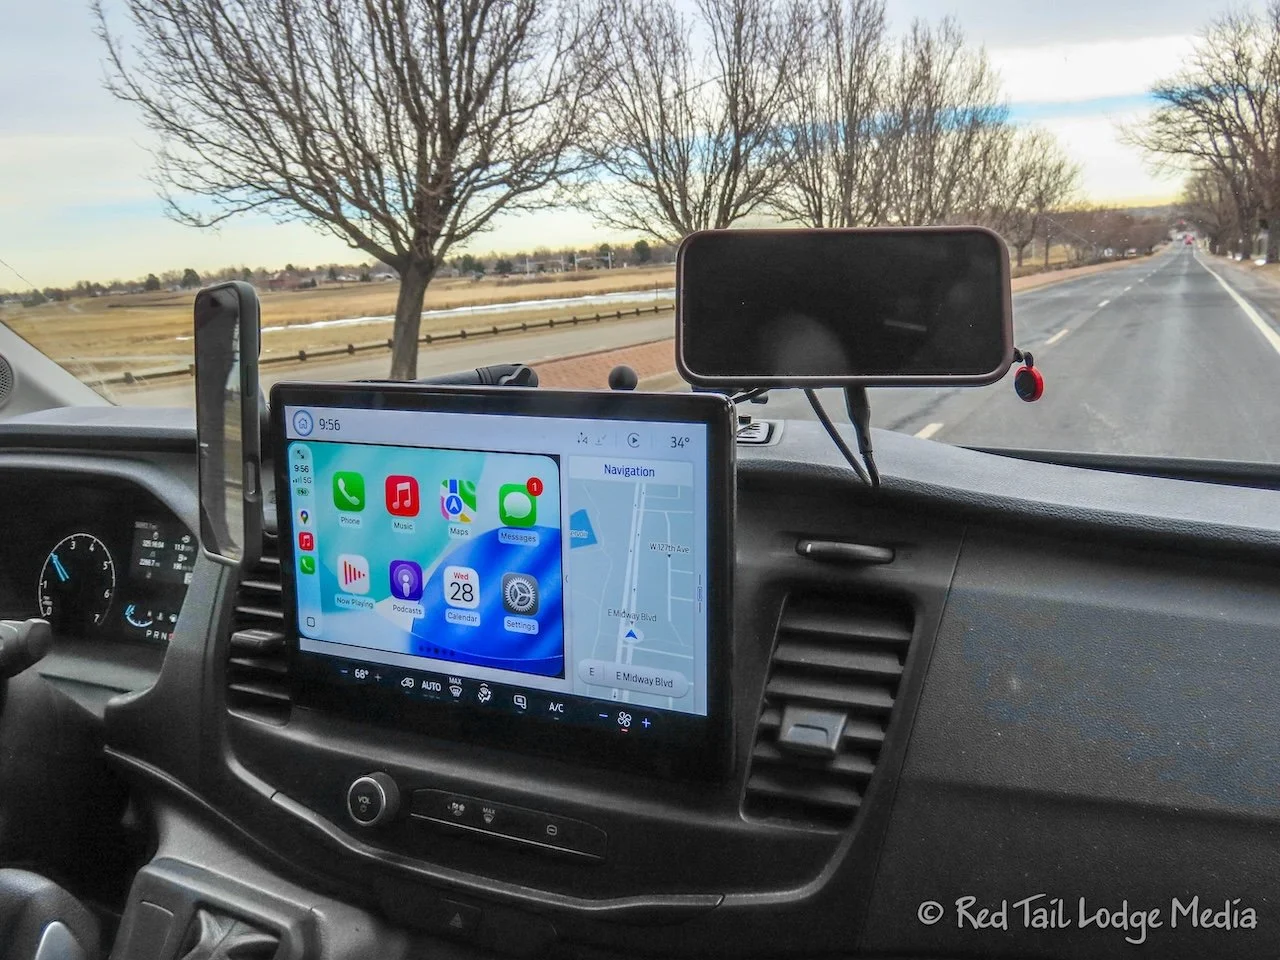
Now we have a very clean look, with no tangle of wires. Our phones go directly onto the phone mounts when we start driving. The magnetic connection makes it easy to mount and unmount our phones. The mounts keep our phones charging. We can easily see the phone displays, if a message pops up. We accidentally ordered one ball mount too many as we didn’t realize one came with the base. So we have a third ball mount on the mounting base, which we could use to attach a GoPro camera if we want to. We’ve only made one short trip so far with the phone mounts, but we are really happy with them.
Mod Twenty Six: Replaced Broken Freezer Door
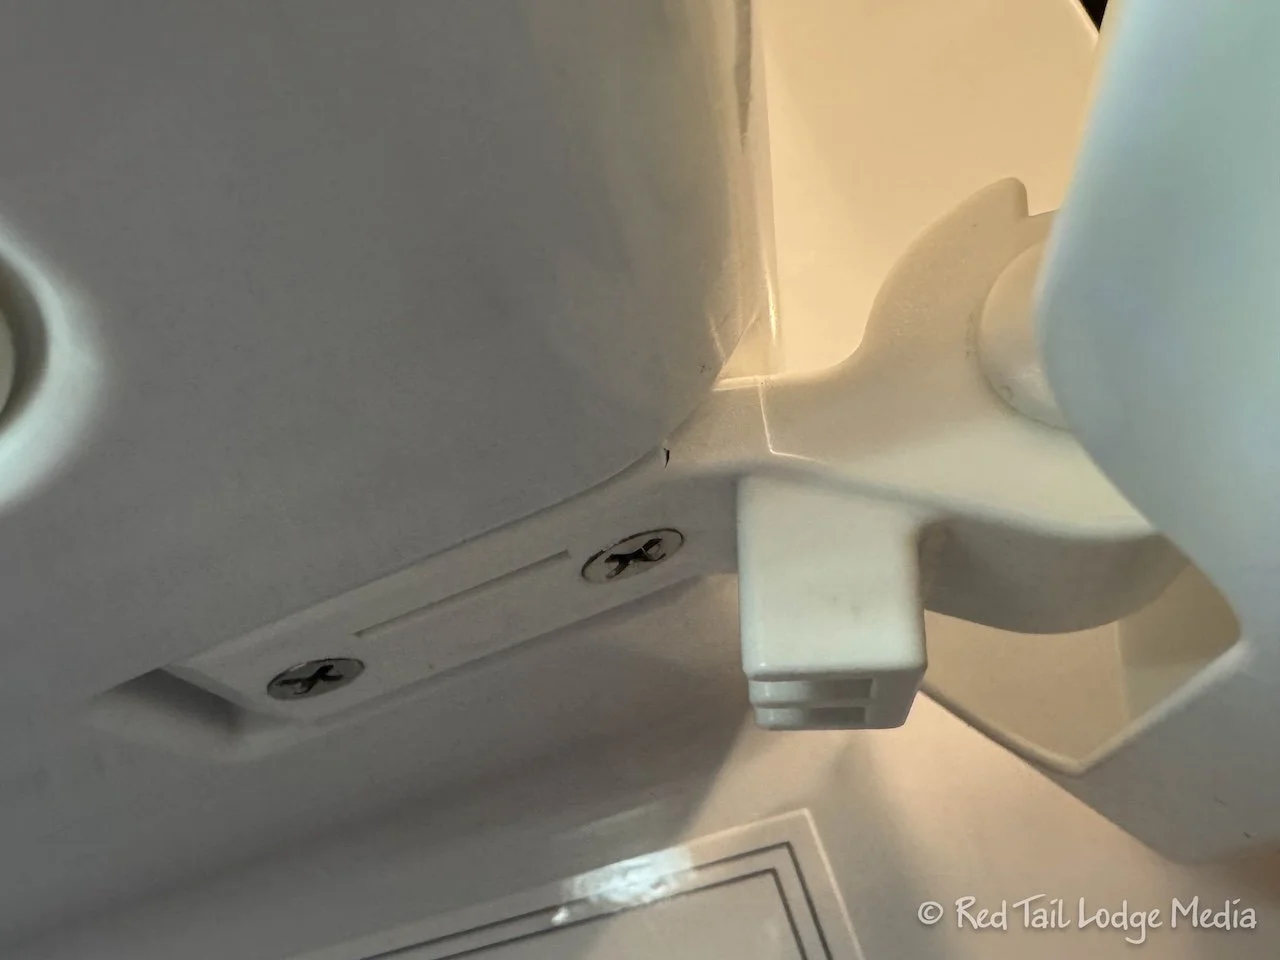
In February of 2026, we went on a short two week trip. We noticed that the freezer door didn’t seem to close all the way and our ice cream was a little soft. Oh no! What a catastrophe! Upon closer inspection, we saw that the freezer door hinge was cracked.
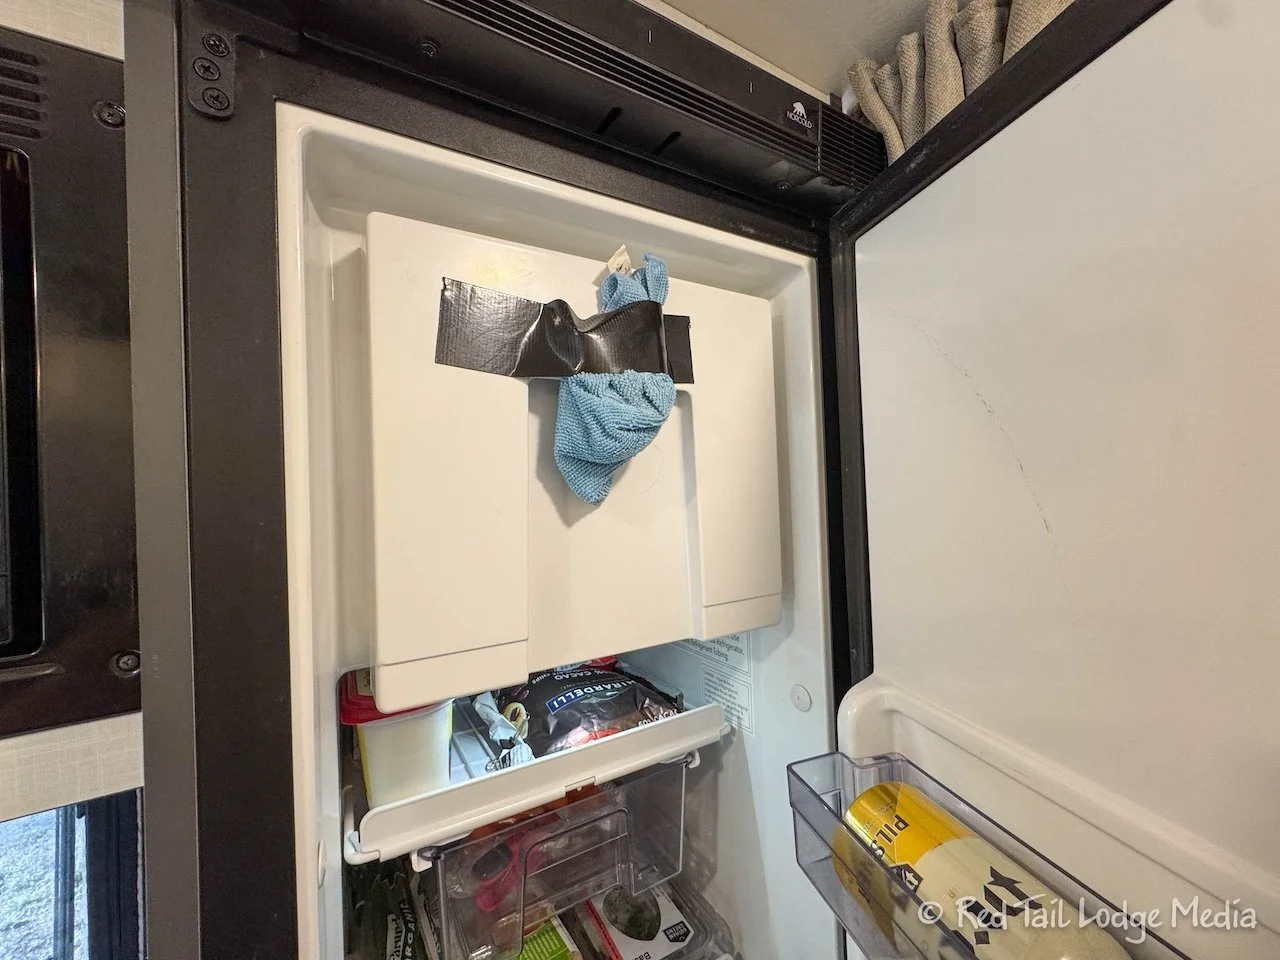
As a temporary fix, we wadded up a spare cloth and taped it to the freezer door. That way, when we closed the refrigerator door, it would push up against the freezer door, keeping it closed.
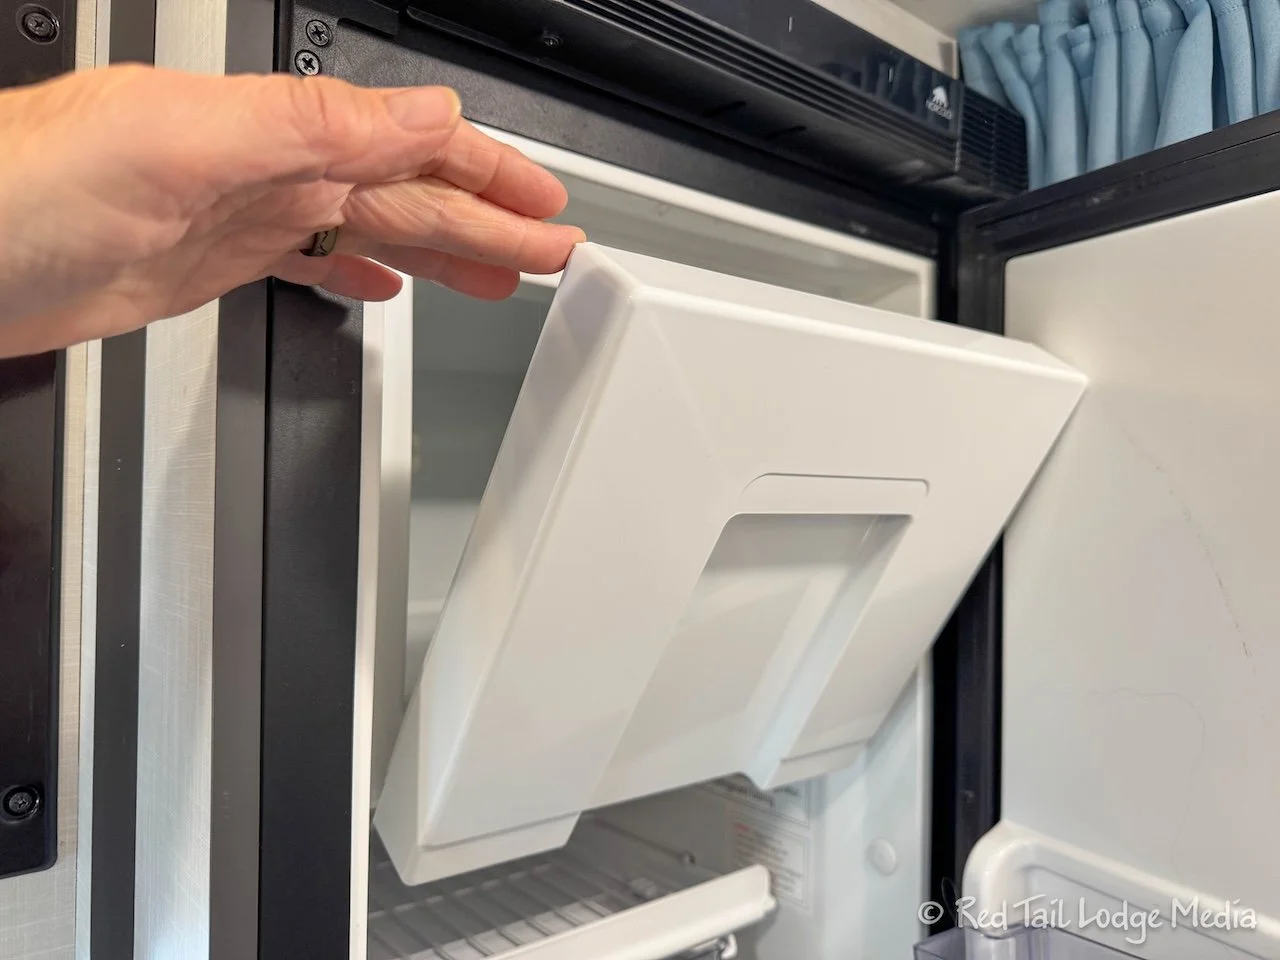
When we got back home, we ordered a replacement freezer door (paid link). Unfortunately, we couldn’t just buy a new hinge. Replacing the door was a pretty easy task.
Mod Twenty Seven: Installed Flip Up Mount for weBoost antenna
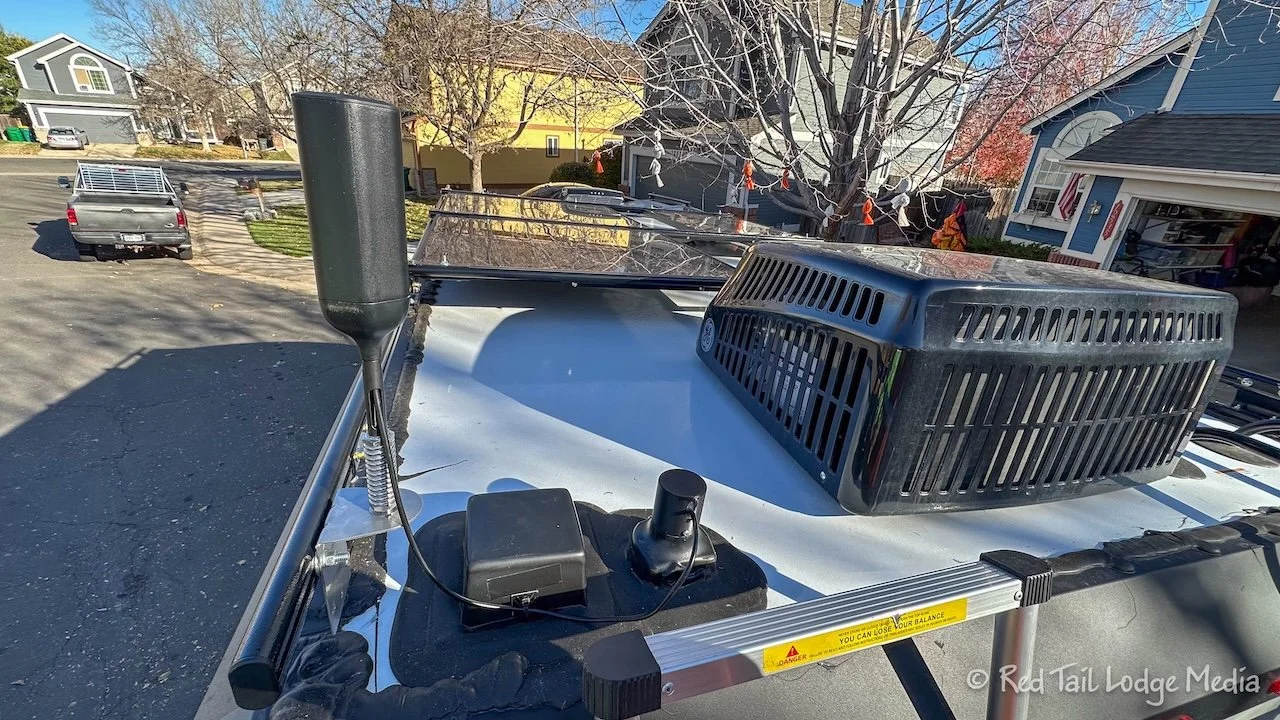
WeBoost is a cell signal amplifier. There is an antenna on the roof of our RV which picks up all the cell signals and is connected to a device inside Red Tail, which amplifies the signals and rebroadcasts them through an antenna inside. We have debated about whether we would keep the weBoost or not. We had one in Red Tail Lodge One, our camper van, which we really liked and it seemed to make a big difference. But the camper van has a metal shell that partially blocks cell signals from coming inside. In the EKKO, except for the cab area, there is no metal shell, so cell reception inside the rig is better to begin with. So we don’t see much of an improvement with the weBoost most of the time.
We decided to keep the weBoost for now. However, the antenna on the roof is the highest point on Red Tail. When we took our two week trip in February, we had one camp site with large low hanging tree branches. It was a struggle to maneuver into the site without hitting the branches.
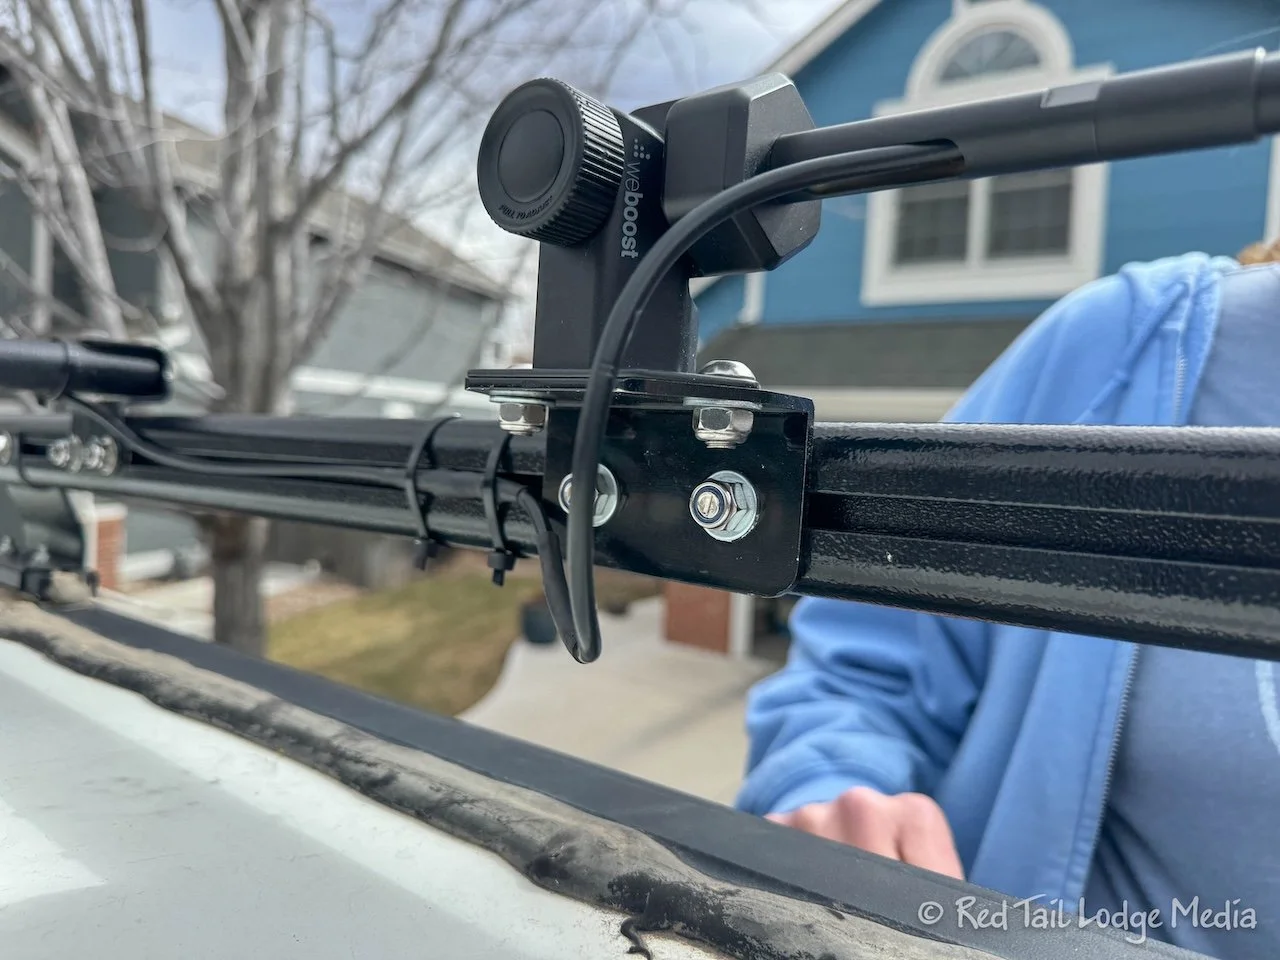
In order to reduce our height some, we bought a new outside antenna that includes a flip up mount. It is the weBoost Overland Antenna and Mounting Bracket Model 311249 (paid link). We installed it on the passenger side rail, near the rear, so we can reach it from the rear ladder. We will keep the antenna lowered most of the time until we want to use it. Then we just need to climb the ladder, flip it up, and lock it into place. We haven’t really traveled with it yet, so we’ll let you know how we like it. The new antenna mount lowered our overall RV height from 11 foot 1 to 10 foot 6, a savings of over half a foot. It’s not a lot, but every little bit helps. Hopefully, next time, we’ll be able to avoid those low hanging branches.
Mod Twenty Eight: Made New Bedroom Storage Boxes
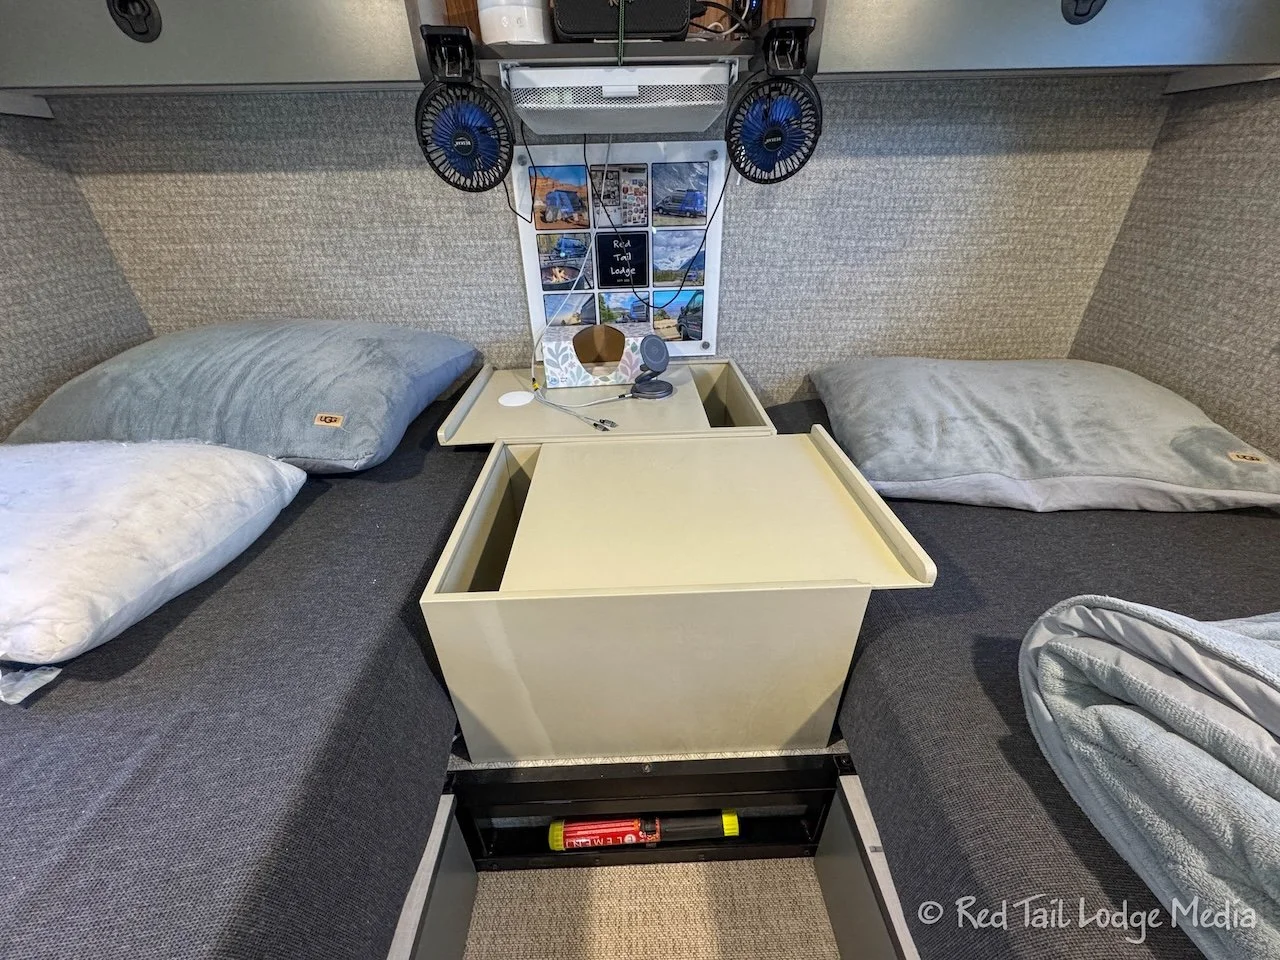
Initially we used a couple of soft storage boxes that fit between the two beds to store things like jackets, a sewing kit, and exercise stretch bands. We also attached multi-charging stand for our phones and watches on top of one of the boxes. In the evening, we placed a laptop or iPad on top of the other box so we could watch videos as we both sat in bed, with our backs up against the front wall of the bedroom.
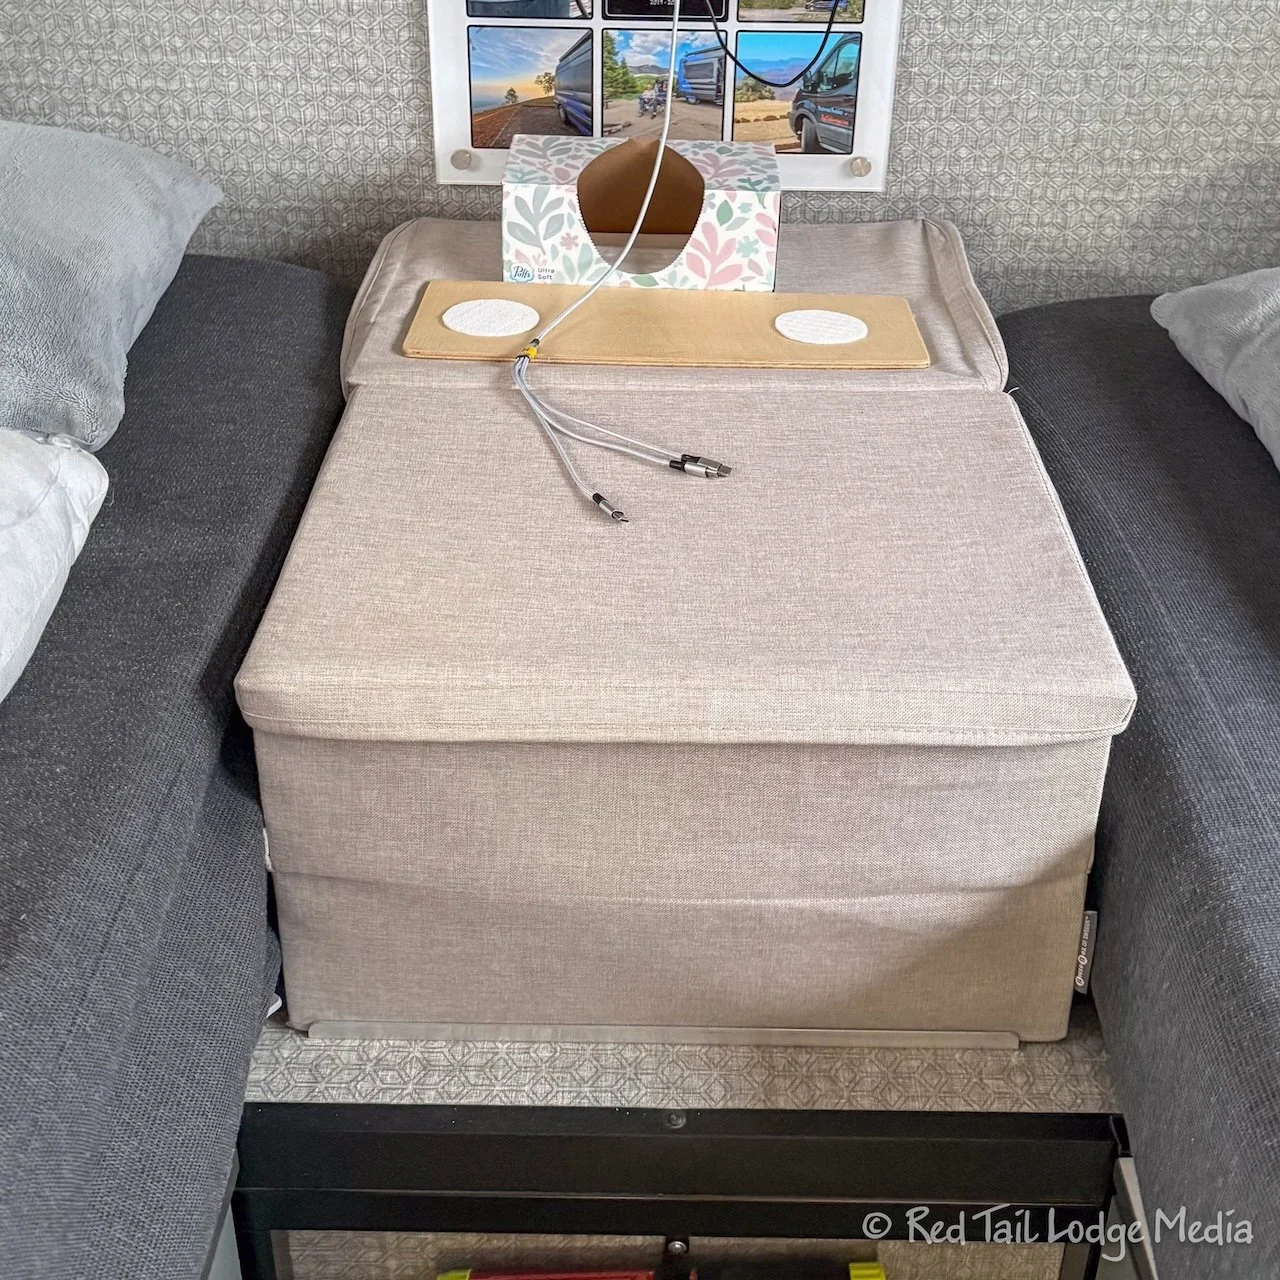
That worked fine, but the lids were rather flexible, bending to the weight of what we placed on top. They also weren’t attached to anything, so, occasionally, as we drove down bumpy roads, the boxes would fall down the steps, despite the piece of angle iron we had attached in front of the boxes. We thought we could do better.
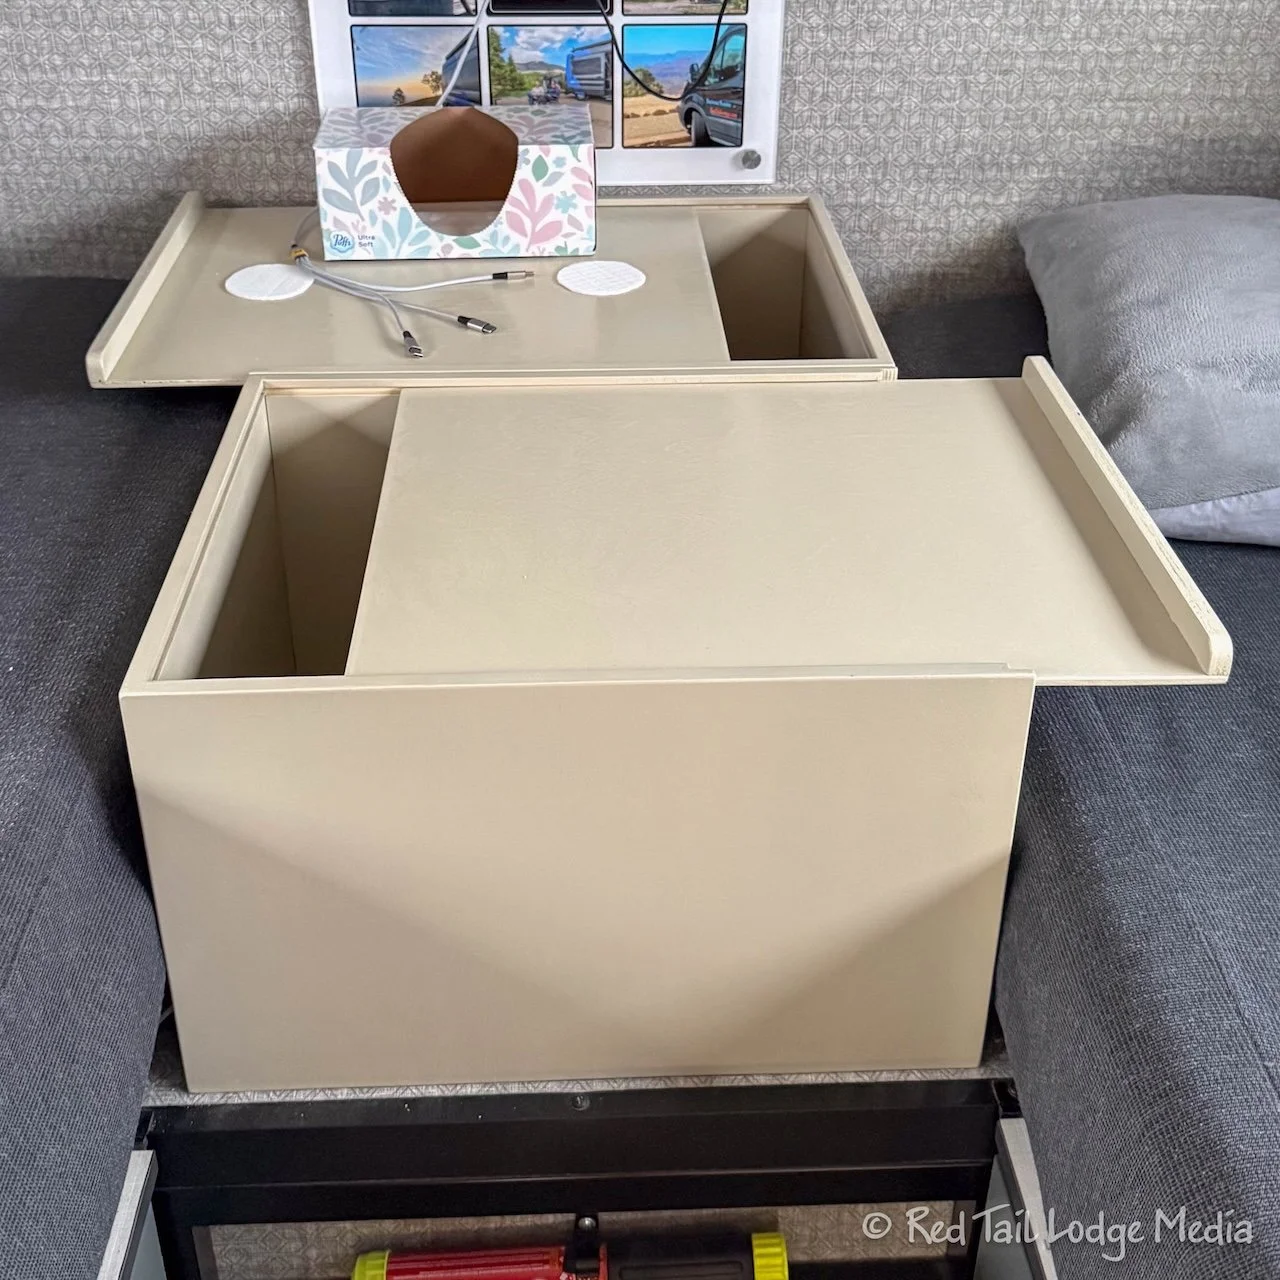
Keith made a couple of simple wooden boxes, with lids that slid open. The boxes are screwed into the top step, so they are not going anywhere, no matter how bumpy the road is. The lids are solid wood, which gives us a firm surface to mount our charging stands and put our larger devices on. It’s not a drastic change, but it should be an improvement.
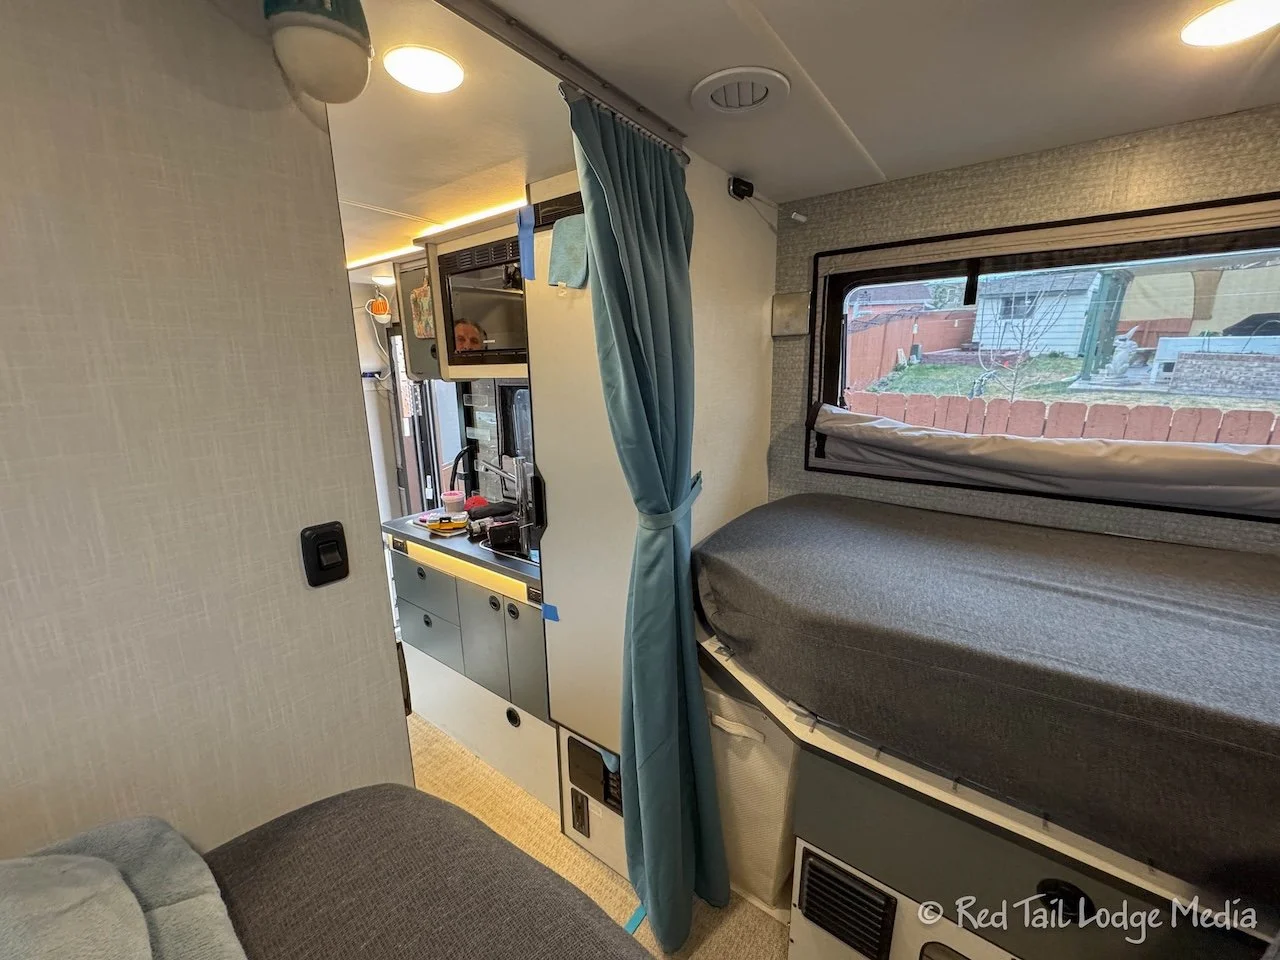
Mod Twenty Nine: Made New Bedroom Curtain
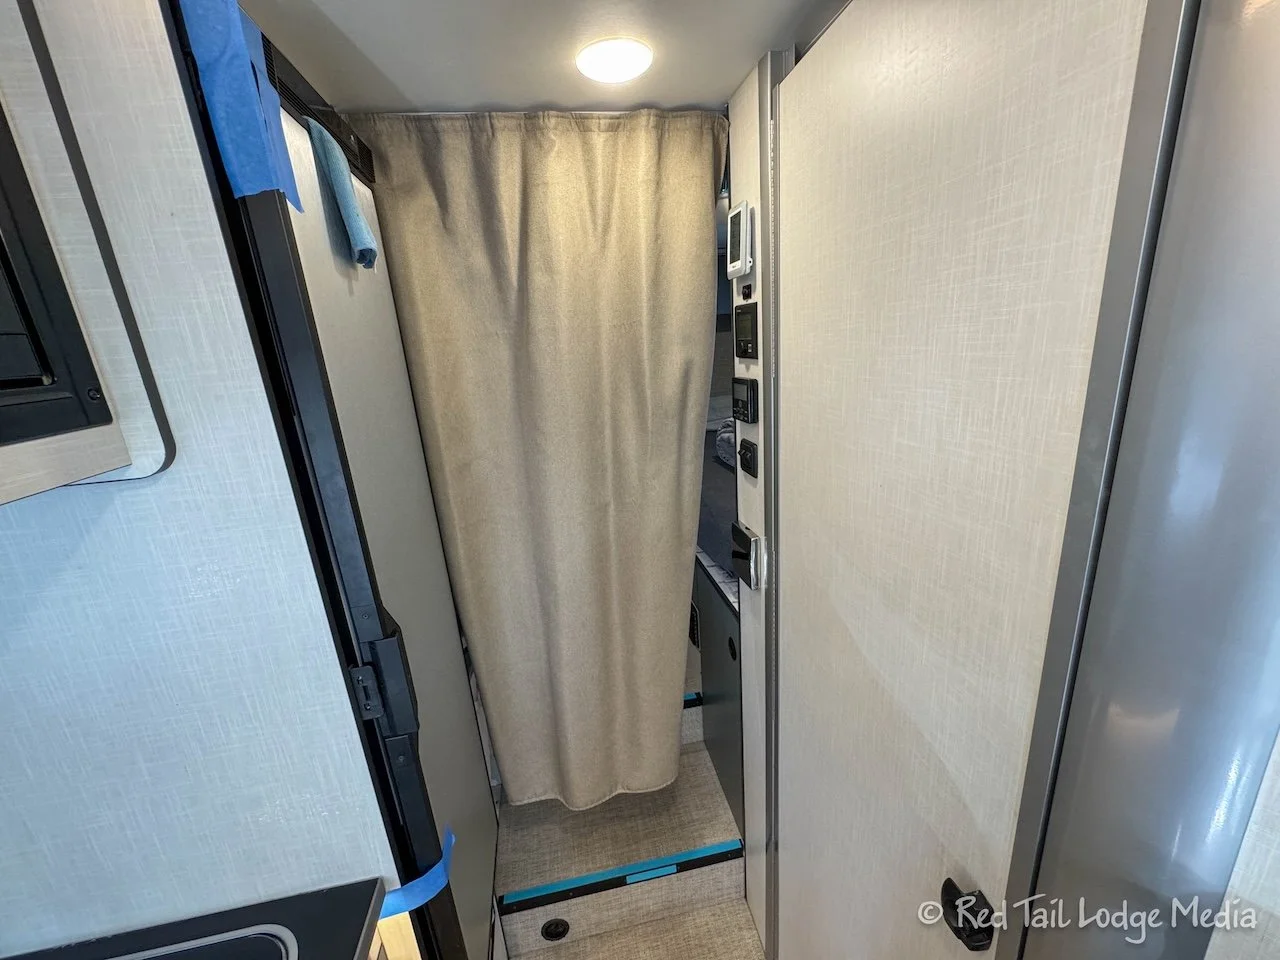
The EKKO comes with a curtain across the door opening to the bedroom. A fabric strap is attached to the wall with a snap that allows you to hold the curtain open. The curtain barely covers the opening. It is a little difficult to get it to stay tucked in to give you privacy when you are using the bedroom for a quick change of clothes. Again, we thought we could improve on the curtain.
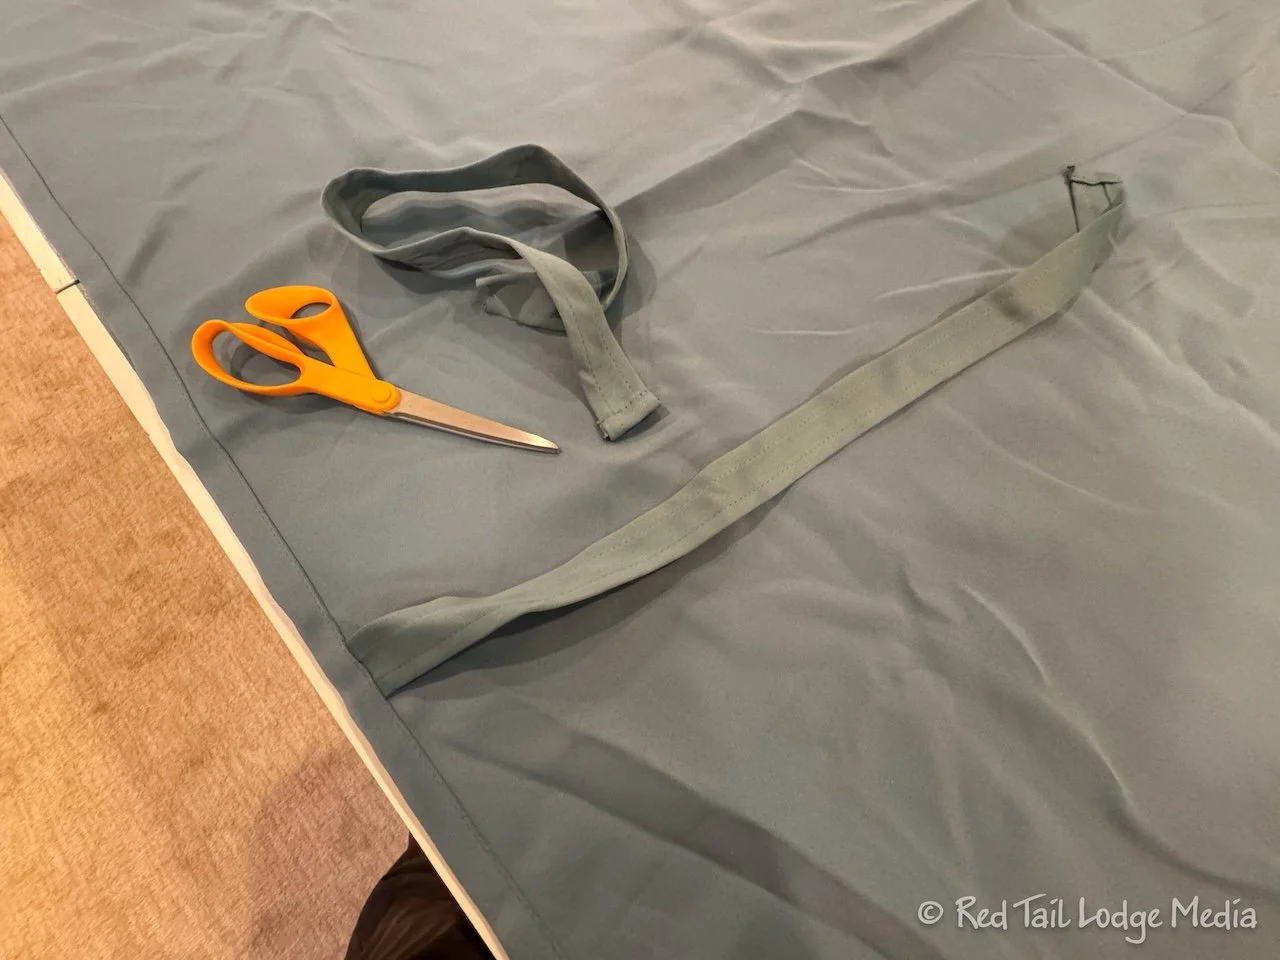
We bought two curtain panels (paid link) on Amazon along with a heavy duty snap kit (paid link) and glide tape (paid link). We only needed one panel and we didn’t need the tie-backs that were attached to the curtains. Don’t ask us why we bought two panels, other than the ones we picked out were sold in pairs. Ann cut off the tie-backs and re-used one of them, hemming up the cut end and adding snaps, similar to the original EKKO curtain design.
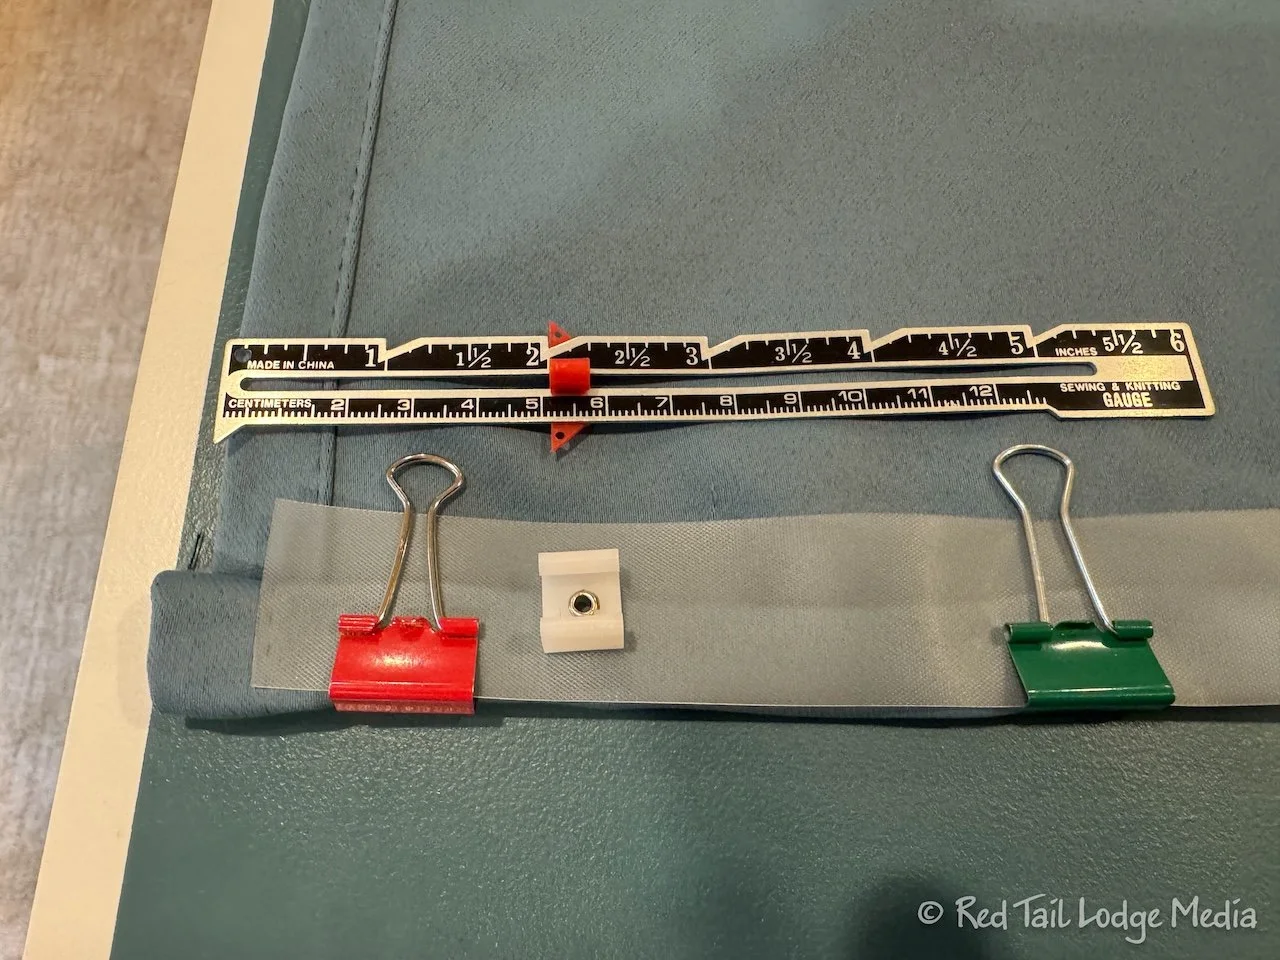
The panel was 60 x 84 inches, so she cut it down to 71 inches. First she rolled the cut end over twice, ironing it flat. Then the glide tape was attached using binder clips, as Ann thought it would be too hard to get straight pins to go through the plastic tape. She positioned the tape so that there was a glide clip about two inches from the side of the panel. It took a couple of passes before getting the glides centered. Because the plastic tape did not stretch, but the curtain panel material did (100% polyester), Ann was concerned that the glide clips would not be centered by the time she finished sewing the tape to the curtain panel. However, it ended up pretty well.
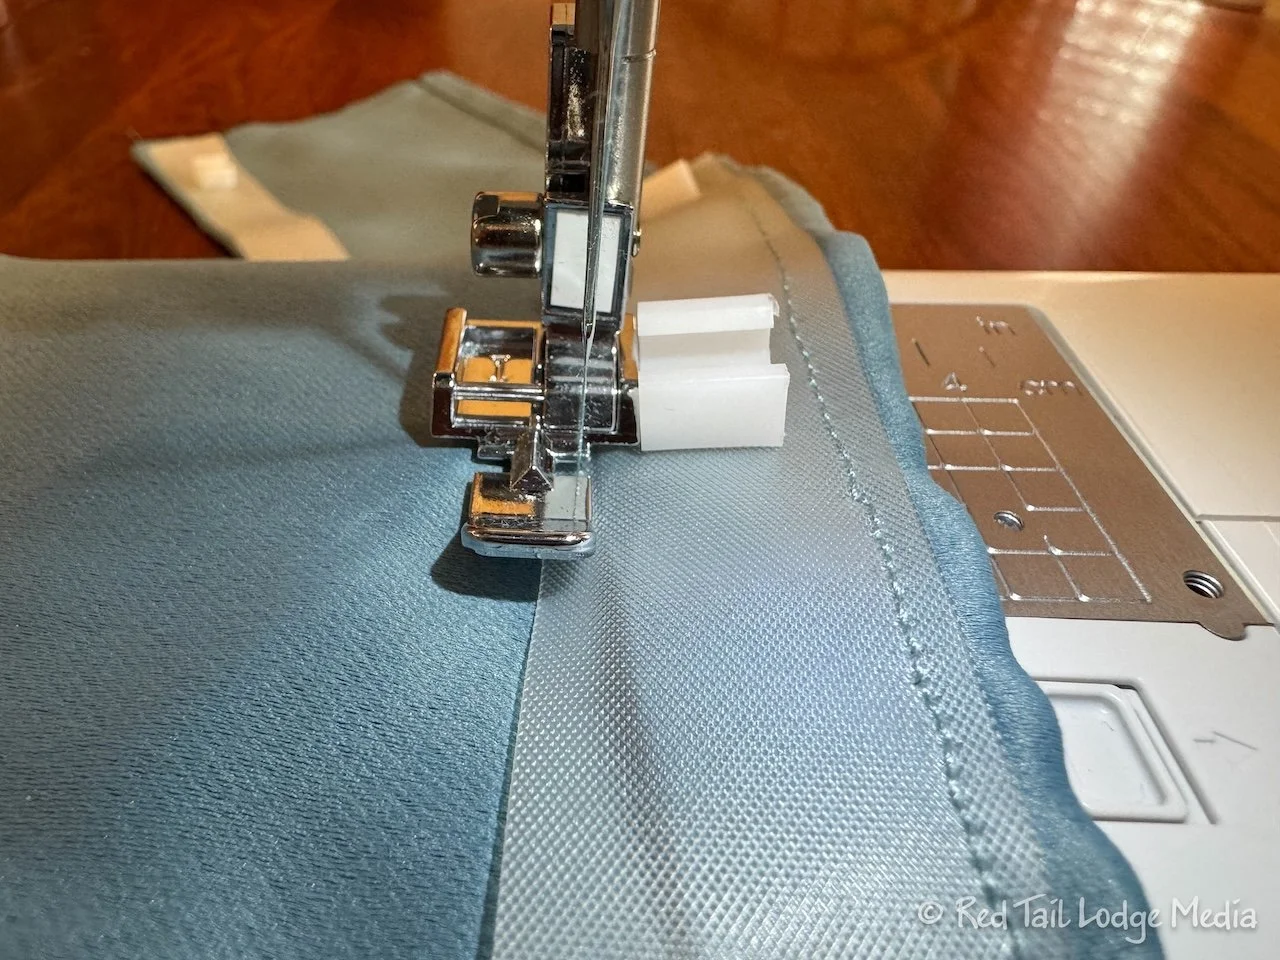
Ann borrowed her daughter’s new sewing machine, as Ann no longer owns one. She used scraps of the curtain material and leftover pieces of the glide tape with clips on it to practice using the sewing machine and to get the thread tension set properly. It was then that she discovered that the pressure foot locking pin blocked the glide clip from passing through the machine while keeping the needle on the glide tape. To solve that issue, Ann used the zipper foot instead. That allowed the needle to stay further away from the edge of the glide tape. The sewing machine also had a way to move the needle from one side of the zipper foot to the other, allowing the short side of the curtain to pass through the machine, leaving the bulk of the curtain on the outside of the machine, while sewing each side of the glide tape to the curtain.
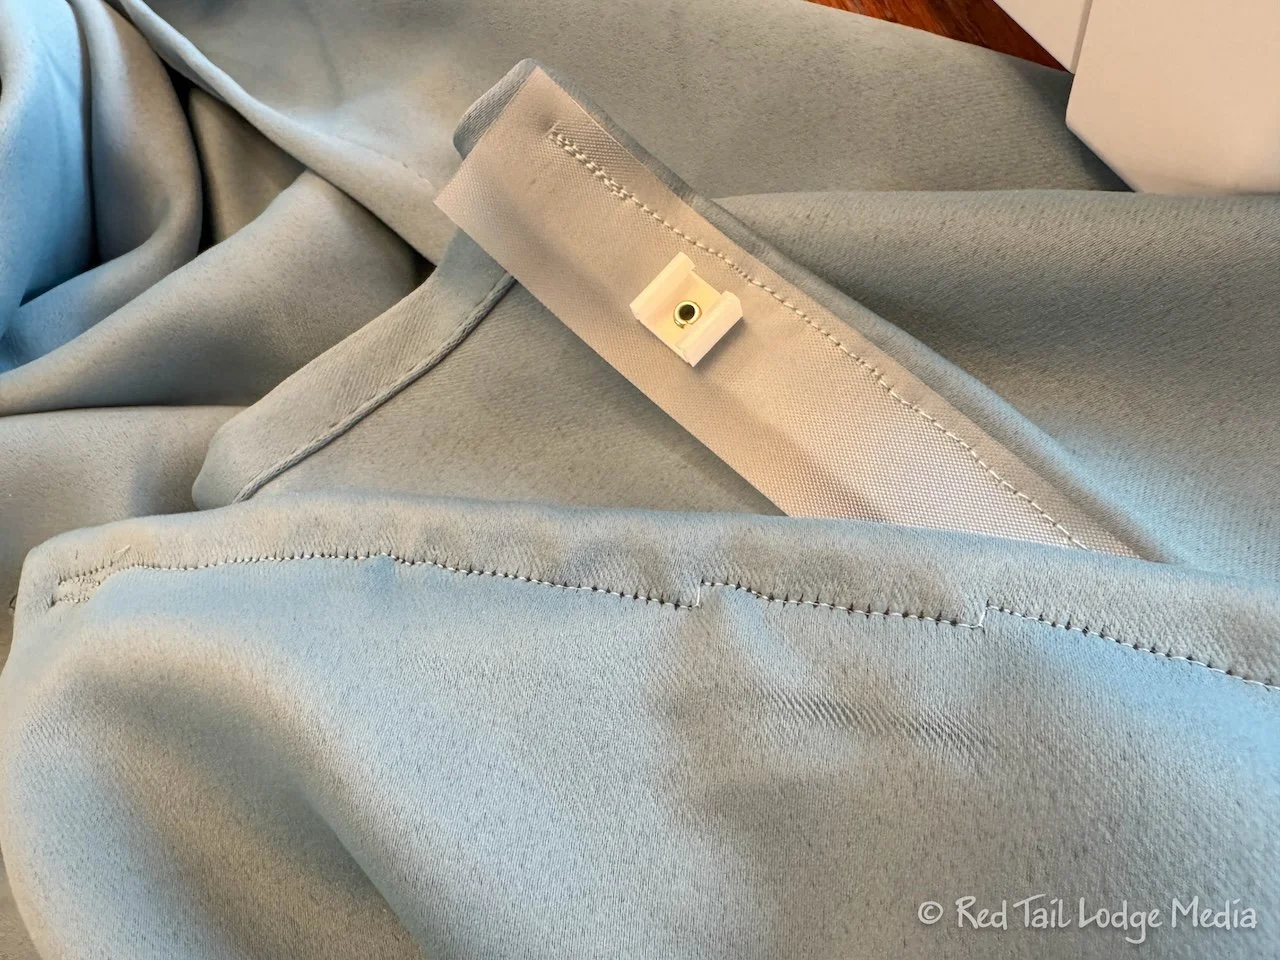
Ann is not an experienced seamstress (but her mother was). However, try as she might, she could not get the machine to sew straight, and the stitching kept drifting towards the edge of the glide tape. So she stopped and moved the needle over, multiple times, leaving a rather stepped line of stitching. Just don’t look too closely at the finished curtain! There is very little room between the glide clips and the edge of the tape for sewing. Rotating the glide clips 90 degrees helped give slightly more room. The clips turned easily and just had to be rotated back before installing the curtain.
We attached the snap to the wall a little lower than the original one, as it just seemed more appropriate due to the new longer curtain. And yes, that means there is a hole in the wall where the old one was, but it is not that noticeable.
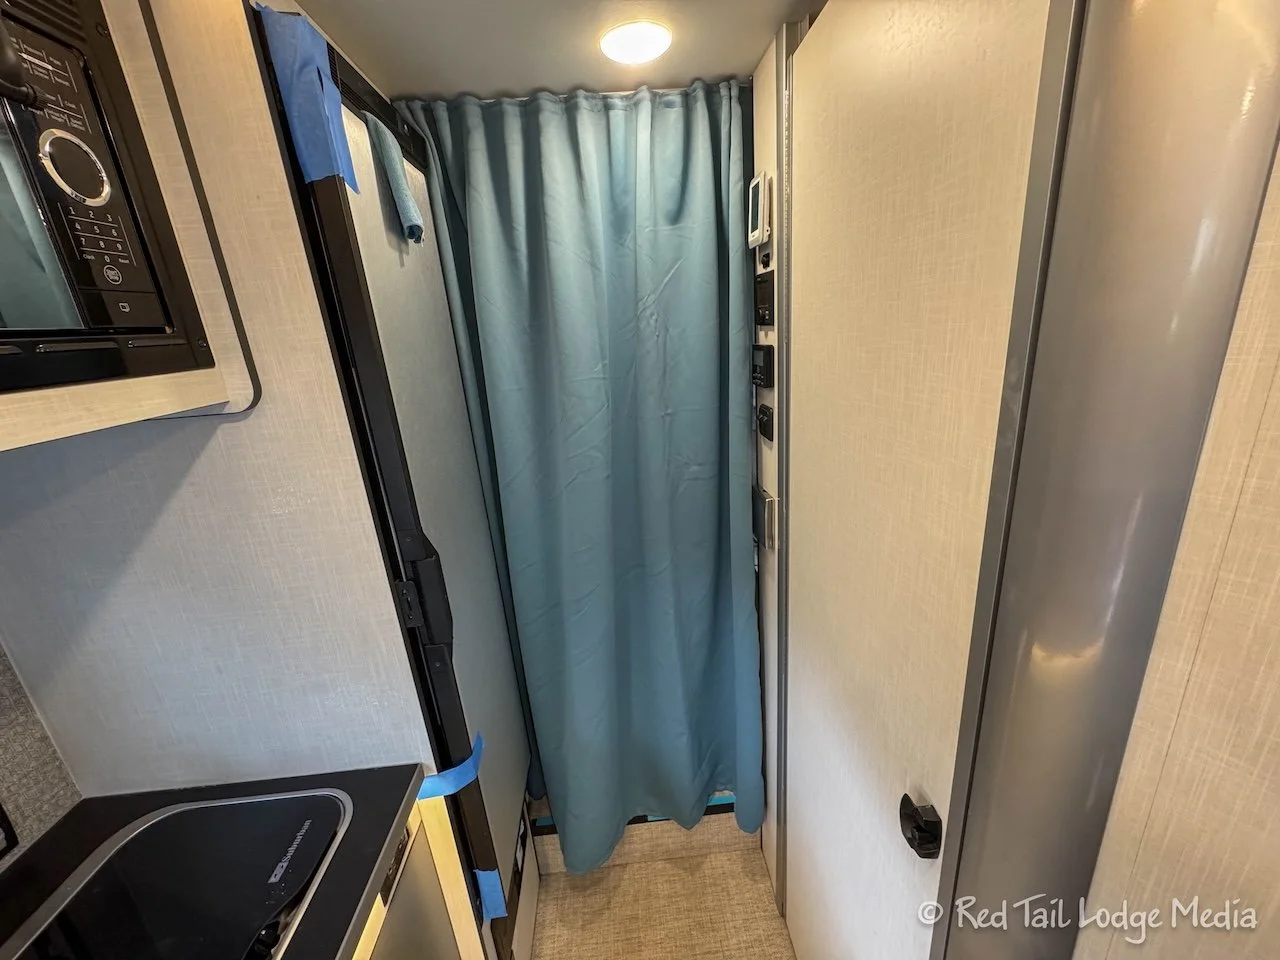
Despite Ann’s lack of sewing skills, we think the curtain looks pretty good. It covers the opening much better and adds a little more color to the space.
Mod Thirty: Had Shroud Crack Repaired

When we visited Winnebago in Forest City in November, we met another EKKO owner, Steve. As we were standing outside of Red Tail, talking with Steve, he noticed that the plastic shroud above the cab of our rig had a crack. Oh no! Thanks for noticing it, Steve!
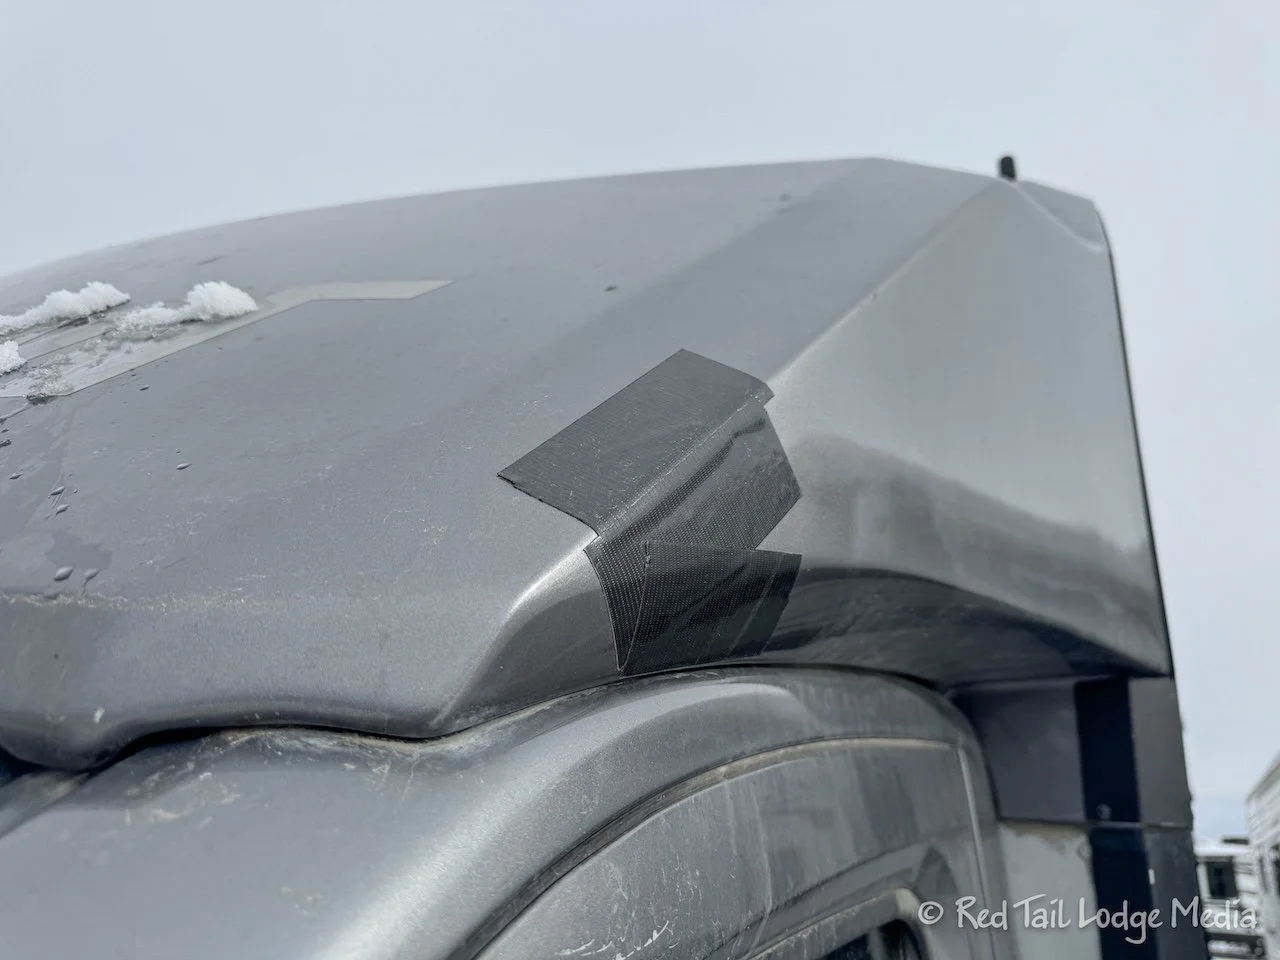
As a temporary fix, we covered the crack with Gorilla tape so we wouldn’t get any water leaking in. Then, in the spring, we contacted Transwest in Frederick Colorado, near where we live, about getting it fixed. Winnebago agreed to pay for the repairs, but Transwest in Frederick doesn’t do body work, so we had to take it over to the Transwest Body Shop in Brighton Colorado.
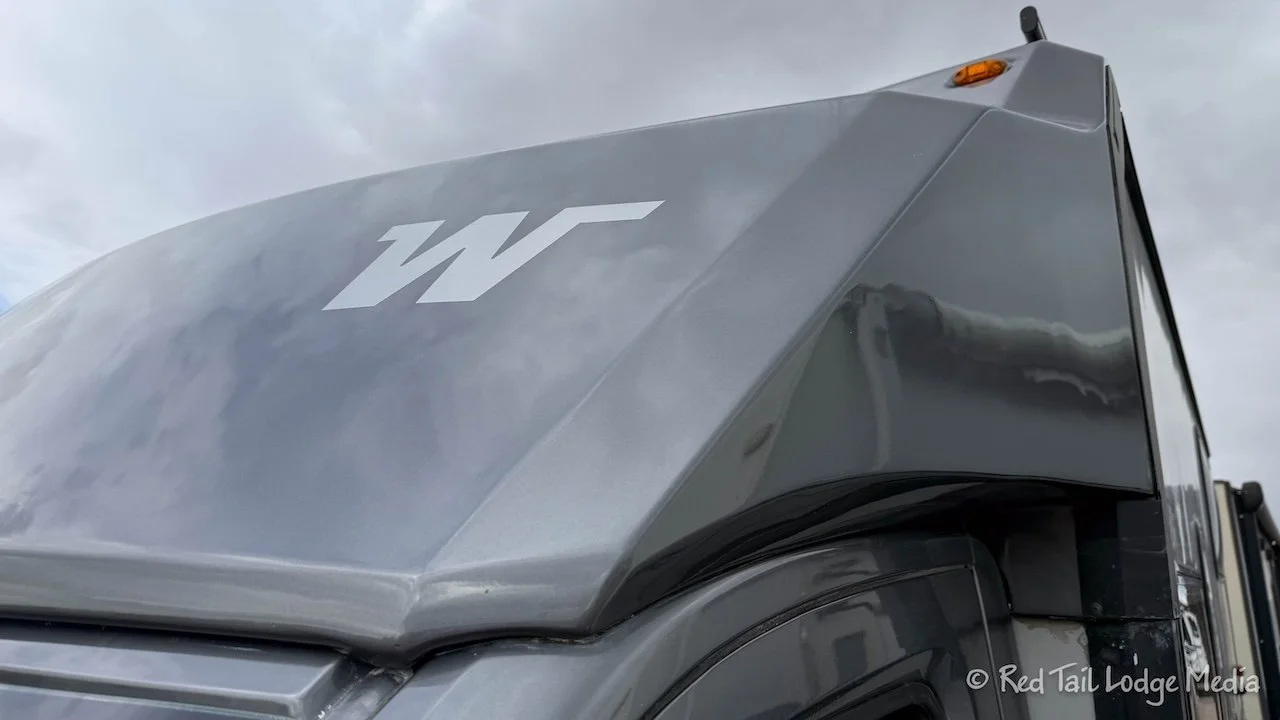
It took a couple of weeks for them to do the fiberglass repair. The repair looks good. Let’s hope no more cracks show up. Cracks in the shroud seem to be reported often in the EKKO Facebook group.
Mod Thirty One: Had Cracked Dinette Window Replaced
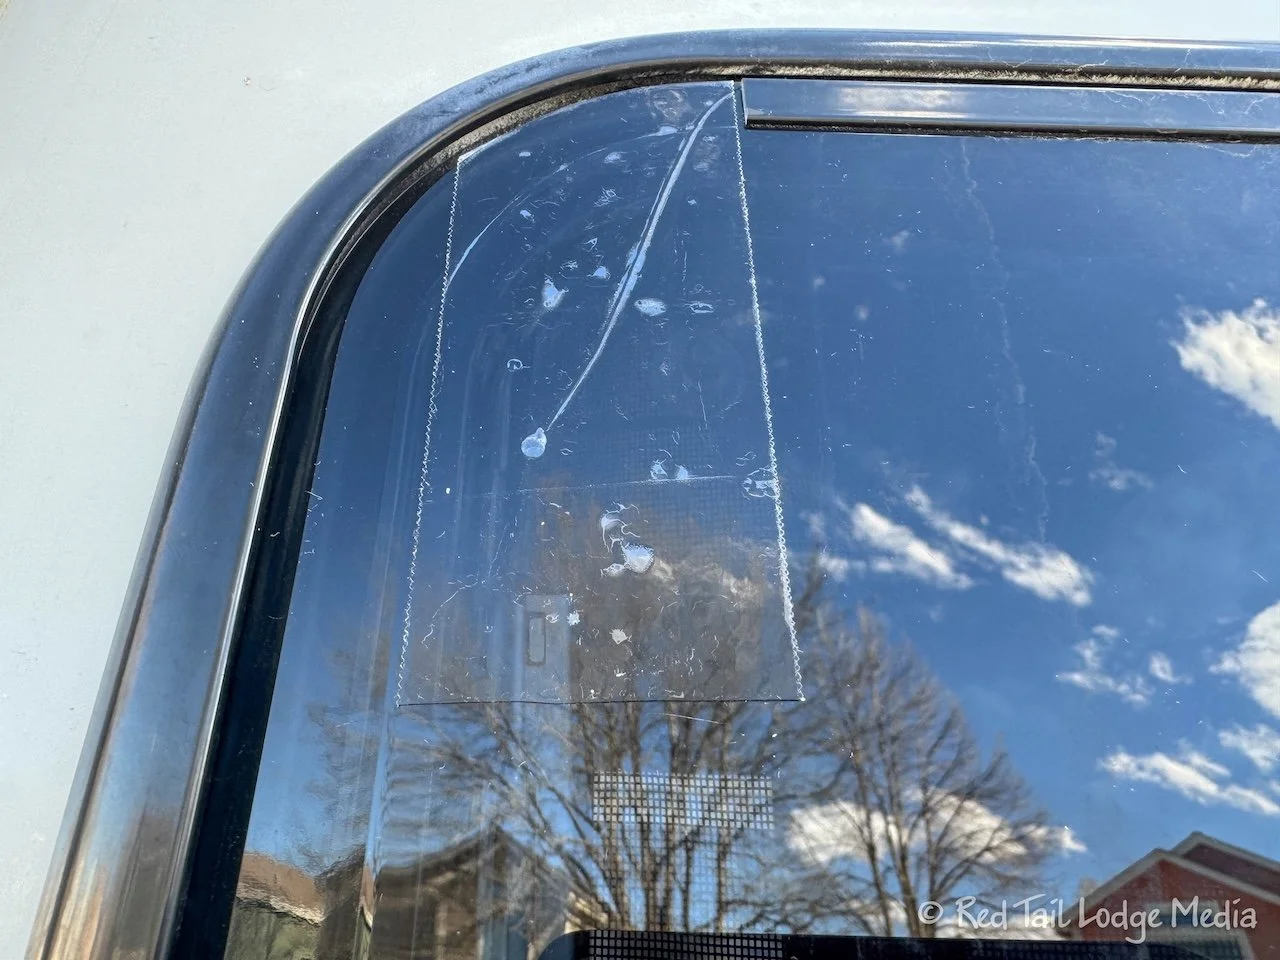
During our two week trip in February, we noticed a small stress fracture in the upper corner of the dinette window. This is another problem that many others in the EKKO Facebook group have reported. As a temporary fix, we drilled a hole at the end of the crack so it wouldn’t spread further. Then we covered the crack with clear Gorilla tape to prevent any water getting in. Again, we contacted Transwest in Frederick Colorado. Winnebago agreed to pay for the installation of a new window if we would pay for the window. So we ordered a new window. The window arrived while Red Tail was at the Body Shop in Brighton. Transwest moved Red Tail from Brighton to Frederick for us when the body work was done. It only took a couple of days for Frederick to replace the window.
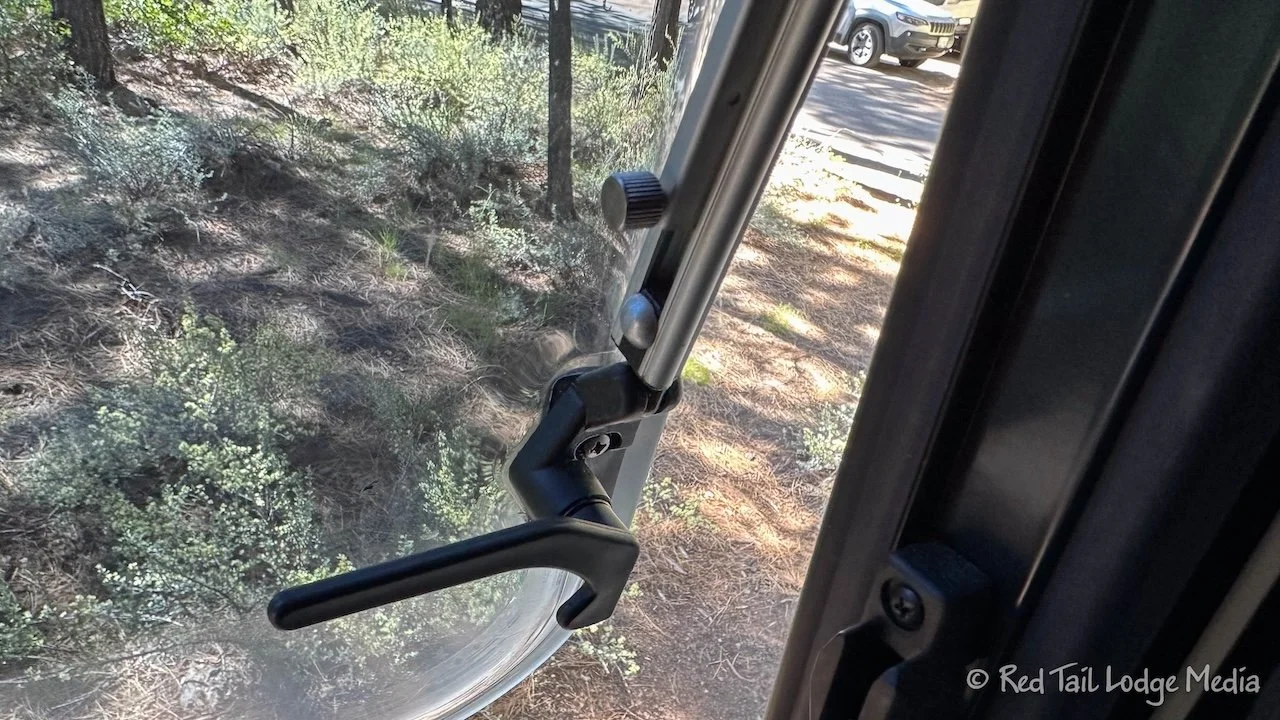
Unfortunately, we forgot about the window hinge mod we had done, so we didn’t ask Transwest to save the window hinges for us. That meant that we had to do the thumb screw mod again for the new window. And, since we did not have left over parts from the original window hinge mod, we needed to order more thumb screws and have more 3-D parts printed.
When we picked up Red Tail from Transwest in Frederick, we had a pleasant surprise. Winnebago agreed to not only pay for the installation of the window, but also pay for the window itself. Thank you, Winnebago!
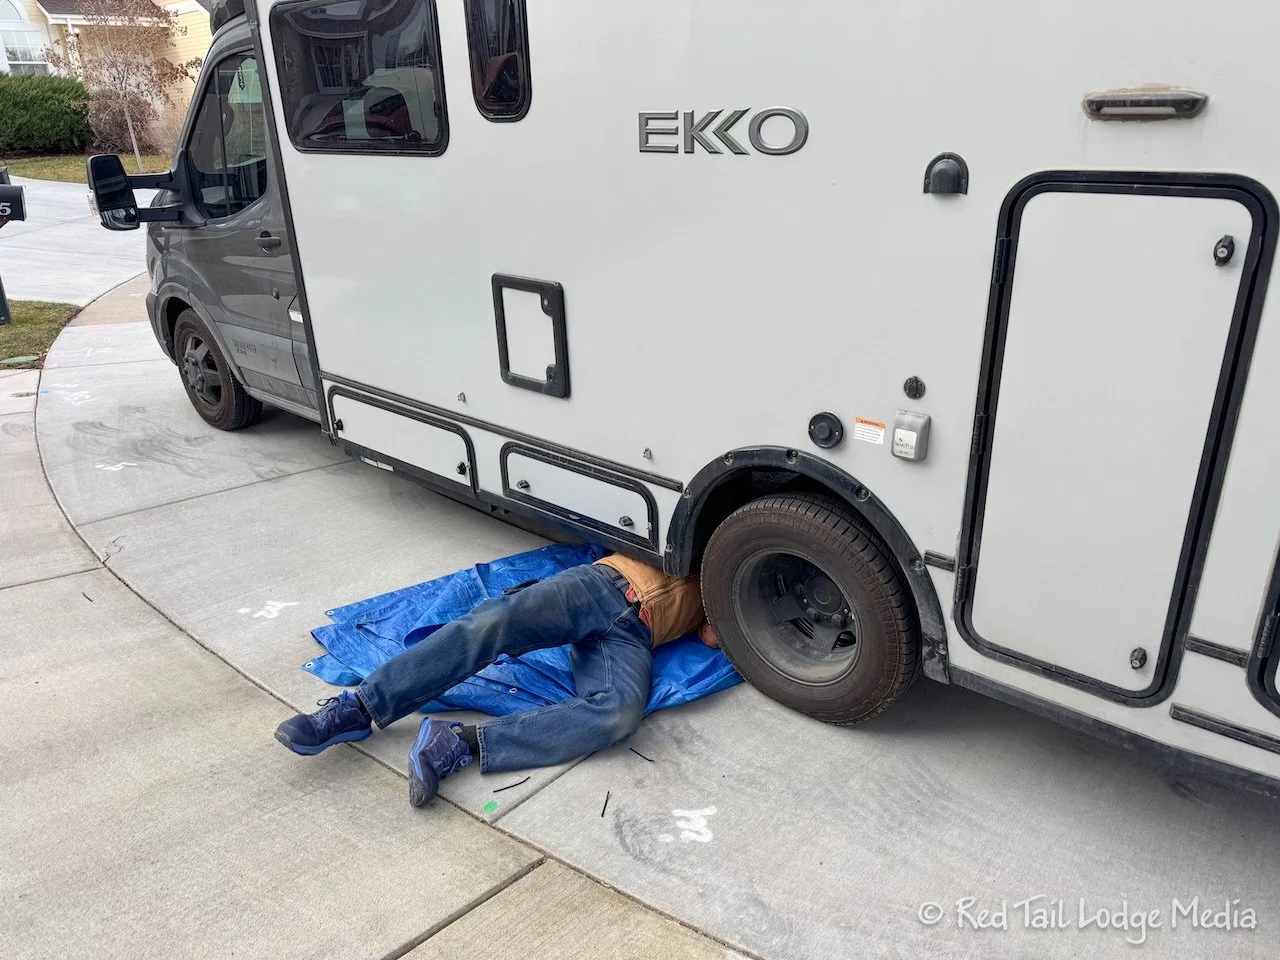
Mod Thirty Two: Fixed Gulper Pump
Also during our two week trip in February, the Whale Gulper pump started turning on every 12 minutes, even though we weren’t using any water. Of course, we first noticed it while we were trying to sleep at night. It kept Keith awake, but Ann slept through it. The gulper is the pump that pumps the gray water from the shower and bathroom sink drains up to the gray tank, since those drains sit lower than the tank. Keith got up in the middle of the night to try to get it to stop. He tried pouring a large amount of water down the sink and shower drains. Then he tried pouring very warm water down the drains. He then tried pulling various fuses from the panel under the fridge. There was one labeled HVAC which he didn’t want to pull because he didn’t want the furnace to turn off. He even threw on some clothes, went outside, and tried to find the inline fuse for the pump inside the battery compartment, where the gulper pump was located, but he couldn’t find it. He finally gave up and just tried to sleep through it.
The next day, Keith tried to figure out the issue with the pump. He emailed the pump manufacturer and posted the issue in the Winnebago EKKO Facebook group. Keith read the owner’s manual of the pump, identified all the water lines coming into and out of the pump along with locating the inline fuse. He also determined which fuse in the fuse panel controlled the pump. Of course, it was one of the ones labeled HVAC.
No one in the Facebook group had the same problem as us. Their issues with the pump were either the pump stopped working altogether or it would run continuously and not shut off. No one reported having the pump turn on at regular intervals. The manufacturer gave us some instructions on some things to look for, most of them required taking the pump apart. We decided to wait until we got back home at the end of our two week trip before diving that deep. In the meantime, we just pulled the fuse to allow Keith to sleep.
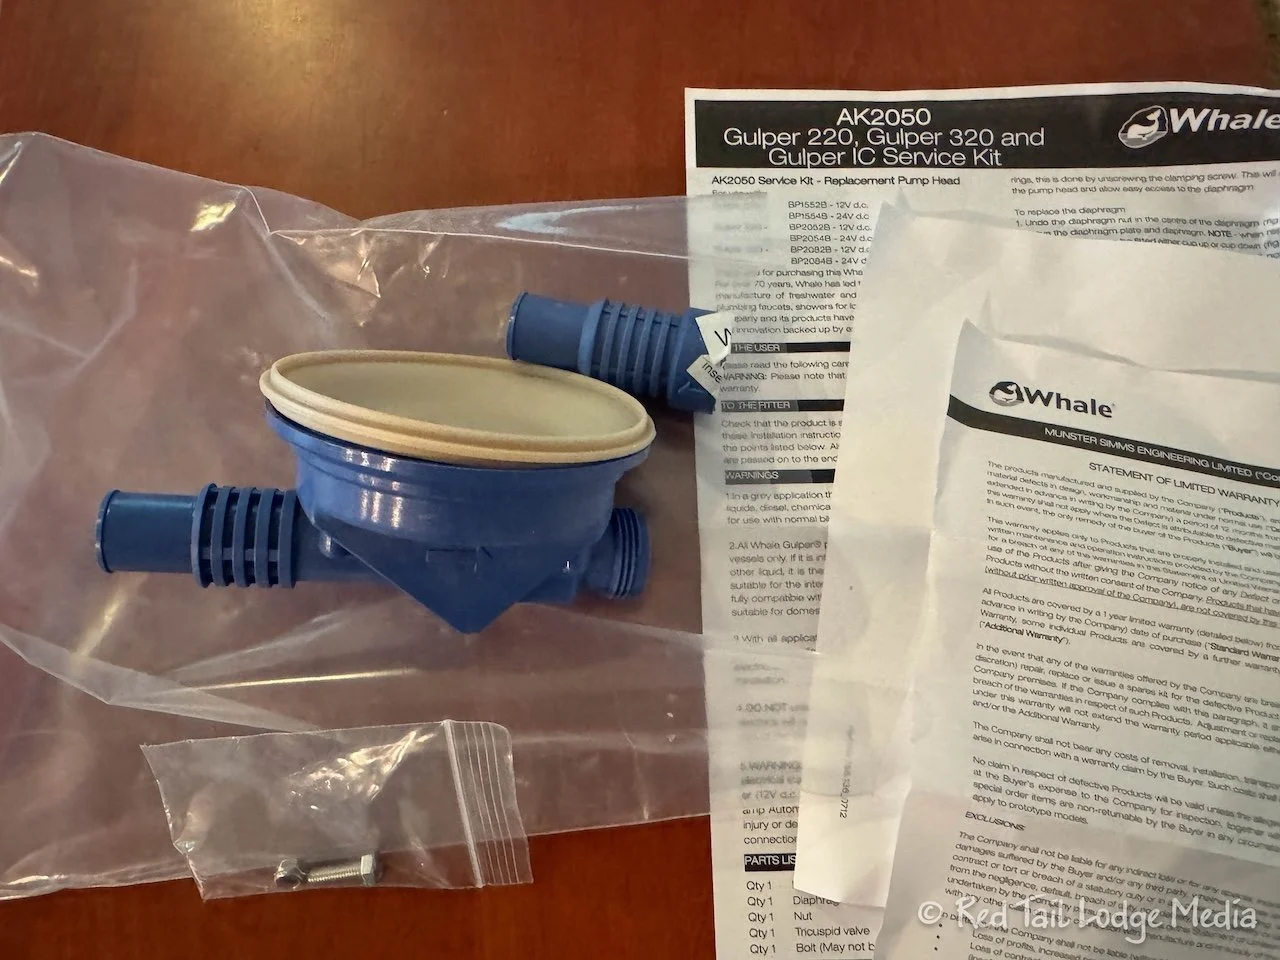
Back at home, we ordered the Whale Gulper Replacement Pump Head (paid link). We figured that the issue was that water was slowly flowing back into the pump from the gray water tank, due to either a faulty valve or a clog. Instead of taking everything apart and cleaning it out, we decided just to replace the whole pump head.
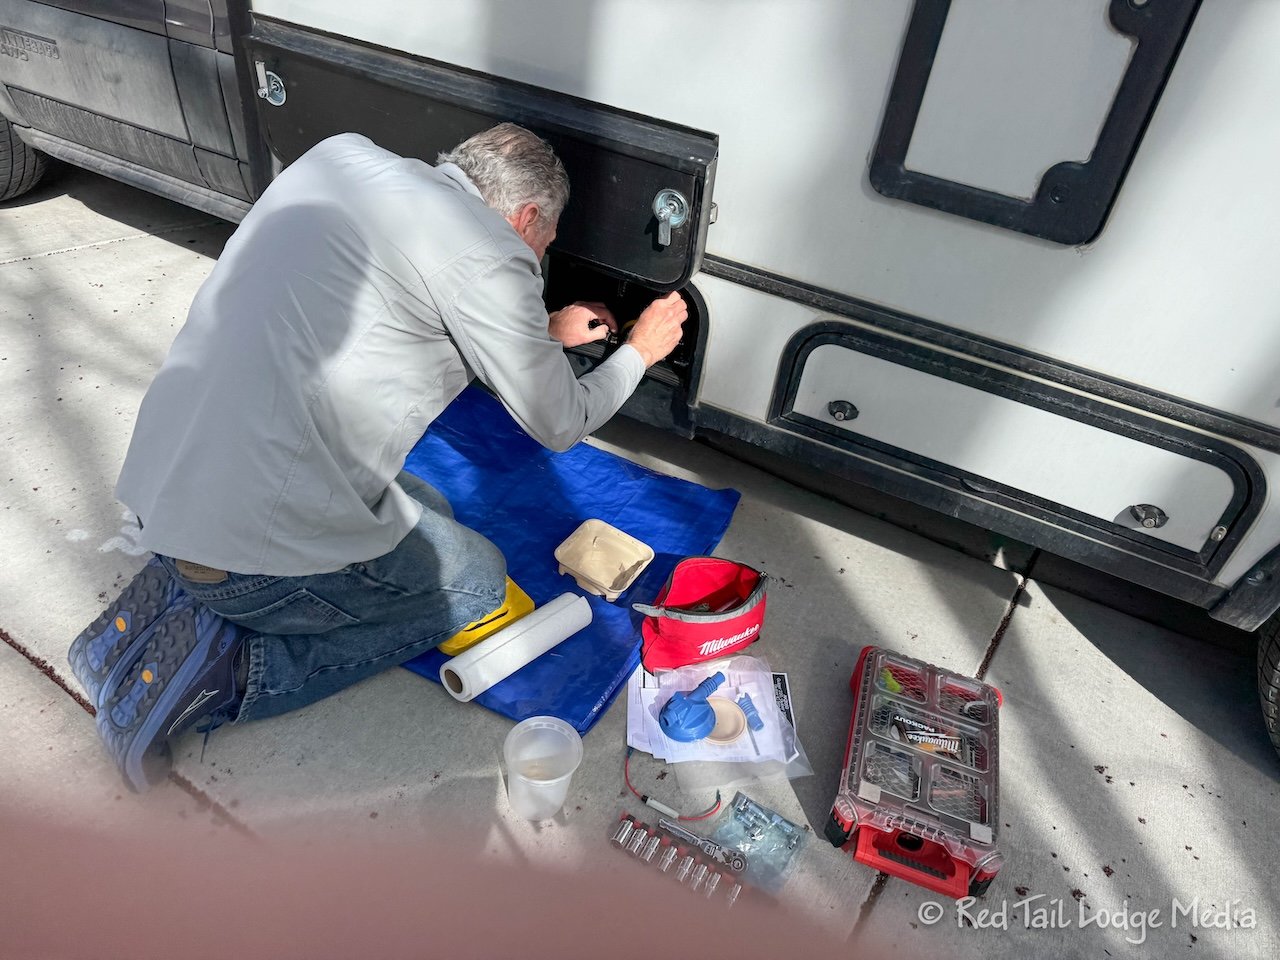
The Gulper pump is located in the battery compartment. Just like redoing the solar wiring, Keith was forced to work in the tight quarters of the battery compartment, not his favorite thing to do. After replacing the pump head, everything seemed to be working as normal again. Keith noticed that he could see daylight through one of the valves of the pump head that he pulled out. So we believe our suspicions were correct.
Mod Thirty Three: Modified AC Buttons
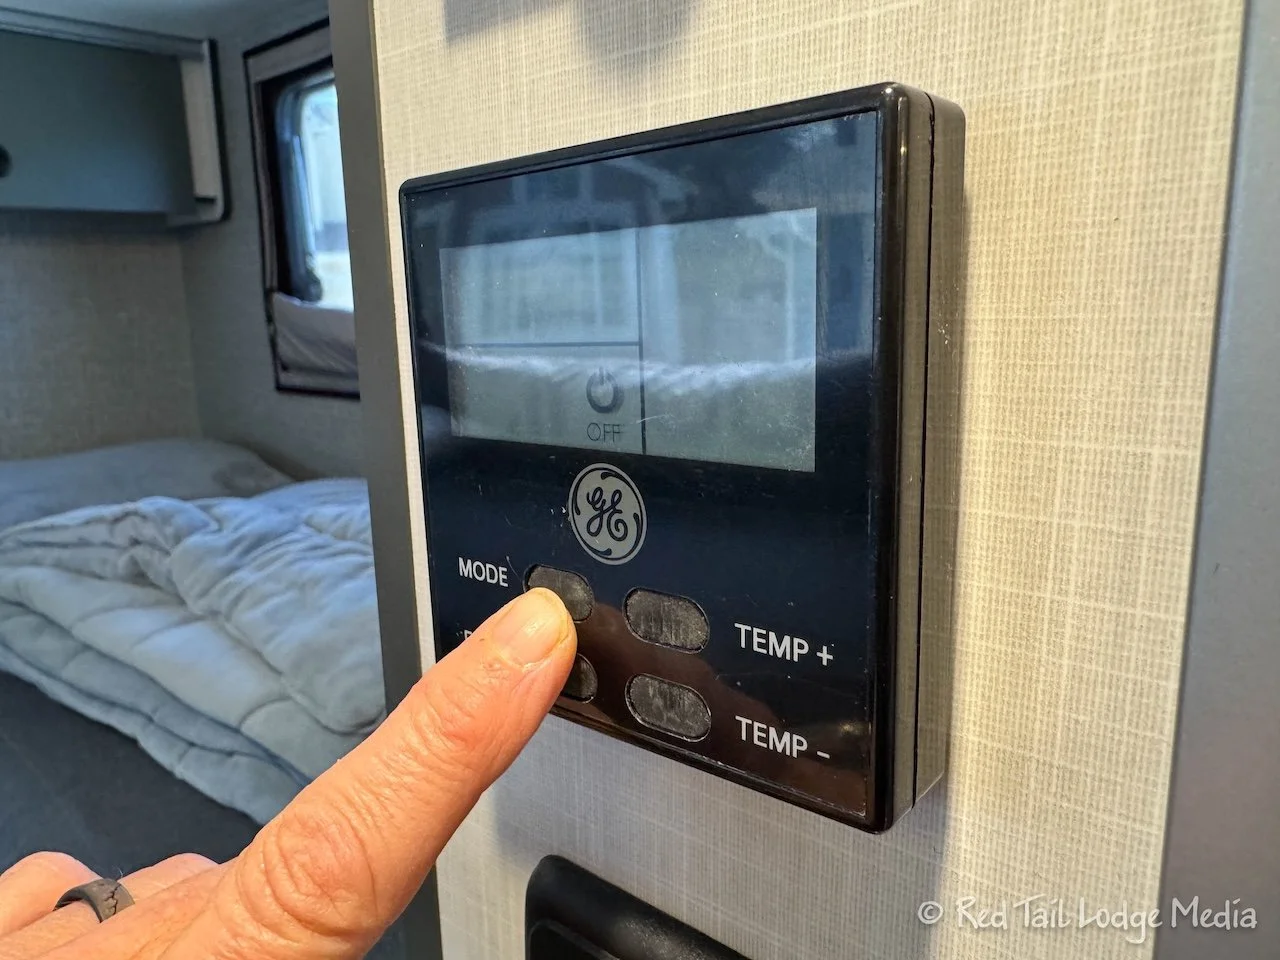
The control unit for the EKKO air conditioner is mounted on the wall in the hallway between the bathroom and the bedroom. We can’t tell you how many times we’ve bumped the buttons on the AC control unit as we are moving around the rig, accidentally turning the AC either on or off. We usually notice and have corrected it. We were concerned that one day, we might not notice that we unintentionally turned on the AC and drain our house batteries. Not to mention that it is annoying, especially if one of us is in bed trying to sleep and the noise of the AC turning on wakes us up.
Keith was considering making a cover to go over the display. In fact, he already cut a prototype out of some spare ABS plastic. But then he noticed that the buttons were solid rubber. So he just cut the buttons flush with the display case, using a razor blade and sanding them a little bit. Now the buttons don’t protrude, but we are still able to push them with our fingers. It’s a rather simple fix.
Mod Thirty Four: Replaced Rear Shocks
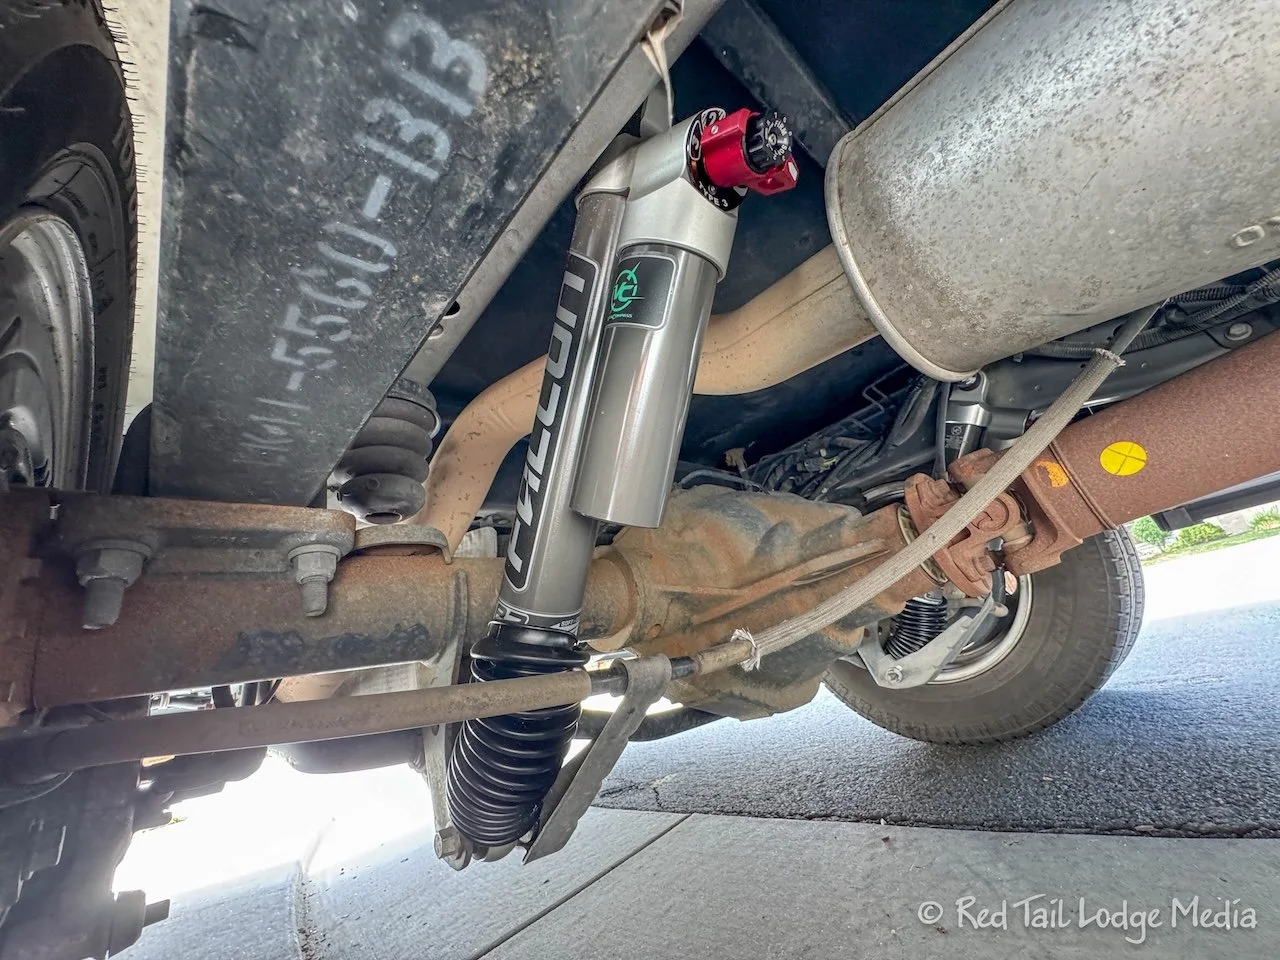
The EKKO can bounce, sway, and rock a bit when driving over uneven surfaces or around tight corners. Keith decided to replace the stock rear shocks with some shocks that will dampen some of that movement. He chose the Falcon 3.3 SP2 (unpaid link) from Van Compass. The shocks are adjustable via a fast adjust knob. A local 4WP (4wheelparts.com) installed them for us in one day. We don’t have much experience with the new shocks yet, but are happy with them so far.
Well, that’s the last of the modifications before we hit the road for Season Eight in 2026, or so we think. We hope we helped or inspired you to make your own modifications or fix some of your own issues.
Check out our related video: More EKKO Mods for Season Eight
(Ann)